by C. Elkins, OK Math and Reading Lady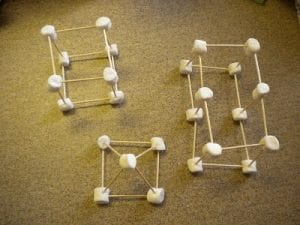
Composing and decomposing 3D shapes should help your students become more familiar with their attributes. Here are a few activities to help. With emphasis on hands-on methods, examining real 3D shapes may help students find edges, vertices, and faces better than pictorial models.
- Nets of 3D shapes are the least expensive way to get a set of 3D objects in each child’s hand, especially since most classrooms just usually have 1 set of plastic or wooden 3D shapes.
- Build cubes and rectangular prisms using blocks or connecting cubes.
- Construct / deconstruct prisms using toothpicks, straws, coffee stirrers, craft sticks, or pretzel sticks as the edges. For the vertices, use clay, playdough, gum drops or slightly dried out marshmallows.
- Lucky enough to have a set of tinker toys? Or Magna Tiles? (We got our grandson some Magna Tiles and he loves them! These tiles have magnetic edges which can hook together in an instant. Creating a cube, rectangular prism, pyramid, etc. is easy! They are kind of expensive, but very versatile and creative.)
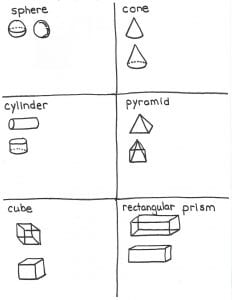
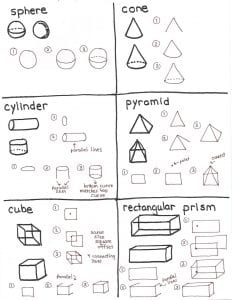
- Teach students how to draw 3D shapes. When composing a 3D shape, a student becomes more aware of the 2D faces, the edges, and the vertices they are drawing. Plus, if needed the student can draw the 3D shape on paper to assist them if taking a computer based assessment. Here is my tutorial (below), but I’ll also include a couple of good websites in case you are 3D challenged. Click HERE for the pdf of the templates below.
-
- Observe how students count the edges, vertices, and faces. If they are randomly trying to count them, they likely will be incorrect. When needed, show them how to be methodical with their counting (ie: When counting the edges of a cube, run your finger along the edge as you count. Count the top 4 edges, then the bottom 4 edges, then the 4 vertical edges = 12.)
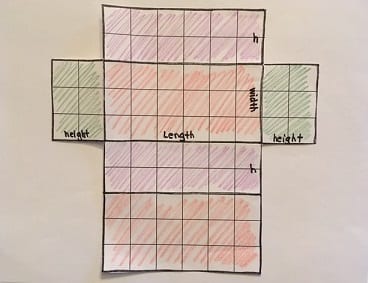
One of my favorite lessons regarding decomposing shapes is when teaching students (5th grade and up) how to measure surface area. Click HERE for the free pdf guide for creating the rectangular prisms shown below. It includes a blank grid so you can create your own (all courtesy of http:illuminations.nctm.org using their “dynamic paper” lesson).
- Create different nets of rectangular prisms (including cubes) on one inch graph paper.
- Students find the rectangles with the same dimensions and color them the same color. This means there will be three sets of equal-size rectangles (or six equal-size rectangles when dealing with a cube).
- Cut out around the outside of this net.
- Fold up to see where the equal size rectangles are in relation to each other (on opposite sides of the prism).
- Repeat with different size nets.
- Guide students to develop a formula or rule to determine the surface area of pictorial rectangular prisms.
-
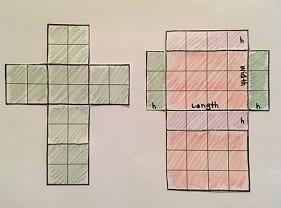
In my opinion, this hands-on experience really enables students to see a way to calculate the surface area is:
- area of the front (x2) +
- area of the top (x2) +
- area of the side (x2).
- This is because they are able to physically see the front and back are the same area, the top and bottom are the same area, and the two sides are the same area.
- Yes, the typical surface area formula is 2lh + 2lw + 2wh, but I have found that students often have difficulty determining which numbers on a pictorial model represent the length, width, and height, or get confused with which dimensions they have calculated and which they haven’t.
Go to illuminations.nctm.org activity called “Cubes”. It is an interactive lesson in which you can change rectangular prism nets to your specs and see how surface area and volume are determined. There are lots of cool activities at this site (nctm = National Council for Teachers of Mathematics).
Enjoy!! Next time I will focus on another aspect of geometry — angles and lines.