by C. Elkins, OK Math and Reading Lady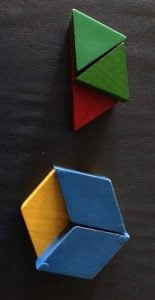
The standards (CCSS or any state) use varied verbs to describe what students are to do regarding fractions: form, compose, construct, model, partition, draw, decompose, share, identify, read, write, describe, order, and compare. Satisfying these standards can often be accomplished through use of concrete methods (manipulatives) and pictorial models (drawings). Remember the best understanding of concepts usually follows the concrete, pictorial, abstract progression (CPA). In other words, “Let’s make it, draw it, and then use numbers to represent it.”
Through constructing and drawing, students will be prepared for further work with fractions, and they begin to conceptualize the relationship between the size of denominators, the numerators, and the whole. Click here for a FREE copy of the pictures you will see below (3 page pdf).
Form / Compose / Construct / Model: Use smaller shapes to form or compose larger shapes (which is also a geometry std. in KG and 1st). Put together fraction pieces or puzzles to make the whole shape (circle, rectangle, hexagon, etc.). Use fraction pieces to demonstrate understanding by constructing models of area, set, and length.
These pictures show different ways students can use manipulatives to form, compose, construct, and model fractional parts (pattern blocks, fraction circles, tangrams, linking cubes, color tiles, fraction bars, Cuisenaire rods, two-color counters):


Partition / Draw / Decompose / Share: Split larger shapes into smaller fractional parts (halves, thirds, fourths, etc.). Divide (fair share) objects into equal groups. Use models to decompose a fraction in more than one way. Represent fractions on a number line.
I enjoy teaching children how to partition common shapes into fractional parts – because it involves drawing. Too often, if I just tell them to divide a rectangle or circle into fourths or sixths, I get something like this: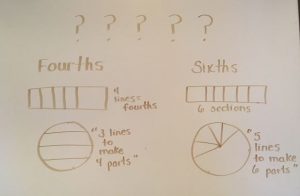
The child often hears “four” or “six” and draws that many lines or that many parts inside the shape, not paying attention to the size or equality of the parts.
Through the following methods, students practice an efficient way to partition shapes equally . . . and they soon start to see how halves, fourths, and eighths are related as well as how thirds, sixths, and twelfths are related.
Start with half: To partition/divide a shape in half, I draw one line down the middle. Show this in vertical, horizontal, and/or diagonal positions. (*See caveat below in the “what now” section for using diagonal lines.) To prove it is half, I should be able to fold or cut it so that both parts are equal. Practice dividing other common shapes in half (squares, diamonds, hexagons, trapezoids, etc.).
Fourths: To partition/divide a shape into fourths, I use this language while modeling because I usually get more precise, relatively equal sections without resorting to measuring.
- Divide in half.
- Then divide each half in half.
- When using a circle, relate the sections to quarter-hours on a clock (or the 3, 6, 9, 12 positions).

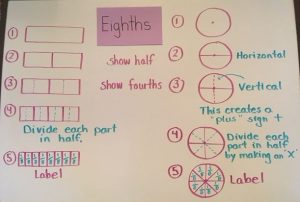
Eighths: To partition/divide a shape into eighths, I use this language (repeating how to get half, then fourths, and then adding 1 additional step):
- Divide in half.
- Divide each half in half.
- Divide each fourth in half.
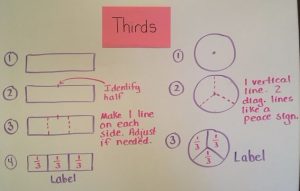
Thirds: To partition/divide a shape into thirds is a little trickier. Just know the end result should be three relatively equal sections. I use this language while modeling (for a rectangle):
- Identify where half would be and put a little tick mark.
- Then draw one line on either side (adding 2 lines). Adjust as needed so all three parts look the same.
- When using a circle, relate the lines to a peace sign or position on a clock (12:00, 4:00, 8:00).
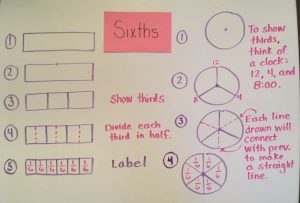
Sixths: To partition/divide a shape into sixths, there are a couple different ways, but I will just focus on one.
- Divide into thirds.
- Then divide each third in half.
- Relate the circle to numbers/positions on a clock. The lines will stretch from 12 to 6, from 2 to 8, and from 4 to 10.
Twelfths: To partition/divide shapes into twelfths, show thirds and sixths. Then divide each sixth section in half. On a circle, the lines should relate to all of the numbers on a clock.
Alternate method for rectangular bars and numberlines: If you are just requiring students to partition/divide one rectangular bar or number line, then making an open-ended rectangular bar would be a good method (see steps below). If students are drawing rectangular bars to compare two or more fractions, then the above steps should be followed because to compare fractions, each bar must be the same length. And it’s hard to draw bars the same length using this alternative method.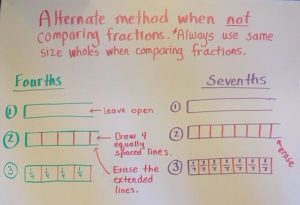
What now?
- Use the fraction bars or circles to illustrate fractions, compose and decompose, solve problems, compare, show equivalencies, etc.
- Link understanding to fraction strips and number lines. Click here for Free Fraction strip cards (color and b/w) from Donna Boucher (www.mathcoachscorner.com).
- Folding paper to get halves, fourths, eighths, thirds, and sixths is also helpful practice to model this concept.
- And . . . for this demonstration to be done with elementary students, I stayed with vertical and horizontal lines regarding rectangles. Sometimes diagonal lines can be used to partition rectangles or other shapes into equal parts, but not always (see illustration below). There are also other ways to partition shapes into ones with equivalent areas. Although the shapes of each part may not visually look the same, the area (space) might be. Stay tuned for future post on equivalent fractions.

Stay tuned: Coming soon . . . equivalent fractions, comparing fractions, fraction art, literature resources and more! Cindy