by C. Elkins, OK Math and Reading Lady
In my last post, I shared my favorite model for elapsed time (Mountains, Hills, and Rocks) using an open number line. In this post I will share another version of the # line some of you might like — I’ll list the pros and cons of it as well as show the std. algorithm / convert version.
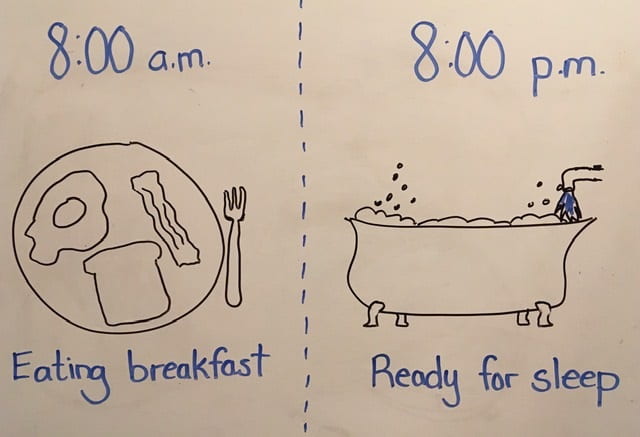
I hope all of you are doing well. I realize many of you are involved in distance learning with your students – and this may be in addition to taking care of your own children’s needs at home. So I understand my blog might not be on your top list of priorities, but I do hope you will bookmark it and keep it for future reference. But again, if you are home with kid, then dealing with elapsed time is a perfect real-life math situation they can apply on a daily basis.
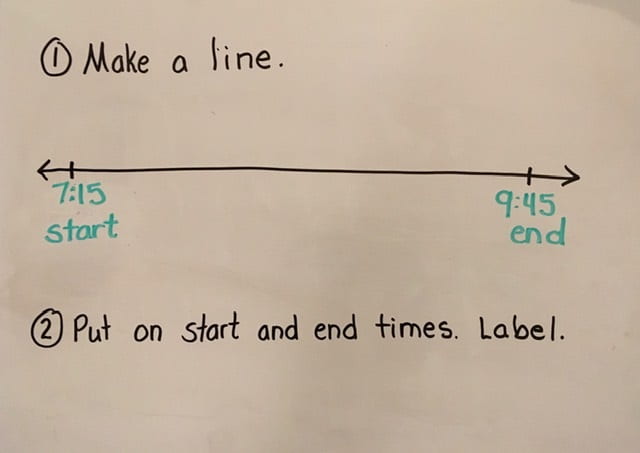
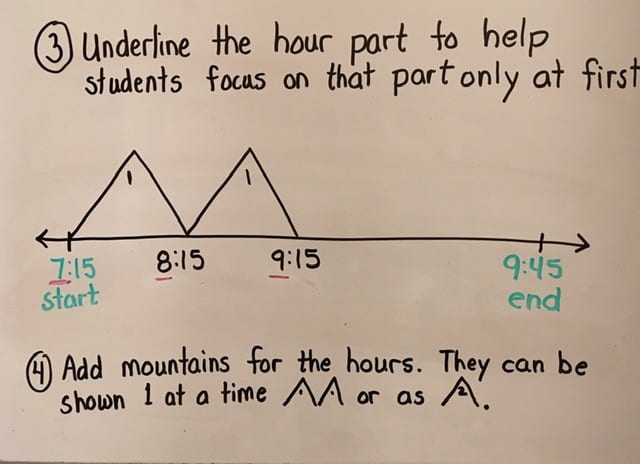
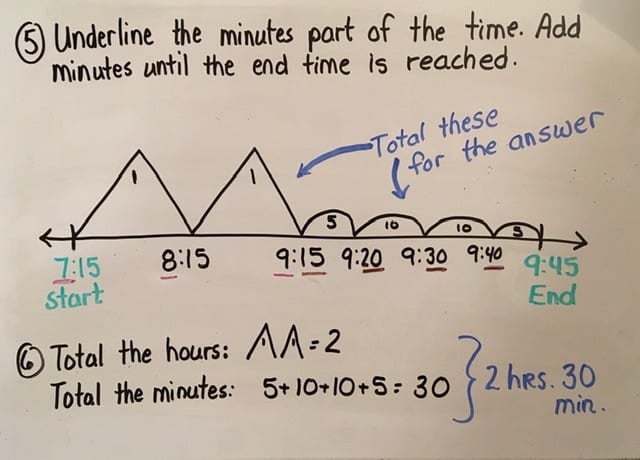
The Z Model:
The Z model is a straight number line “bent” into 3 parts of the Z:
- 1st “leg”: From start time to next full hour – determine how many minutes
- 2nd “leg”: From hour to hour – determine how many whole hours
- 3rd “leg”: From last hour to end time – determine how many minutes
Here is an example to see the steps involved:
-
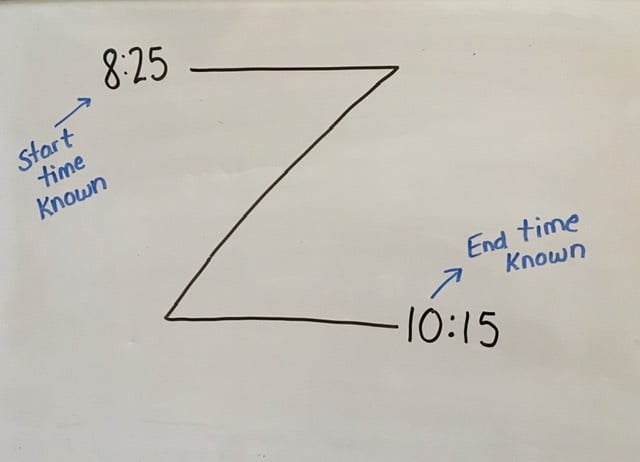
- Step 1: Note start & end times
-
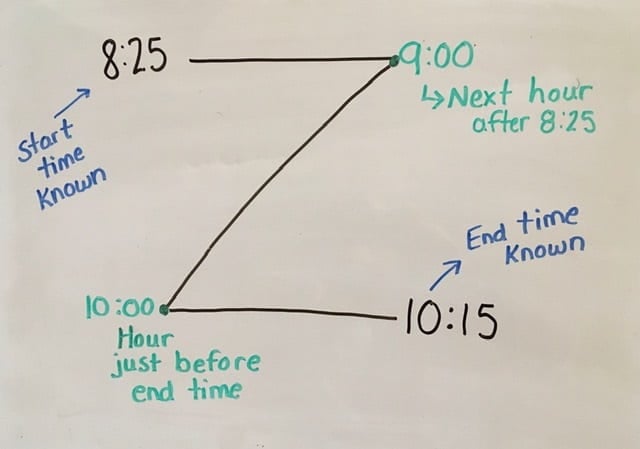
- Step 2: Locate nearest hour to each
-

- Step 3: Figure elapsed time on each “leg” of the Z
-

- Step 4: Total all
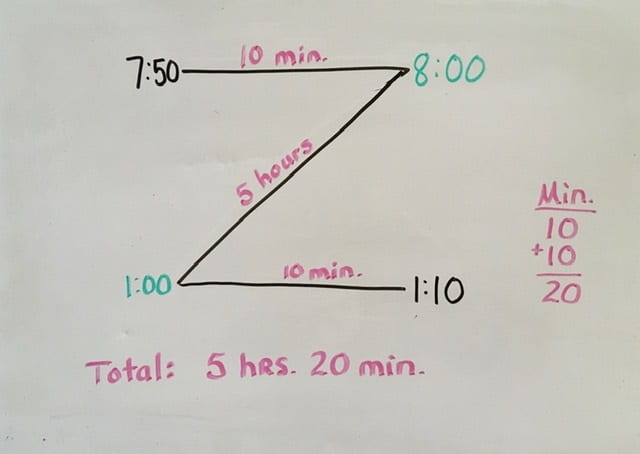
Here’s another in one single view to determine elapsed time between 7:50 and 1:10:
Pros:
- It helps break time down into smaller chunks.
- It’s a visual model which can help a child mentally process the elapsed time in these chunks.
Cons:
- Students would more likely have to know automatically how much time has elapsed on the first “leg” of the Z. In other words, can they mentally figure that the time from 8:25 to 9:00 (the nearest hour) is 35 minutes? Or the elapsed time from 3:47 to 4:00 is 13 minutes?
- In my opinion, this model is mostly just helpful when start and end times are given and the task is to compute the total elapsed time. It would not be very helpful if the task was to determine the start or end time.
- If a child can figure the minutes of elapsed time of the first “leg” of the Z, they might not need the visual model to solve.
The Std. Algorithm / Converting Model
This model resembles a std. algorithm problem because time is aligned vertically and added or subtracted.
- When adding, any minutes which total 60 or over would be converted to hours.
- When subtracting, exchange 1 hour for 60 minutes.
Here is an example to see the progression from start to finish when start time and elapsed time are the known parts:
-
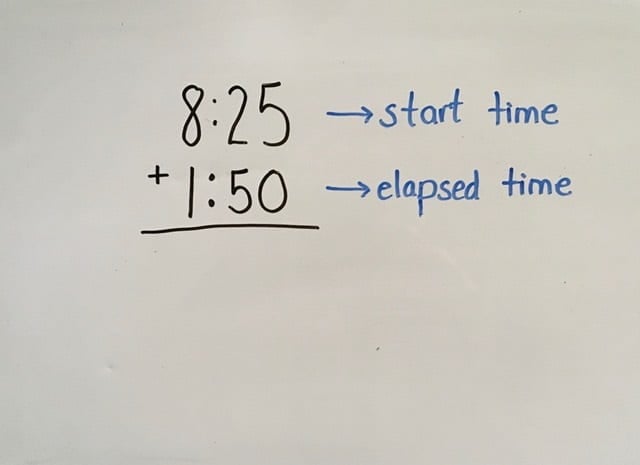
- The problem. Put into context such as: I started watching a movie at 8:25. It was 1 hour and 50 minutes long. What time did it end?
-
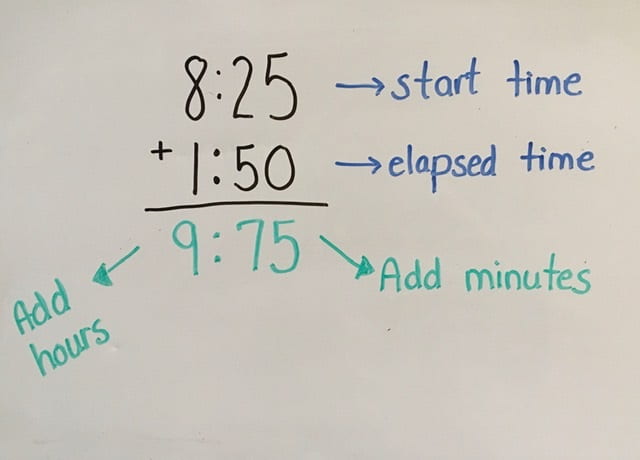
- Step 1: Add minutes. Add hours.
-

- Step 2: If total minutes are 60 or more, exchange 60 minutes for 1 hour.
-
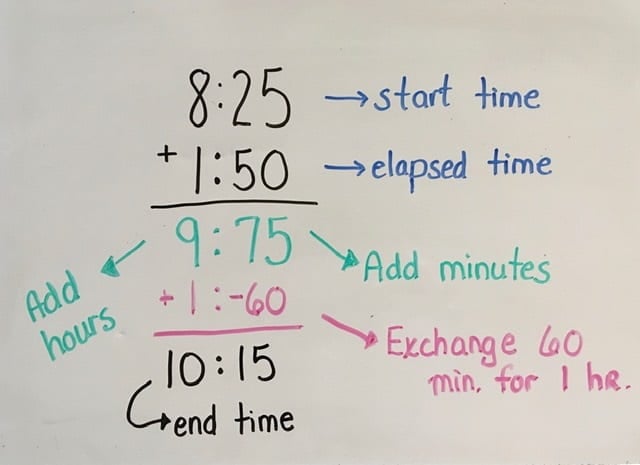
- Step 3: Add hours, subtract 60 from the minutes side to find the end time.
Here’s another example in one view:
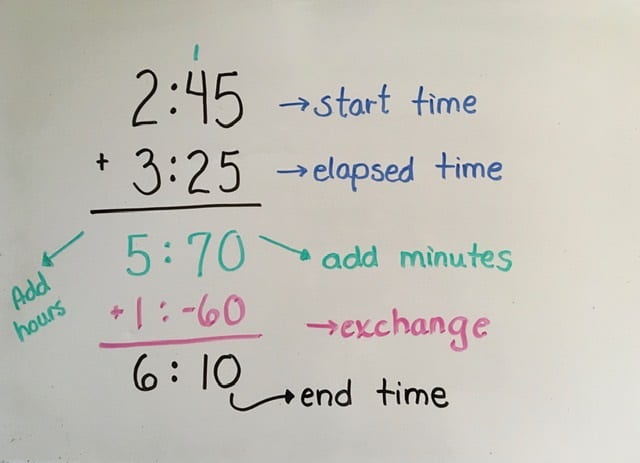
Contextual scenario: At 2:45 I went to the zoo. We stayed there 3 hours and 25 minutes. What time did I leave the zoo?
Here’s an example that involves a known end time and elapsed time. The problem is to determine the start time which involves subtracting time:
-
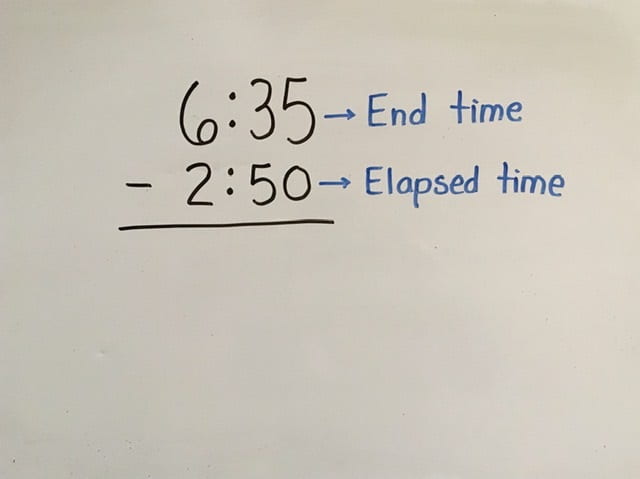
- The problem: I finished my chores at 6:35. I spent 2 hours 50 minutes doing them. What time did I start?
-
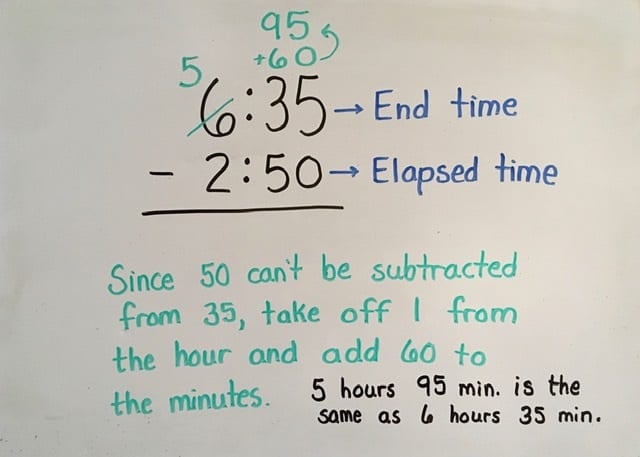
- Step 1: Notice that 50 cannot be subtracted from 35, so an hour is exchanged for 60 minutes.
-
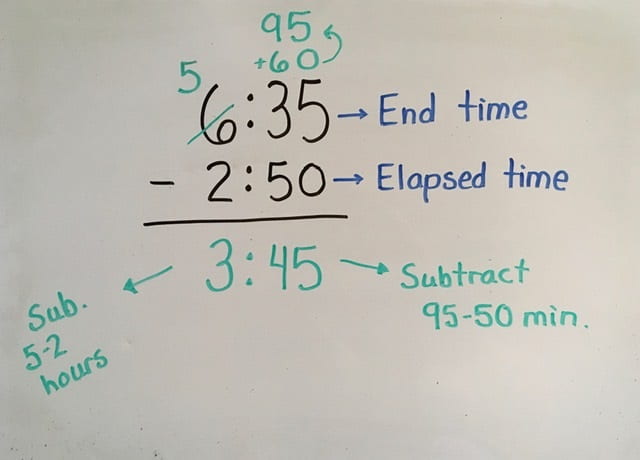
- Step 2: Subtract 95 – 50 minutes and 5 – 2 hours.
-
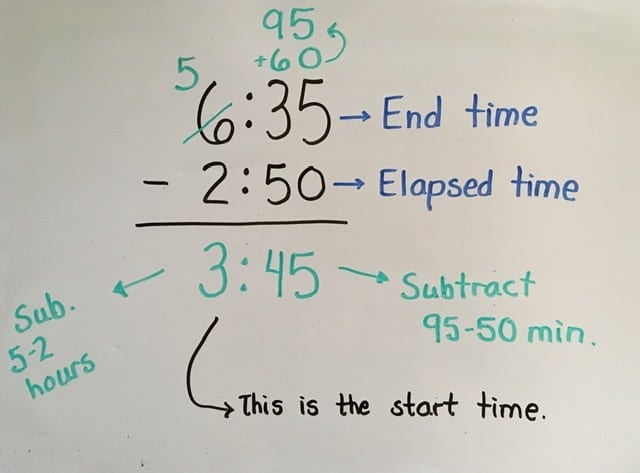
- Step 3: The result is the start time
And another problem in one view:
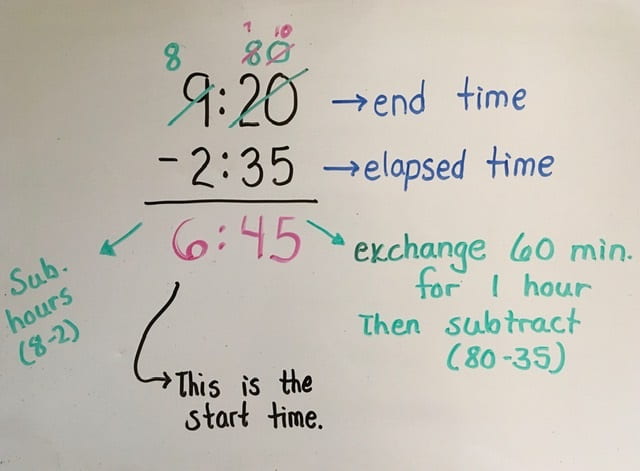
Before I got ready for bed at 9:20 p.m., I spent 2 hours and 35 minutes doing homework. What time did I start my homework?
Pros:
- Students who are ready for more abstract strategies might enjoy this model.
- This model is more useful when solving problems in which the task is to find the end time or start time.
- This can be utilized with hours, minutes, and seconds problems.
Cons:
- Having strong knowledge of number combinations that equal 60 is needed.
- There may be two or three steps involved to arrive the final answer.
- The regrouping in the subtraction version may involve two types which could be confusing: minutes vs. base 10 (as shown in picture directly above)
- Understanding what converting time means and why we subtract and add within the same problem (subtract 60 minutes, but add 1 hour).
I miss seeing my friends in person! Let me know how you are coping during these crazy times!

 “Boys and girls, it’s time to line up to go to PE.” As students line up, you as the teacher will silently keep track of how much time it takes students to get ready. When they are ready, say someting like: “It took you 3 minutes 20 seconds to get ready. We miss learning time when it takes this long. Let’s see if we can beat that next time.” Most kids respond well to this mini challenge. If it’s a real contentious issue in your class, this can be followed with an easy reward such as: “It took 3 min. 20 seconds to line up and get ready. That is too long. Next time we line up if you can get ready in less than that time, I will keep track by building the word G-A-M-E. You earn a letter each time you beat the previous time to line up. The time starts when I say line up and the time stops when everyone is facing the front, quiet, and hands to themselves. You must walk to do this.” Building a short word helps students earn a reward in a short amount of time so they are more likely to strive to meet the goal. It is easy to implement and can easily be incorporated into a reading or math game. The word to build could also be F-U-N. Then it’s wide open to what that could be: A video, talk time, drawing time, a few minutes extra recess. Yes, this takes time also – but it helps students work together toward a common goal, and may save your sanity. This “time” technique can also be applied to other procedures such as getting out materials, staying quiet, etc. One hint: Don’t do a countdown or let students know how much time they are taking as you are keeping track. If you announce, “We are at 2 minutes . . . you might make it.” this gives students knowledge they have time to waste.” We are trying to build an awareness of time along with a sense of urgency and teamwork. So wait until they are all ready to announce the time it took.