Phonics Part 8: More Vowels and Consonants

by C. Elkins, OK Math and Reading Lady

Do your students (K-5) really know the difference between vowels and consonants? Do they think you are talking about the continents instead?? Can they name the 5 vowels and both vowel sounds with ease? The more I work with individual students, the more I realize they often DON’T know or have a hard time articulating what they are.  So if they are confused, then are they really paying attention when we rattle along using terms such as cvc, cvce, vowel teams, vowel pairs, consonant blends, etc.

Manipulate middle letter(s).

So much of our phonics instruction relies on students knowing what they are, it may be worth it to check with yours to see.  I will admit that I have assumed they have this knowledge, especially at the 3rd grade levels and above, but this is not always the case.

Vowels:  a, e, i, o, u

Consonants:  all of the other letters of the alphabet

Vowel sounds

  • The long sound is just like saying the letter names.
  • For the short vowel sounds, I recommend providing a key word or two for students to refer to such as:  short a = apple, at; short e = egg, the middle sound in red; short i = is, it; short o = on, off; short u = up, umbrella

CVC:  Consonant-vowel-consonant words

  • These are words like cat, red, will, hot, bus
  • They are considered “closed” syllables.
  • The middle vowel usually makes the short vowel sound.
  • This is helpful to apply to multi-syllabic words with closed syllables:  cac-tus, rab-bit, pic-nic, etc.

CVCE: Consonant-vowel-consonant + silent e

  • These are words like cake, fine, note, mule
  • The silent e gives the middle vowel the signal to make the long sound (generally).
  • When there are 2 vowels within a single syllable, the vowel sound is usually the long sound.

Long vowel teams: Generally this means 2 vowels together making just one sound

  • Examples:  ai, ee, ea, ie, oa, ue  (rain, sleep, team, pie, coat, glue)
  • The first vowel makes the long sound, while the second vowel is silent

The above are the basics and need to be understood and mastered to better tackle digraphs, blends, and multi-syllabic words. Read other vowel and consonant information with this link to one of my previous posts: Phonics Part 3: Vowels and Consonants.

Activities to practice:

  • Path games
  • Matching activities
  • Spelling word lists
  • Word hunts for these in texts they are reading
  • Word family lists

Have a wonderful week everyone!

Teaching the Alphabet / Letter Sounds Online

by C. Elkins, OK Math and Reading Lady

How do you go about teaching your online students about the alphabet and letter sounds when you can’t be with them in person? That is the topic of today’s blog.  By no means do I have all the answers, so please chime in with your ideas too!

In an actual classroom, your students would have opportunities to manipulate and sort objects by letter or beginning sound, to write under your watchful eye and guidance, to find the letter used in actual text, and experience fun learning center-type activities to immerse themselves.  Maybe it’s not as hard as you think — below are some possible teaching strategies (and some FREEBIES) you can use with your students to help teach the letter sounds and alphabet. By all means, ensure this instruction is a regular and systematic part of your teaching routine.

Before I go on, one important piece of equipment in case you are working from home and not at school would be a document camera.  I know from my experience that physically holding something up to the camera for a student to see isn’t always a good idea.  For one thing, it covers your face. It wiggles when you hold it.  It can appear backwards (unless you uncheck “mirror my video” if using Zoom). While the type of document camera purchased for your classroom is likely too costly for home use, there are many small portable ones (see Amazon) in the $100-200 price range that connect to your device via a usb port. With their downloaded software you will be in business!  I use one from Ipevo which I love!

My document camera has been crucial to online teaching. It allows me to show strategies in real time, read text together, play games, show pictures, etc.

  1. Alphabet cards:  Cards that are colorful and a good size to show students under your document camera are essential.
    • Present when teaching the letter / sound for the first time. Show how to form the letter. Use cards easily for frequent review. These are like the type you might have posted on the walls in your traditional classroom.
    • Here is an editible FREE set from TPT. Editable alphabet cards with pictures  While the pictures shown are very good, I did notice on the vowels some of them are using a picture to represent the short sound (apple, elephant, umbrella) while some pictures represented the long sound for the vowel (ice cream, orange).  In some cases, this would prevent me from getting the set — but it’s FREE and you can edit it to change the picture.  Or better yet, for the vowels show 2 pictures (1 to represent each sound).
    • Here is another set from a TPT author who is very early-childhood friendly and has a ton of good free stuff (you may have to join her blog to get access to the free stuff).  I like her alphabet cards because they have a few pictures to accompany each letter.  https://thisreadingmama.com/mega-pack-free-phonics-cards/
  2. Alphabet – how your mouth should be formed:

    O says /o/ like this:

    This is a critical aspect of teaching letter sounds.  It matters how the lips, teeth, and tongue are coordinated to produce the sound.  For example, many young children have difficulty with /l/ and can often be corrected by physically showing them where to place the tongue (behind the front teeth).  You can show them how their lips, etc. should look with each letter.  It’s ok to exaggerate a little bit. And by all means, when working on the next item in my list (video), make yourself visible so they can see how to form the letter with their mouth and you can check via your screen if the child is forming their mouth correctly.

  3. Alphabet videos:  I am sure most all of you have used videos from youtube for your students.  Here is the one I recommend because of the repetition of the letter sound and pictures starting with that sound.  In each video (devoted to only one letter at a time) the student gets dozens of opportunities to say the sound and objects with background music that is motivating to get children to participate.  Here’s one for the letter Mm: “Have Fun Teaching” Letter M /m/ video on Youtube
  4. Alphabet pictures:  With a document camera, showing pictures (or real items) with the beginning sound you are teaching is easy.  Here’s a set (6 b/w pictures for each letter) that can be sent to students to put together as a mini book for each letter, or printed and cut apart for you to use for teaching.  A Dab of Glue Will Do (Blog) Free alphabet booklets  The word is printed with each picture making it easy for you to point to the first letter for emphasis.
  5. Alphabet writing:  If your online students have a whiteboard, you can use your document camera to model how to write the letter, let them practice, and then hold up their board to show you.
  6. Alphabet in text:  It is super important to include opportunities to see the letter you are working on in text.  I recommend using the child’s name, class member names, easy patterned text, or short poems.  Show the text under your document camera or pull up from a licensed site you have access to. Have students find the letter wherever it appears in the text. This shows students how letters are being used.
  7. Alphabet sorting and review:  Using pictures (like from #4 above), you can show a picture (cover the word though) and have students name the letter, hold up a letter tile, or write the letter on their whiteboard to show you. You can also display 2-3 letters (magnetic, tiles, or written in column form on a whiteboard) and help students sort pictures by telling you where to place them. This is also a good video to review all of the letter names, sounds, and pictures/words with that beginning sound:  Jack Hartman Alphabet song
  8. Alphabet practice:  There are a lot of resources you may already have that can be transformed to a digital format via boom cards or Seesaw, etc. Some teachers also print up packets at school for weekly distribution to parents (worksheets, cut-n-paste, sorting), and these could be included as supplmental to your online teaching.

Finally, please read this Alphabet research I summarized.  Alphabet Letter and Sounds Research (C. Elkins Edublog)  Very eye opening and beneficial in my opinion. You will come to understand why children get confused with learning the alphabet.  Example:  “F” is pronounced with a short vowel sound before the letter /ef/ while “J” is pronounced with a long vowel sound after the letter /jay/.  “Double you” = /w/.  “Aych” = /h/.  You will find a great 1 page teaching template for teaching letter sounds which focuses on aspects I mentioned above (Here is the letter, here’s how it sounds, here’s how to write it, here it is in text).  

Take care!  Hope you are all well and safe. Looking forward to your comments!

Phonics Part 7: Word Analogy Strategy

by C. Elkins, OK Math and Reading Lady

I have been a fan of using a word-analogy strategy to help students decode words for a long time. Actually ever since I saw a video and read more about Irene Gaskins Benchmark Word approach years ago.  She even had a school in which she practiced this approach. Word analogy is the process of using a known word to apply to a new word.  Think of it as being a word detective. Sometimes word families are envoked, but more often similar vowel patterns are analyzed.

Here are ways I have used it recently with students:

  1. A first grade student came to the word far in a sentence. He stopped and didn’t try anything. There was no picture. Skipping the word and reading on would not have helped in this case. I wrote this word “are” on a small whiteboard (knowing the child knew this common sight word). I asked:  “What is this word?”  Child responded correctly with “are.”  I underlined the are in the word and said, “Use this part of the word to help you.” The child could immediately and correctly respond with “far.”
  2. A fifth grade student came to the word wren in a sentence. She did not recognize the word, and again there was no picture, even though from the context she could tell it was a type of bird.  I wrote the word “write” on the board, suspecting she knew it. She did, immediately. So I underlined the wr and said, “Use this part of write to help you with this word you don’t know.” She quickly surmised it was wren.
  3. A second grade student came to the word termite in a sentence and stopped. I had the student cover up the ending (mite) to expose ter.  Still nothing. So I wrote “her” on a small whiteboard I always keep handy with my teacher materials.  She knew it quickly. Then I told her to apply that “er” part to the tricky word. She was able to quickly say “ter” and then used the picture to confirm the correct word was “termite.”

These are specific examples to help children realize they can apply something from a known word to a new word. . . . without the teacher giving a mini lesson on vowel sounds, decoding rules, tricky r’s, sounding out letter by letter, etc.  It’s very helpful when dealing with whole words or word parts. This is exactly what we want students to be able to do on their own as they make their reading journey.

Here is an article from the University of Illinois about the methodology:  Look closely at pages 9-11 for application in the class. Here is an excerpt regarding decoding the word “momentum” in this sentence:  “The falling object gained momentum as it fell.” Students use the key known words go, ten, and drum to relate to the syllables in the unknown word. Get the article here: A Metacognitive Approach: Using what you know to decode words you don’t know

The typed word analogy chart pictured below is a handy reference.  I keep a copy (in a plastic sleeve) close by to pull out when needed. I point to a known word on the list and then help the student use that to help with a new word. When I don’t have the chart close by, I write a word I feel is known on a little white board, show it to the student, then show how to apply it (as in examples above). Here’s a FREE copy of the chart (word document): Benchmark word analogy list

I have also presented this small chart as a larger version on a poster board for all students to reference in the classroom.  It’s a different version of a word wall.

Give it a try, and let us know what you think!


Phonics Part 6: Open and Closed Syllables

by C. Elkins, OK Math and Reading Lady

What are open and closed syllables? And what are some ways to help students decode them? How can students apply this knowledge to read and spell multi-syllabic words? FREE activities below.

Closed Syllables

  • The vowel is closed in (or trapped) between two consonants and usually makes the short vowel sound.
  • Examples in one-syllable words:  cvc patterns such as hot, big, mat, pen, tub
  • Examples in two-syllable words: picnic (pic-nic), rabbit (rab-bit), pencil (pen-cil), tablet (tab – let)

Open Syllables

  • The vowel is open at the end of a word or syllable and usually makes the long sound.
  • Examples in one-syllable words:  go, she, glue, tree
  • Examples in two-syllable words:  lion (li – on), baby (ba – by), local (lo – cal), music (mu – sic), tiger (ti – ger)

Reading Open and Closed Syllable Words:

  1. If it is a closed one-syllable word, I advise students to try the short vowel sound first to see if that sounds right and makes sense. If not, flip the vowel sound to the long sound.
  2. With a two-syllable word: Use a small post it, a masking card, or your finger to block off part of the word so only the first syllable is exposed. This is often 2-4 letters. If it looks closed (vowel between two consonants), try the short sound first to see if it sounds right and makes sense. If it looks open (one vowel at the end of a syllable), try the long sound first to see if it sounds right or makes sense. If not, flip the vowel.
  3. Apply this to 3 and 4 syllable words (looking at one syllable at a time). Common rimes or chunks might be revealed in the process.
  4. Practice breaking words apart to hear the two syllable and the vowel sounds. Here is a matching activity I made which you can get for FREE. Click here for the Closed syllable matching 4 pages (2 pages of pictures, 2 pages of matching words). Click here for the Open syllable matching 4 pages (2 pages of pictures, 2 pages of matching words).
    • You can match the whole word to the picture.
    • You can cut the words apart by syllables and match picture with both syllable parts.
  5. Try this game format using some of the same above words. Click here for a FREE copy of the Open and closed syllable game.

Stay tuned!  Next week I will focus on a fabulous strategy for decoding (making analogies). 

Phonics Part 5: Manipulating Phonemes and Letters

by C. Elkins, OK Math and Reading Lady

Add beginning letter(s)

Manipulating phonemes refers to the abilty to add, delete, or substitute them orally. This is a prerequisite skill to visually manipulating letters in order to read and write (the phonics part). First grade programs should include both of these routines on a daily basis – and at other grade levels with struggling students. Skill with manipulating letters relates to a child’s ability to use a known word (or word part) to read and write new words. Stay tuned for 10 ways to work on manipulating letters (whole class or small group) as well as some free resources to accomplish your goals. Phonemic awareness falls under the Phonological Awareness umbrella.

Add phonemes – phonemic awareness (examples — letters inside / / represent the sound):

  • “Say /at/.  Now add /k/ before /at/. What do you hear?”
  • “Say /un/. Now add /f/ before /un/. What do you hear?”

Add letters – phonics (examples):

  • “Write at.  Now add the letter c before at.  What word did you make?”
  • “What other letters can you add before at to make new words?” (suggest b, f, h, m, p, r, s)
  • “Write un. Now add the letter f before un.  What word did you make?”
  • “What other letters can you add before un to make new words?” (suggest b, g, n, r, s)

Delete phonemes – phonemic awareness (examples):

Manipulate ending letter.

  • “Say fat. Take off the /f/ sound.  What part is left?”  (at)
  • “Say run. Take off the /r/ sound. What part is left?” (un)

Delete letters – phonics (examples):

  • “Write track. Take off the letters tr. What part is left?”
  • “What other words can you write with the letters -ack?” (suggest back, smack, lack, tack)
  • “Write sting. Take off the letters st. What part is left?”
  • “What other words can you write with the letters -ing?” (suggest sing, ring, fling, thing)

Substitute phonemes – phonemic awareness (examples):

  • “Say like. Take off the /l/ sound and trade it for the /b/ sound. What word do you hear now?” (bike)
  • “Say hop. Take off the /p/ sound and trade it for the /g/ sound. What word do you hear now?” (hog)

Substitute letters – phonics (examples):

Manipulate middle letter(s).

  • “Write like. Change the letter l to a b. What word did you write?” (bike)
  • “Write like. Change the letter i to the letter a. What word did you write?” (lake)
  • “Write like. Change the letter to the letter f.  What word did you write?” (life)

You will notice that manipulating letters also links directly to identification of onsets and rimes.

  • With onsets and rimes, we want students to be able to identify the rimes. This means they have to separate it from the beginning of the word.  Example:  sh + op
  • We also want students to be able to recognize and produce the rimes or common “chunks”  in other words. This involves deleting and substituting letters. Examples:  hop, mop, drop, helicopter. If they can’t hear it, they most likely can’t read it or write it.

Here are 10 ways to work on letter manipulation in the classroom or with small groups:

  1. Utilize some of the above examples as part of your daily word work routine.
  2. Use sound boxes and magnetic letters or letter tiles to model manipulation of the letters.
  3. Use post-its to practice manipulating words.
  4. Provide word family practice like these rimes -op, -and, -it, – un, -et, eet, -oat, -ine, and so on.
  5. Give students letter cards to hold and arrange to make / change words.
  6. Break words apart (and put back together).
    • Break apart letter by letter.
    • Break apart onsets and rimes
    • Break apart beginning / middle / ending
  7. Explore words by making a word chain. Write it or use letter tiles to help. How long can you make the chain go on?

    Word chain starting with cat.

    • Start with one word such as cat.
    • Change just one letter at a time to make a new word (this can be the beginning letter, middle letter, or ending letter):  hat
    • Change it again (just one letter): hit
    • Change it again: bit
    • Change it again: big
    • Change it again: dig
    • Change it again: dog
    • Change it again: dot
    • Change it again: hot
    • Change it again:  pot
    • Change it again: pet
    • Can you keep going???
  8. Use spelling words to make changes. After all, the purpose of spelling is not to just spell the words on the list, but to apply the generalization to other words.  Spelling word is wide? Try these: slide, hide, bride . . .  Spelling word is eat?  Try these:  meat, seat, treat . . .
  9. Give pairs of students word family lists to partner read (-ake:  bake, cake, lake, take, make, rake, snake, shake, wake . . .)
  10. Check out some of these FREE resources from TPT:

As always, please share your favorite manipulating phonemes or letters activities!!


Phonics Part 4: Segmenting and Blending CVC and CVCe words

by C. Elkins, OK Math and Reading Lady

This part of my phonics series will focus on some beginning strategies to help student apply letter-sound knowledge with predictable cvc and cvce words. Knowledge of onsets and rhymes, use of Elkonin sound boxes, the “Drive-Thru” and “The Arm” strategies are 
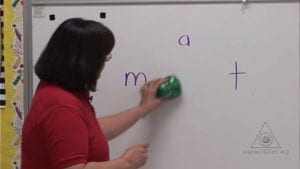
wonderful methods to accomplish this. We will look at separating sounds (segmenting), combining sounds (blending), and ways to connect to spelling/writing using these methods. Plus, I will recommend some resources to help with teaching and practicing this in your classroom.

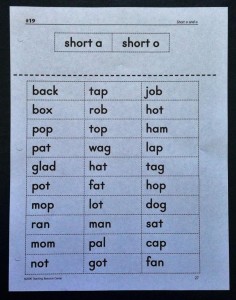
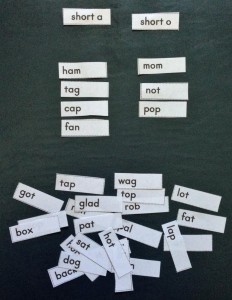
Students are ready for segmenting and blending when they have a good concept of word, which includes these phonological awareness routines:

  • Fun with words:  rhyming, tongue twisters / alliteration
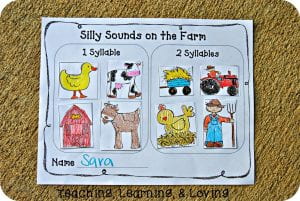
  • Familiar with syllables:  clapping or counting # of word parts
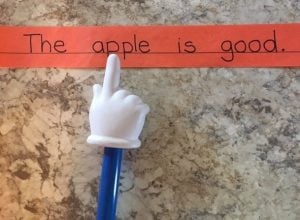
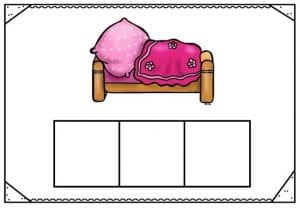
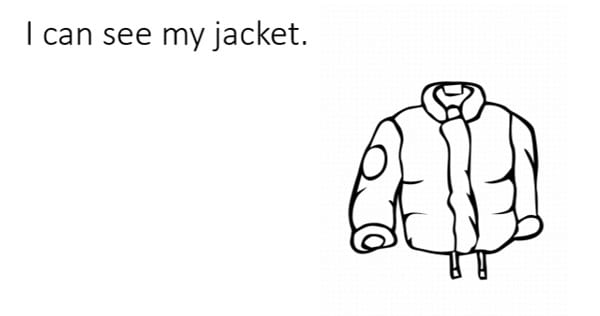
  • Hearing and identifying # of words in a sentence: Concept of spoken word is important as a beginning reader so students track under each word a word at a time, not a syllable at a time. Example:  In this pictured sentence, does the child keep their finger under “apple” until it is done?
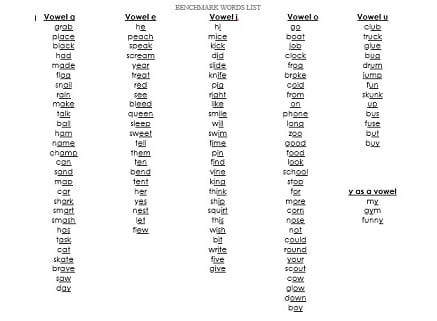
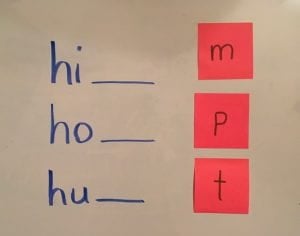
  • Hearing onsets and rimes:  Can the child segment cat into c + at?  Or shop into sh + op? The onset is the first part of the word before the vowel. The rime is the rest of the word starting with the vowel. The notion of word families is built on the concept of identifying onsets and rimes. Hearing these is a prerequisite to reading them later. Check out this great piece from Reading Rockets on onsets and rimes: https://www.readingrockets.org/strategies/onset_rime

Segmenting:  Segmenting is the practice of separating the individual sounds in each word. Phonemic awareness activities help students attend to this in an oral fashion. Then connecting them with the actual letters is what phonics instruction is based on.  Here are a few examples of segmenting for a phonics lesson:

  • Listen and look at the word dog. Can you take it apart sound by sound? /d/ + /o/ + /g/
  • Listen and look at the word ship.  Take it apart sound by sound:  /sh/ + /i/ + /p/
  • Listen and look at the word feet.  Take it apart sound by sound: /f/ + /ee/ + /t/

This is the skill we want students to be able to do when they are spelling/writing the words. Ask them:  “What do you hear? Say it slowly and listen for all of the sounds.” Use of Elkonin boxes and “The Arm” are helpful tools for children to visually and auditorally isolate the individual sounds. See more information about this at the end of this post.

Blending: While segmenting is a worthwhile skill, it is the actual blending we want students to be able to do quickly and smoothly so it hooks the letters/sounds together and doesn’t sound choppy as they are reading.

Here are a few methods to help with segmenting and blending:

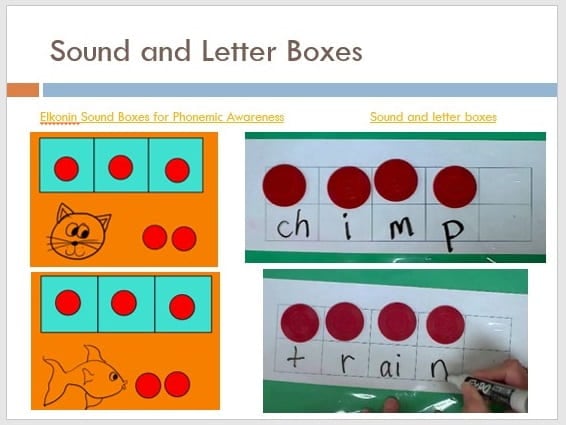
Elkonin Sound Boxes:  A box is used or drawn for each sound in the word. To me, these are most helpful with single-syllble predictable short as well as long vowel words.  I use them often with spelling to help a child notice the different sounds. Then once the sound is identified, the corresponding letters can be put in the boxes. IMPORTANT: Draw an arrow under the sound boxes for students to trace with their finger under the letters to make sure they are not choppy, but hooking the letter sounds together (blending). Here are some resources to help with using this tool.

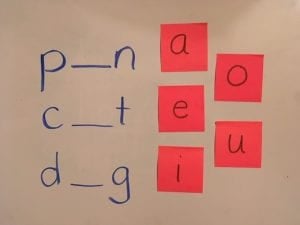
For cvce words, the silent e would be placed outside the last box. Why? The e does not make a sound, but it is part of the spelling. This also may give the student the opportunity to practice the “flip the vowel” strategy when reading cvce words. If they try the short vowel sound, but it doesn’t make sense or sound right, then flip to the long vowel sound.

“The Arm” Method: Take advantage of the 3 parts of the arm to model the 3 sounds in a word by pointing to the shoulder (beginning sound), inside of elbox (middle sound), and hand (end sound). Tapping each part of the arm is the segmenting portion. Then blend the sounds together by running your hand down the length of your arm as you quickly blend together to pronounce the word. Again, this provides a visual and auditory model for students.

“Drive-Thru” Method:  PLEASE watch this video from Reading Rockets showing the Drive-Thru method for segmenting and blending.  I love it! The teacher models first using a large toy car on the whiteboard as she/he “drives” to each sound, slowly at first, then faster to accomplish blending the sounds together quickly. The letters making up the beginning, middle, and ending sounds are placed at different parts of the board — but still in order. Notice the consonants are placed at the bottom, with the vowel(s) at the top.  I presume this is to give the students more of the experience of “driving” as they go from one sound to the next (as opposed to putting them in a straight line like in sound boxes). After the teacher models this with a few examples (the “I do / We do” parts of the lesson), then students practice the “you do” part with their own little Hot Wheels / Matchbox cars.

Here is the link to the Reading Rockets article and video about Segmenting and Blending. Click on the article and then you will see the short “Drive-Thru” video.  You will see cvc words, words with blends, etc.

Connecting to Spelling and Writing

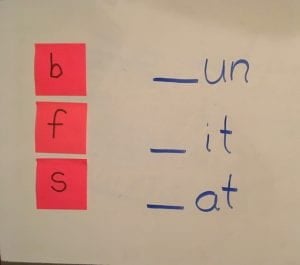
  • Help students use the “arm” method to break apart or stretch out words to hear the sounds they are trying to spell.
  • Ask students:  What do you hear? Write the letters down in the order you hear them.
  • Provide students with magnetic letters and pre-made sound boxes to make the words they are trying to spell. Here is my sound box template (2 sides): Sound Boxes CE
  • Use picture cards along with sound boxes for students to spell (see resource above).
  • For weekly spelling words, make sure students can segment and blend the letters together on their own so they can do this while they are taking their spelling test.  For KG or first grade assessment (and maybe some second graders), I definitely recommend using the “arm” method or provide a sound box template for students to use.  And to help students gradually get the idea of a spelling test, I would recommend the teacher segmenting the sounds for the words involved (once), then asking students to do that out loud (as many times as they need to in order to write the correct letters). This is a scaffolded task to teach students this is what they should eventually be doing on their own.  It would go something like this on a pre-test or test:
    • Your first word is “hop.”
    • Listen to the sounds: /h/ + /o/ + /p/
    • Now you say the sounds as you write the letters. Say them over and over until you are done spelling the word.
    • Use your arm (or pre-printed sound boxes for test day) to help you as well.
    • The next word is “fog.” . . . .

Next time I will focus on substituting and deleting phonemes, and their connections to reading words with common rimes. Have a great week!!
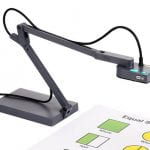
 

Phonics Part 3: Vowels and Consonants

by C. Elkins, OK Math and Reading Lady

The 5 vowels make up just 19% of the letters of the alphabet, but have 38 different spellings (for the short and long sounds).  The vowels are much like the “glue” that hold words together. The 21 consonants, on the other hand, make up 81% of the letters of the alphabet, and have 54 different spellings (not including the digraphs). Here again is a 44 Phoneme chart 44Phonemes to illustrate this (from Orchestrating Success in Reading by Dawn Reithaug, 2002.)  Stay tuned for other resources and FREEBIES.

Some other interesting vowel and consonant trivia:

  •  “A vowel is a sound that is produced with no obstructions. The air simply floats through your mouth and has very little interaction with your teeth, your lips, or other structures. On the other hand, a consonant has some degree of air obstruction.” (Dr. Molly Ness, Linuistic expert). So now is everyone trying that out like I did? It’s true!  Producing vowel sounds require little or no lip / tongue movement. Whereas most consonants require specific lip and tongue placement.
  • Each syllable is made up of one vowel sound. This is how we count and divide multi-syllabic words (one vowel sound per syllable).
  • While most single consonants only make one sound, there are a few exceptions such as:  c = /s/ or /k/; g = /g/ or /j/; y = /y/ or /long e/ or /long i/; s = /s/ or /z/; x = /ks/ or /z/ . This reveals the letters c and x don’t have their own unique sound.

Then there is this interesting information about how we say the consonant letter names vs. the sound the letter makes — no wonder kids get confused! Here’s a previous blog post going into more detail on this fantastic research. I think it’s a must read for all elementary teachers: Alphabet Letter and Sounds Research (Cindy’s Blog)

Letter names starting with short vowel sound when pronounced:

  • f = /ef/
  • l = /el/
  • m = /em/
  • n = /en/
  • s = /es/
  • x = /eks/
  • r = /ar/ — not exactly a short vowel sound, but close

Letter names with long a sound when pronounced:

  • j = /jay/
  • k = /kay/

Letter names with long e sound when pronounced:

  • b = /bee/
  • c = /see/
  • d = /dee/
  • g = /jee/
  • p = /pee/
  • t = /tee/
  • v = /vee/
  • z = /zee/

Letter names with pronunciatons not using their letter sound:

  • h = /aych/ —  the letter sound is pronounced /h-h-h/
  • q = /kue/ — the letter sound is /kwuh/
  • w = /double u/ — the letter sound is pronounced /wuh/
  • y = /why/ — the letter sound is pronounced /yuh/

The article on Alphabet Research I referenced above has some excellent instructional guidelines for introducing and teaching the letter sounds. If you are a “letter of the week” teacher, this may shed some light on what newer research has revealed.

Here are some good strategies for vowel and consonant instruction in the classroom. Please share some of yours that aren’t on my list!!

  • Check out Kate Garner’s “Secret Stories.”  https://www.katiegarner.com/ She has a fantastic approach to help students notice what their mouth is doing when saying a sound and links it to fun phrases and actions.
  • POST an alphabet chart in the classroom which includes pictures, big enough to be seen across the room.  A good thing to look for is one that has 2 pictures for the vowels, or has the vowels in a different color. To me, this is a MUST in pre-K, KG and first grade classrooms. A poster close to your group teaching station is also highly recommended for easy, quick reference.
  • Here’s a desk alphabet chart that is handy for use at your small group station. FREE alphabet chart from TPT (Mrs. Ricca’s Kindergarten)
  • Learn letter formation steps that can be repeated. Here’s an idea from Pinterest: Lower case letter formation rhymes and Uppercase rhymes for letter formation
  • Provide lots of alphabet books in the reading center for individual reading time.
  • Learn the sign language finger spelling for letters of the alphabet. Here’s a link: ASL Finger Spelling Charts
  • Match upper and lower case letters.
  • Match pictures (beginning sounds) with letters.
  • Do picture sorts with 2-3 letters/sounds at a time.
  • Use object sorting tubs.
  • If working on 2 sounds at a time, give children those 2 letters on cards or with letter tiles. Teacher says the word or shows a picture and the students must descriminate between the two to hold up (all students engaged).
  • In shared or guided writing, have children supply the beginning consonant or vowel sound instead of the teacher writing. Example:  If writing the sentence We will go to the library today, the teacher could get students to help with spelling parts of the words (the w, l, t and perhaps the e, i, o  in we, will, and go).
  • Look for particular vowels and consonants in short poems (see Phonics Part 1 for resources).
  • Make alphabet books.  These could be individual or a class big book which can be viewed over and over again during center time.
  • Refer to one of my favorite bloggers / TPT authors for young children (This Reading Mama): https://thisreadingmama.com/teaching-letter-sounds/
  • Making letters with play-dough or in an art related activity should always be connected with pictures and sound practice so students can connect the sound to the letter.

Finally, using knowledge of beginning letters along with picture cues can help a child read easy texts and verify the correct word was used. Here are two examples:

  1. Look at the ______.  If a child only looks at the picture, it might be read as “Look at the rabbit.” But asking the child to confirm by looking at the first letter should reveal the word can not be rabbit because the word shown begins with the letter b.
  2. I can see my _______. If a child only looks at the picture, it might be read as “I can see my coat.” But asking the child to confirm by looking at the first letter, and prompting the child like this:  “What else could that word be that begins with the /j/ sound?” If the child does read the word jacket correctly, the teacher could ask the child, “How did you know that word wasn’t coat?” This would enable to you to determine if the child was using first letter clues, or just guessing.

Happy Reading!!

Phonics Part 2: What are Phonemes, Graphemes, Blends, Digraphs, and Diphthongs?

by C. Elkins, OK Math and Reading Lady

With 44 different phonemes (sounds) in our English language, no wonder some students have a hard time learning to read! Click on this link to get a chart to show all 44: 44 Phonemes This list shows the 5 vowels, 18 consonant sounds (remember the letters c, q, and x don’t make their own distinct sound), the combinations of vowels (digraphs, diphthongs and r-controlled), as well as the consonant digraphs. See the end of this post for some freebies. And be sure to reference Phonics Part 1 for some other cool resources and videos for teaching phonics.

Below are some commonn phonics terms that often get confused.

Phoneme: The smallest unit of sound. Phonemes can be made up of more than one letter. Phonemic awareness experiences are those in which students listen to or produce these phonemes that are heard in words. Here are some examples:

  • Phonemes can be made up of one or more letters: /d/, /sh/, /ow/
  • The word dog has 3 phonemes:  /d/ + /0/ + /g/.
  • The word ship also has 3 phonemes: /sh/ + /i/ + /p/
  • The word cow has 2 phonemes: /k/ + /ow/

Grapheme: The letter or letters used to write the sound (think about the “graph” part of the word). What obviously gets confusing is that many phonemes can be represented by different graphemes such as:

  • Long a:  sayrain, gateeight
  • /f/:  phone, farm, enough
  • /k/:  cat, Christmas, kick

Blend:  A combination of 2 or 3 consonant letters in which each consonant sound is voiced, but blended together.  Blends are often found at the beginning and/or ending of words. Sometimes blends are referred to as consonant clusters.  Here are some common blends:

  • r blends:  br, cr, dr, fr, gr, kr, pr, tr   Be on the alert for students who actually hear /jr/ or /chr/ when looking at words with “dr” or “tr.”
  • l blends:  bl, cl, fl, gl, kl, pl, sl
  • s blends:  sc, sk, sl, sm, sn, sp, st, sw
  • 3 letter blends: scr, str, spl

Consonant Digraph:  Two consonants which work together, but make one sound. These are made with the letters ch, sh, ph, th, wh, kn, wr. The “graph” part of the word “digraph” deals with the concept of writing / spelling (ie graphics, grapheme).

  • Often these are introduced early in phonics since they are present in many sight words: sh, th, wh, ch

Vowel Digraph:  Like consonant digraphs, vowel digraphs are the written vowel pairs or teams which work together to produce one sound.  Some vowel digraphs are vowels combined with consonants (such as ow, ay, aw). Here are some examples:

  • ea:  team, reach, bread
  • oo:  foot, soon
  • ai:  chain, bait

Diphthongs:  The sound created when two combined vowels are pronounced differently.  The word diphthong comes from the Greek language meaning “two voices” or “two sounds.” Most common diphthongs are spelled with the digraphs ou, ow, oi, oy.  Notice how your mouth changes or glides as you make these sounds. They aren’t long a (as in ai, ay) or long e (as in ea, ee), etc; but usually a sound that cannot be classified as a long vowel or short vowel sound.

Here are some cool charts (FREE) which are handy to keep at your teacher table to show the different letters, digraphs, and blends you are likely to reference:

Please share your thoughts or your own ideas!

Phonics Part 1: Getting Started

by C. Elkins, OK Math and Reading Lady

The National Reading Panel has named five essential components of reading: phonological awareness (which includes phonemic awareness), phonics, fluency, vocabulary, and comprehension. To be a reader, a student must learn how to decode words and also comprehend them. As I encounter students in my consulting practice, many are at a loss regarding ways to decode words and thus fall further and further behind. According to numerous educational articles about the science of teaching reading, teachers are also often feeling they didn’t have the proper background information from their university experiences about how to teach children to read. Plus, many of my subscribers are alternatively or emergency certified and have not had this information presented to them either. Check out this article. Notice how explicit phonics instruction is a central focus: https://www.nctq.org/blog/The-Science-of-Teaching-Reading

Most reading classrooms utilize a balanced literacy model, trying to devote an equal amount of time to the above 4-5 components. Often times due to time constraints, phonics is “covered” through the spelling lessons or through individualized computer programs. This is not enough. Many commercial reading series provide some phonics instruction, but the lessons are often not to-the-point, rely too much on worksheets, and have too much teacher talk (in my opinion). Many teachers with whom I work have expressed they don’t feel adquate in their attempts to help students beyond saying, “sound it out.”

So let’s see if we can tackle this beast for the next few posts.  Here’s what I plan to focus on:

  • What are the sound / letter combinations students should know?
  • Why are letter sounds and spelling them often difficult?
  • Do students know the difference between vowels and consonants?
  • What is the benefit of helping students know what their lips and tongue are doing as they make various letter sounds?
  • What are some of the best rules of phonics?
  • How many of the “rules” actually work?
  • There are many different ways a student can “sound out” a word. What are they?
  • What to do if a student’s only method is to sound out each letter one at a time?
  • What role do the 3 cueing systems play in reading instruction. How is phonics involved?
  • What are some helpful resources for the teacher as well as the students?
  • How often and what should be included in an explicit phonics lesson?
  • How can the teacher monitor a student’s progress with regard to phonics knowledge?
  • How can the teacher assist the parents so everyone is on the same page regarding helpful strategies?

Here are three wonderful easy to use systematic resources that will help us get started:

Free phonics lessons:Lots of words (and sentences) to practice each phonics skill. The phonics skill is also explained.

Free video phonics reading lessons:Watch the blending procedure and practice in short video clips.

Explicit Phonics Lessons (from W. Virginia):These lessons focus on how to physically articulate the sound (where is the tongue, what are the lips doing?) as well as an I do, we do, you do approach. An easy to implement routine.

Reading Routines Part 5: Phonics (OK Math and Reading Lady)This is a previous post of mine. We will revisit some of the comments made there throughout this series.

What phonics instruction concerns and questions do you have? Please feel free to comment (click on speech bubble at the top of this post). 

Reading Routines Part 5: Phonics

by C. Elkins, OK Math and Reading Lady

Research supports the fact that explicit systematic phonics instruction is highly beneficial to students. In other words, phonics instruction should make up part of the daily reading routine . . . especially in primary classrooms. Here is Reading Rockets take on the Alphabetic Principle: “Alphabetic principle is the idea that letters and letter patterns represent the sounds of spoken language. It differs from oral language and phonemic awareness because it is introducing students to letters and incorporating what they have already learned (sounds). It is showing them that the sounds they have learned have letters and can all be put together.” Here’s some more info from RRockets on this subject: Alphabetic Principle

Phonics instruction starts with matching letters with sounds as well as naming the letter. Here is a summary I wrote regarding some  fantastic research on alphabet learning (to change from the former letter-of-the-week method): Alphabet Letter / Sounds Research

  • Some of the most significant parts of the research for me was the realization that saying the letter name results in a variety of added vowel sounds such as short e sounds /em/ = m; /ef/ = f; or sometimes a long a /kay/ = k; /jay/ = j; or sometimes long e /dee/ = d; /tee/ = t; or something all together different such as /aich/ = h; /double u/ = w.
  • Sometimes the letter name is close to the sound assigned to it, and sometimes it’s not.
  • The research provides some evidence that letter of the day instruction with 5 to 6 cycles of instruction was very beneficial. Each cycle had a different focus such as letters common in the students’ names, most frequently used letters, by the ways letters are formed, etc.

In my last post on phonemic awareness (see Reading Routines Part 4), I shared the progession from sound boxes to letter boxes and included a couple of good videos. These are very helpful with cvc words and other one syllable words. The goal in all of this is to move from letter-by-letter sounding out to continuous blending and chunking.

So what do explicit phonics instructional programs look like? Although not set in stone, there is usually a progression of skills that look similar to this:

  • Letter and sound matching
  • CVC with short vowel practice
  • CVCe with long vowel practice
  • Beginning consonant blends
  • Beginning consonant digraphs
  • Vowel pairs
  • R controlled vowels
  • Vowel diphthongs
  • Multi-syllablic words

Starting in 2nd grade, the emphasis is more on the vowel patterns (such as different ways to spell the long a sound) as well as consonant combinations, both beginning and ending (such as ck, ng, str). Grades 3 and above focus on these as well, but improve and apply to multi-syllablic words. Most textbooks have a daily phonics lessons to help you keep your instructional explicit and systematic.

These are at the core of all phonics instructional programs:

  • Connecting phonics instruction to weekly spelling patterns and learning centers helps students practice a specific set of words and apply the skill to other similar words.
  • Moving away from sounding out words letter-by-letter to try continuous blending and chunking (by looking for common parts or patterns)
  • Using knowledge of one syllable words to apply to multi-syllablic words
  • Relating known words to new words (often called an Analogy Strategy). Here is an example I used with a 5th grader recently who was trying to read the word “wren” in a portion of text. Obviously this bird species is not well known, and the context didn’t help her with the pronunciation.  I just simply wrote the word “write” on my little white board because I was positive she knew it – and she recognized it immediately. Then I said, “Use what you know about this word (write) to help with the word in your text.” She was able to make the analogy quickly! I didn’t have to go into a phonics lesson on how to pronounce words with wr, etc.

Your phonics instruction is strengthened via fix-it strategies which are embedded in your day-to-day teaching situations (guided reading, etc.). Here is a link to my fix-it-strategies post: Decoding fix-it-strategies Continue reading

Reading Routines Part 4: Phonemic Awareness

by C. Elkins, OK Math and Reading Lady

This is Part 4 of a series about daily reading routines I recommend. Previously we have looked at read alouds, independent reading, and phonological awareness. Today’s focus is Phonemic Awareness. Some videos and freebies via TPT are linked below.

See link #3 below for FREE task cards from TPT

Phonemic Awareness is under the umbrella of phonological awareness. This encompasses pre-reading skills associated with the sounds of language. Phonemic awareness is the part dealing with individual phonemes and how they can be identified, segmented, blended, and manipulated to create recognizable units or words . . . . the auditory portion. Students need a firm foundation with this aspect before they can adequately apply it to phonics and reading (which is where the visual aspects of the letters that make these sounds appears). So here are some basics about phonemic awareness:

  • Phonemes are the basic sound units. In the English language there are 44 of them (the consonants, the vowels, digraphs, etc.). Here is a good, short list from Orchestrating Success in Reading by Dawn Reithaug (2002).: 44 Phonemes However, if you want to go more in depth, then this link should satisfy your curiosity (or make you want to quit teaching spelling) from The Reading Well44 Phonemes in Detail
  • Onsets/rimes:  The onset is the part of the word before the vowel. The rime is the part of the word including and after the vowel. Examples: In the word shop, /sh/ is the onset and /op/ is the rime. In the word bed, /b/ is the onset and /ed/ is the rime.
  • Identifying: When presented with a word orally, can a student identify the beginning sound or ending sound? Example: What is the beginning sound in the word moon? /m/.  What is the last sound in the word jump? /p/. The brackets are used to represent the sound – the child is not asked to name the letter.
  • Segmenting: When presented with these words, can a student take the parts or individual sounds apart orally (segment)? Examples: bed = /b/ + /ed/ or /b/ + /e/ + /d/.  Students would NOT be asked at this point to identify the letters that make those sounds, just the sounds.
  • Blending: When presented with these sounds, can a student put them together orally (blend) to form a word?  Examples:  /k/ + /at/ = cat; or /sh/ + /o/ + /p/ = shop
  • Manipulating:  This involves adding, deleting, or substituting sounds. Example:  What is /ap/ with /m/ added to the beginning? (map). What is /land/ without the /l/ sound? (and).  Change the /b/ in bed to /r/. . . (red).

Daily teaching routine for Phonemic Awareness:

  1. If using a reading series, check to see if there is a daily practice with words (like the examples above). Just a few minutes with the whole class is a good introduction and chance for you to observe / listen to who is or is not grasping these tasks.
  2. Use simple pictures (such as fox): Ask students to do some of the following when you feel they are ready:
    • Name the picture and tell the onset and rime. /f/ + /ox/
    • Orally say all of the separate sounds /f/ + /o/ + /ks/.  Use the length of your arm for these cvc words: tap shoulder and say /f/; tap inside elbow and say /o/; tap the wrist and say /ks/.  Then run your hand along the whole arm to blend them back together.
    • Use an Elkonin sound box to show the distinct sounds. For fox, use a 3-part box. Push a chip into each box as each sound is being made (no letters yet, just chips, beans, cubes, pennies, etc.). Then blend all the sounds together. (I like to put an arrow at the bottom of the boxes and run my finger along it to remind students with a visual that the last step is to blend the sounds together.)
    • Change the /f/ to /b/. What word does that sound like? /b/ + /o/ + /ks/ = /box/
    • Change the /ks/ to /g/. What word does that sound like? /f/ + /o/ + /g/ = /fog/
    • Change the /o/ to /i/. What word does that sound like? /f/ + /i/ + /ks/ = /fix/
    • If you remove the /f/ sound, what is left? /oks/ or /ox/
    • Be sure to use short and long vowel words, digraphs, etc. because it’s all about hearing the separate parts – not about matching up the letters that make those sounds.
  3. Follow up these same routines during guided reading and work station time. Here are 2 links from TPT (FREE) with some great sound box practice opportunities:

Here is a great short video I recommend regarding the Elkonin sound boxes: Sound boxes

When you are ready to progress from sound boxes to letter boxes, these two videos should be very helpful.

These routines will be very important once you feel they are ready to associate the letter(s) that make these sounds (via phonics, spelling, and writing). A phonics routine will be the next topic. So stay tuned!

Reading Routines Part 3: Phonological Awareness

by C. Elkins, OK Math and Reading Lady

Daily explicit routines regarding phonological awareness and phonics are important, especially for KG-2nd grade levels (and beyond for those who are in need of extra intervention). Whether you are utilizing the textbook’s recommended lesson plan or seeking out on your own, I’d like to advocate for a daily routine to teach and/or practice these skills. In this post, I will focus mostly on teaching early phonological awareness routines and how they are connected to later reading, spelling, and writing success.

Phonological Awareness encompasses pre-reading skills associated with the sounds of language. If you have assessed this at the PreK-2nd grade levels, you know part of the assessment involves identifying spoken words, rhymes, syllables, onsets/rimes, and identifying, segmenting, blending, and substituting phonemes. Phonemic awareness is under the umbrella of phonological awareness with more of a focus on the latter part (onsets/rimes, and identifying, segmenting, blending, and manipulating phonemes). All of this, regardless, is based on SOUNDS only. This awareness is AUDITORY and not print related.

My opinion regarding this daily routine, is for a whole class explicit 10-15 minute lesson. During the whole class daily routine, keep mental tabs or quick notes on who has difficulty so you can follow up during small group and learning station opportunities throughout the week. Try video taping your routine for those “extra eyes.” See a link to some FREE research-based activities at the end of this post.

Spoken Words: 

I have observed frequently that young students do not always know the difference between letters, words, and sentences. I usually discover this via writing lessons. Wonder why students don’t space between words? Or spread letters within a word far apart? I think it may go back to a misunderstanding about this very basic phonological awareness concept.

The assessment for this involves the teacher stating a sentence and the child pushes chips or pennies to indicate how many words were heard. Usually this isn’t too difficult until the teacher utters a 2-syllable word. Does the child understand this to be one or two words?

Believe it or not, this is a huge key concept later when the child is reading text. You may discover errors with 1-to-1 correspondence. When reading this sentence: “The apple is good.” does the child keep their finger on apple until the word is finished, or do they move their finger for each syllable? And then, as mentioned previously, it also becomes a hindrance when writing.

As you can see then, concept of spoken word is closely tied to the understanding of syllables. The number of syllables per word is determined by the number of vowel sounds heard. Friend = 1 syllable. Funny = 2 syllables. There are several ways to count them:

  • Clap or snap each syllable
  • Count with fingers
  • Feel the jaw move

Why is knowledge about hearing syllables important to later reading skills?

  • Breaking apart words by syllables is an important reading strategy. Can the child visually see the syllable and then pronounce each part as if it was a little word (example: yes-ter-day).
  • Breaking apart words by syllables is an important spelling and writing strategy.  Hearing the sounds of the word is just as important as the visual aspects of the word. Trying to spell the word important? Can I hear the parts /im/ + /por/ + /tant/? If I can hear them, I can come closer to spelling them.

Daily teaching routine for Spoken Word and Syllables:

  1. Present a sentence orally. Step 1:  Students repeat the sentence. Step 2: Have them do one of the following to indicate # of spoken words:  clap, stomp, use magnetic chips on a the board, unifix cubes, count with fingers, or select a # of students to match the # of words and they each stand to say one of the words in the sentence – they become the sentence.
  2. State a word and have students clap, snap, or count # of syllables.
  3. Hand out picture cards and have students group together by # of syllables.

Rhyme: Continue reading

Reading Fix-it Strategies: Part 4 (Decoding)

by C. Elkins, OK Math and Reading Lady

Here are 12 decoding strategies you might like. These show various ways to help students break apart, analyze, and relate to known words. I only recommend sounding out words letter-by-letter in a few limited situations. Beginning readers do this to apply newly learned letter-sound knowledge. It is a successful method for cvc words and other small words which follow the phonics rules. However, if this is the child’s main method of reading, it begins to become unproductive and impede fluency. In addition to prompting students for meaning or use of structure (see Fix-it Strategies parts 1 and 2), try some of these strategies to help children decode words.

  1. Help the child think of a word that makes sense which also begins with that letter(s).alligator
  2. Use the picture and the first letter to help predict the word. Example: The alligator is green. I know it’s not crocodile because the word begins with the letter a.
  3. On a word which can be predicted using the meaning and structure of the story, show a student how to cover up the end of the word (with their finger) to “force” the student to focus on the beginning letter or blend. Or use a post-it note over everything except the first letter or blend. The cloze procedure works well here. For example: “The first time I got on an airplane I was feeling sc_____.” A student probably doesn’t need to even see the rest of the word to predict it says “scared.”
  4. Limit “sounding out” to highly predictable words. Use Elkonin sound boxes for students to “push” sounds of words and then blend them together. Click on this link to see a video of this process: Elkonin Sound Boxes When ready, replace chips with letter tiles.
  5. Use “continuous blending.”  The reader slowly blends the sounds together instead of segmenting one at a time.  Example with cat:  Instead of /k/ + /a/ + /t/ it might sound like /kaaat/.
  6. Show the student how to cover up parts of words to isolate known syllables, base words, or word parts.
    • Candy: look for known word part –and (or can)
    • Jumping: look for base word jump
    • Herself: look for compound words
  7. Help student relate the tricky word to another that is similar (word analogy). If a child is struggling with a word, it is often helpful to write a simple known word (on a handy small whiteboard) to see if they can relate the known to the new.
    • For week: You know we so this word is . . .
    • For star: You know are so this word is . . .
    • For chat: You know cat so this word is . . .
    • For dress: You know yes so this word is . . .
    • For perfect: You know her so this word is . . .
    • For wreck: You know write so this word is . . .
  8. Sometimes a student gets a word on one page and not another. Help them notice when this happens. “You read this word correctly on page 2. What did it say on page 2? Try it here on page 5.”
  9. Teach children to look for chunks and break the word apart. Example: For standing break into /st/ + /and/ + /ing/. Children will learn more of these “chunks” through spelling instruction. Or, make new words using word families so they can see similar chunks, such as: -ame, -ell, – ick, -oat, -ug
  10. Tell the child to “flip the vowel.” This means if they try one sound and it doesn’t make sense, to try the other sound the vowel makes. This is a quick prompt without the teacher going into a mini-lesson on vowel rules. As a visual reminder, I flip the palm of my hand from one side to the other.
  11. For single or multi-syllabic words, practice these generalizations:
    • Closed syllable:  If a single vowel is “closed in” with consonants on each side, the vowel sound is usually short (tub, flat, bas-ket, lim-it, in-spect). This generalization often applies to vc syllables in which the consonant ends the syllable.
    • Open syllable: If a vowel ends the word or syllable, it is considered “open.” In this case, the vowel usually makes the long sound (be, go, be-gin, o-pen, ta-ble, cho-sen)
    • Two vowels in a syllable? Most often the vowel will produce the long sound (this includes vowel digraphs and the vce pattern such as coat, cone, treat-ing).
  12. Practice word sorting, so children can visually discriminate between words /patterns.

For those of you who use Journeys (Houghton Mifflin), you can access word study/spelling cards for sorting only through Think Central. Go to teacher resources, then choose the “Literacy and Language Guide.” Click on the word study link to find them.

As I mentioned in other posts, when the child is reading text let them complete the sentence before prompting for uncorrected errors. This is because the child’s use of the meaning and structural systems are huge. The visual aspect of a word is meant to help them confirm – not drive their system of reading. See previous posts (Fix-it Strategies parts 1-3 and freebies) for more information.

Have a great week!  Cindy