Interactive math lessons and activities on NCTM

Review by C. Elkins, OK Math and Reading Lady

Resource – http://illuminations.nctm.org

This is a math resource I absolutely love! It is a product of the National Council for the Teachers of Mathematics (NCTM).

This site includes lesson plans and interactive activities. Search in several ways: by topic, by standard, or by grade level. Need some strategy games? Check out “Calculation Nation” (some of which can be played against other players), and “Brain Teasers.” I have just added this link to my Resources page (on my blog home page).  Pass this along to parents for them to use with their children at home!

Many of the lessons connect to exploration projects and literature. The interactive features are outstanding!! These are perfect for the smartboard, on laptops, or tablets. Doing Zoom lessons? Then these are also wonderful for sharing the screen to introduce or review concepts. Once you are on the home screen, click the Interactives box (right side) and then the desired grade level. There are dozens of great applets, but here are a few you might really like. I have linked them for easy reference, so just click on the  title and you’ll be there:

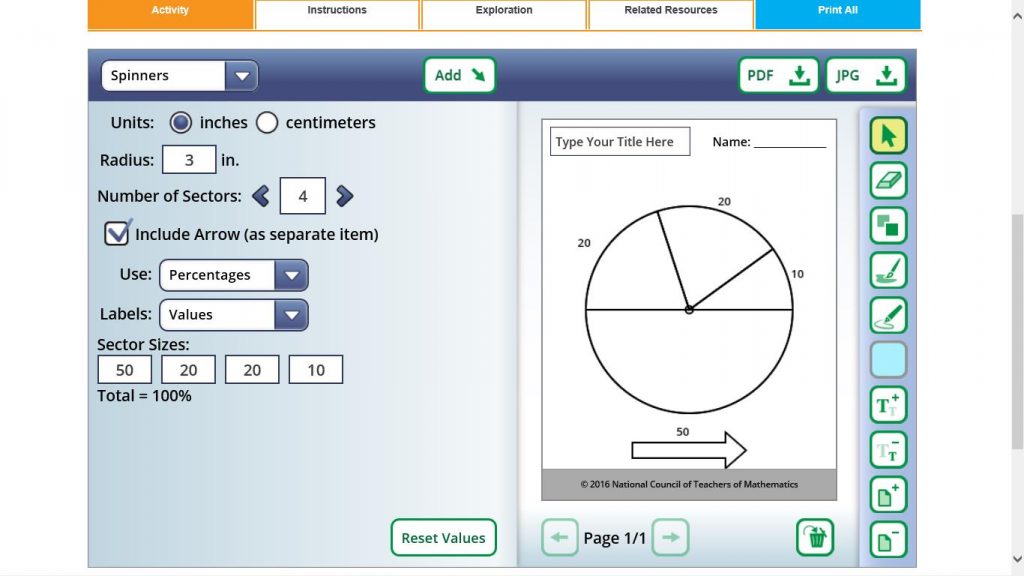
Dynamic Paper: Customize graph paper, number lines, spinners, nets, number grids, shapes (to include pattern blocks, color tiles, and attribute blocks), and tessellations. You can also choose inches or cm. These can be customized, saved and printed as jpeg or pdf. I created the spinner shown here from this application.

Five Frame and Ten Frame tools: Geat activities to build number sense using five or ten frames. These may take 1-2 minutes to load.

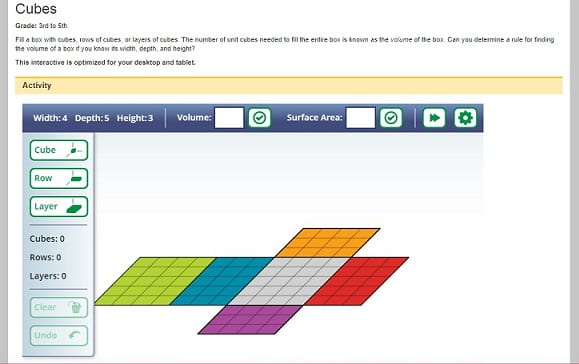
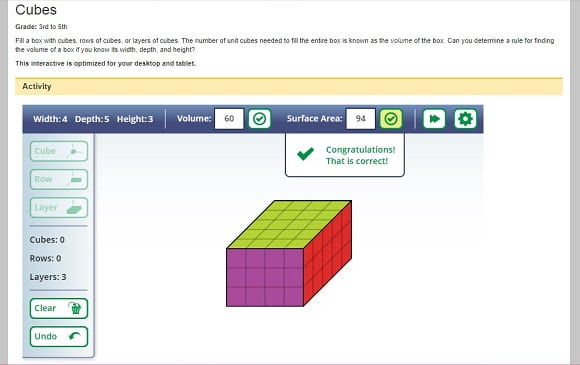
Cubes: Build a rectangular prism one cube, or row, or layer at a time and then compute the volume or surface area.

Coin Box: Drag and exchange coins. There is also a feature I like (the grid at the bottom right corner), which puts coins in blocks (by 1s for pennies, 5s for nickels, 10s for dimes, and 25s for quarters). This really helps see the value of the coins. Want more info about coin blocks? Once on the Coin Box page, click on the “Related Resources” tab.

Try these for fractions: Fraction Models (which includes decimal and percent equivalencies) and the Fraction Game.

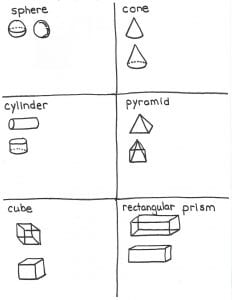
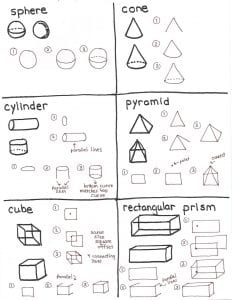
Geometric Solids: Create a shape (either transparent or solid) and swivel it around to see all of the faces, vertices, and edges. It has a cube and pyramid as far as basic 3D shapes are concerned. I wish it had more that 3rd-5th students would encounter.

Here’s a nice multiplication game:  Product Game  Two players (or a player vs. the computer) choose factors from the bottom bar to create products shown on the game board grid to get 4 in a row (and try to block your opponent from getting 4 in a row).  Be sure to see the directions included.

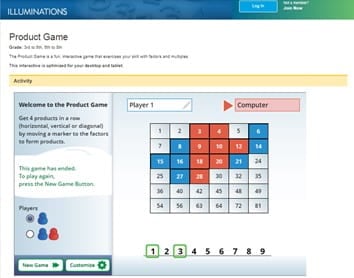
Some of the interactives require an NCTM subscription.  The ones I have listed above should be okay to access without membership. I have subscribed for years and just paid $94 for this coming year. Well worth it if you plan on using their site extensively.  This subscription also entitles you to a print and and online journal, blog capabilities, and more.

Enjoy these and so many more!!! Let us know if there are others you recommend.  I’ll highlight more on my next post.


Geometry Websites

by C. Elkins, OK Math and Reading Lady

There are several great math websites which might help you and your students with geometry and measurement standards such as area, perimeter, volume, surface area, angles, etc.  The ones I am recommending are interactive and often customizable.  Check them out!! (Each title can be clicked to take you directly to the linked website.)

  1. Geoboard by The Math Learning Center:  I love the concept of geoboards to help children create polygons and measure area and perimeter.  However, most teachers have ditched their physical geoboards. They are often in boxes relegated to the basement storage areas.  I get it, though.  They take up a lot of shelf space in the class, there aren’t enough rubber bands to go around (aka geobands), the kids misuse them or break them, they don’t stretch far enough, the pegs get broken, etc.

I think you will LOVE this app. 
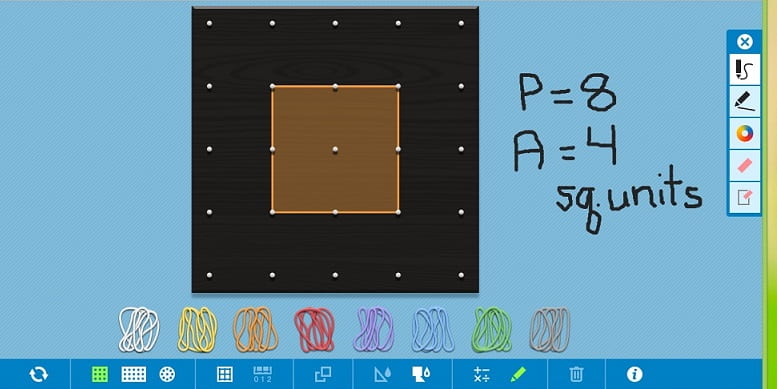
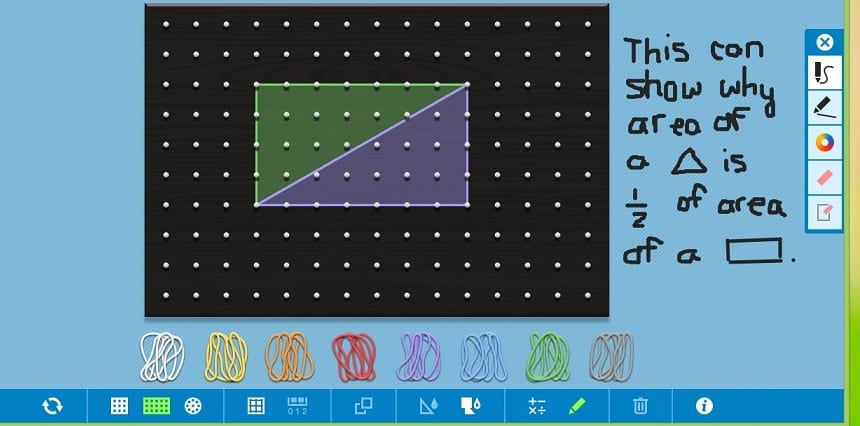
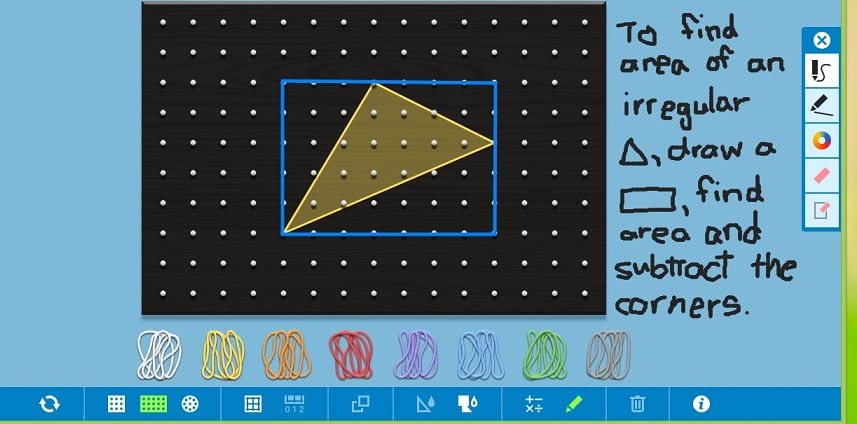
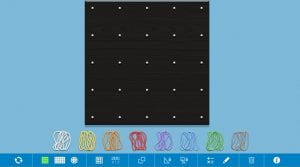
Check out the little “i” on how to get the most use out of it, but it has 2 variations for the board size and you can show it with/without gridlines or numbers. There are different colored bands which you drag to the board and stretch to whichever pegs you need. You can shade in areas, copy, and rotate (which is helpful to see if 2 similar shapes are equivalent). There is also a drawing palette in case you want to freehand something or draw lines (and with different colors as well).

What are the possibilities with this?

  • Use with primary students to create squares, rectangles, and other polygons. The teacher can elicit different responses with directions such as:  Make a square. Make a different size square. Make a trapezoid. Are any of our trapezoids the same?
  • Creations can sometimes be recorded on dot paper – although I would reserve this for less-complicated shapes.
  • Count the pegs around the shape to determine perimeter. The teacher might ask students to create a rectangle with a perimeter of 10 (or 12, or another amount). How many different ways are there? Be cautious with diagonal connections because they are not equivalent to vertical or horizontal connections. Think of how you can get students to discover this without just telling them.
  • Show the gridlines to help students determine area.  Initially,  students may just count the squares inside the shape. Guide students to more efficient ways to figure this (multiplying, decomposing into smaller sections, etc.).
  • This app is also great for creating irregular shapes in which students may decompose into smaller rectangles or triangles. Then check them with the standard formulas.

2. “Cubes” at NCTM’s site (Illuminations):  This one is perfect for volume and surface area.

  • Volume:  You can use the gear symbol to select the size (l, w, and h) of the rectangular prism, or use the default ones shown. Then there are 3 tools used to fill the rectangular prism:  individual cubes, rows of cubes, or layers of cubes. I prefer using the layer tool to support the formula for volume as:  area of the base x height.  The base is the bottom layer (which can be determined by looking at the length x the width). The height is the number of layers needed to fill the prism. Once you compute the volume, enter it and check to see if it is correct.
  • Surface Area of Rectangular Prism:  To calculate the surface area, you must find the the area of each face of the prism. Again, you can customize the size using the gear tool.  I prefer this as the shapes shown randomly often are too small to see. Yes, there is a formula for surface area — but conceptually we want students to note the surface area can be thought of in three parts. With a click on each face, this app opens (or closes) a rectangular prism into the 6-faced net making it easier to see the equal sized sections:
    • Area of the front and area of the back are the same
    • Area of the top and area of the bottom are the same
    • Area of each side is the same
    • Be sure to explore what happens when the prism is a cube.

3.Surface area with Desmos:  This link provides an interactive experience with surface area, using a net. This time, the three visible faces of the prism are color coded, which helps with identifying top / bottom; front / back; and side / side. The prisms on this site are also able to be changed so students can see how altering one dimension affects the surface area.

4. “Lines” on GeoGebra

5. “Angles” on GeoGebra

6. “Plane Figures” on GeoGebra

These three may be more relevant to middle school math standards.  Check them out!!  Also take a look at the “Resources” link (left side of web page).  There are plenty of other good links for arithmetic standards as well – too many to list here.  You may have to create a log-in, but it’s FREE!

Enjoy!  Do you have other websites to recommend? Let us know.

Geometry Part 5: Composing and Decomposing 3D Shapes (+ surface area)

by C. Elkins, OK Math and Reading Lady

Composing and decomposing 3D shapes should help your students become more familiar with their attributes. Here are a few activities to help.  With emphasis on hands-on methods, examining real 3D shapes may help students find edges, vertices, and faces better than pictorial models.

  1.  Nets of 3D shapes are the least expensive way to get a set of 3D objects in each child’s hand, especially since most classrooms just usually have 1 set of plastic or wooden 3D shapes.
  2.  Build cubes and rectangular prisms using blocks or connecting cubes.
  3. Construct / deconstruct prisms using toothpicks, straws, coffee stirrers, craft sticks, or pretzel sticks as the edges. For the vertices, use clay, playdough, gum drops or slightly dried out marshmallows.
  4. Lucky enough to have a set of tinker toys? Or Magna Tiles? (We got our grandson some Magna Tiles and he loves them!  These tiles have magnetic edges which can hook together in an instant. Creating a cube, rectangular prism, pyramid, etc. is easy!  They are kind of expensive, but very versatile and creative.)
  5. Teach students how to draw 3D shapes. When composing a 3D shape, a student becomes more aware of the 2D faces, the edges, and the vertices they are drawing. Plus, if needed the student can draw the 3D shape on paper to assist them if taking a computer based assessment.  Here is my tutorial (below), but I’ll also include a couple of good websites in case you are 3D challenged. Click HERE for the pdf of the templates below.
  6. Observe how students count the edges, vertices, and faces.  If they are randomly trying to count them, they likely will be incorrect.  When needed, show them how to be methodical with their counting (ie: When counting the edges of a cube, run your finger along the edge as you count. Count the top 4 edges, then the bottom 4 edges, then the 4 vertical edges = 12.)

One of my favorite lessons regarding decomposing shapes is when teaching students (5th grade and up) how to measure surface area.  Click HERE for the free pdf guide for creating the rectangular prisms shown below.  It includes a blank grid so you can create your own (all courtesy of http:illuminations.nctm.org using their “dynamic paper” lesson). Continue reading