by C. Elkins, OK Math and Reading Lady
When working with students on geometry lessons involving angles and lines, I notice many misconceptions. So . . . I thought I would share them with you on this post. Some activity ideas and freebies are located at the end of this post.
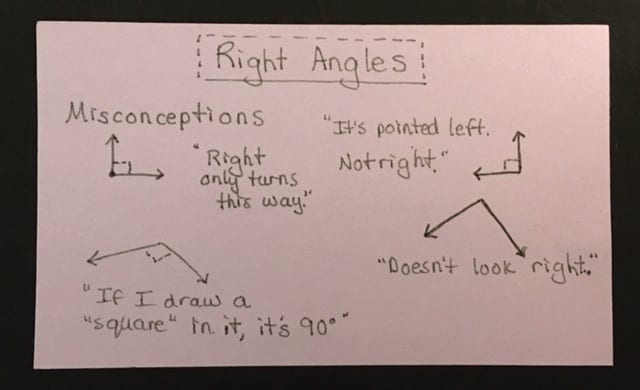
Right Angles:
- Students can only see the 90° angle if it is presented in the direction as a capital L.
- Try turning the angles in different positions.
- It is still considered a “right” angle even though it is turned to the left, up, or down.
- Students are told if they can draw a square inside the angle, then it is a right angle. So if it looks “squarish” to them, they think it’s a right angle.
- Show them how to put the square corner of a piece of paper or index card into the angle to check. Take time to have them practice – don’t assume they know how.
- Show them how to put the square corner of a piece of paper or index card into the angle to check. Take time to have them practice – don’t assume they know how.
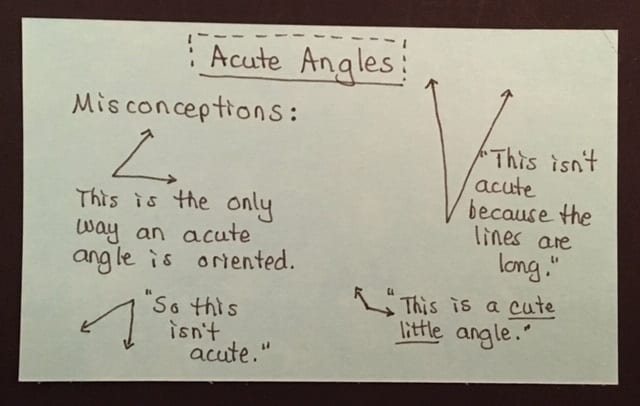
Acute Angles (angles less than 90°):
- Students often can’t tell if the angle is <90° if it is oriented upside down or if one of the rays is not aligned horizontally.
- Show how to put the square corner of a piece of paper into the angle to check. If the paper covers up the angle, it is <90°.
- Students are told an acute angle “is a cute little angle.” I am guilty of having done this in the past. But if a student sees any angle made up of short lines, they may interpret it as “little” or acute.
- Remind them it’s the size of the angle that makes it acute, not the size of the lines.
- While right angles are exactly 90°, students may expect an acute angle to be given a specific number.
- Acute angles range from 1° to 89°.
- Acute angles range from 1° to 89°.
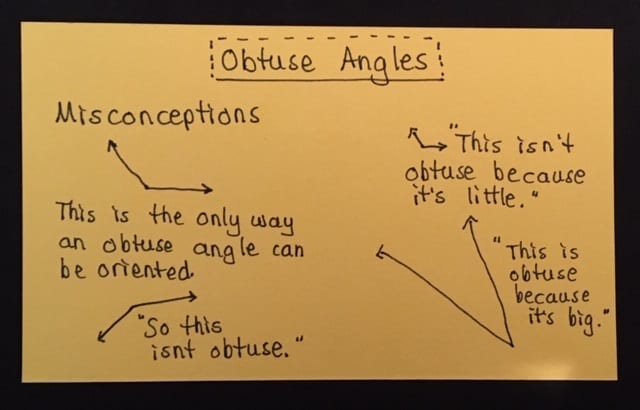
Obtuse Angles (angles greater than 90°):
- Students often can’t tell if the angle is >90° if it is oriented upside down or if one of the rays is not aligned horizontally.
- Show how to put the square corner of a piece of paper into the angle to check. If the ray is wider than the paper corner, it is >90°.
- Students are told an obtuse angle is big, and may classify an angle with long rays as obtuse (because it is a large picture).
- Remind them it’s the size of the angle that makes it obtuse, not the size of the lines.
- While right angles are exactly 90°, students may expect an obtuse angle to be given a specific number.
- Obtuse angles range from 91° to 179°.
- Obtuse angles range from 91° to 179°.
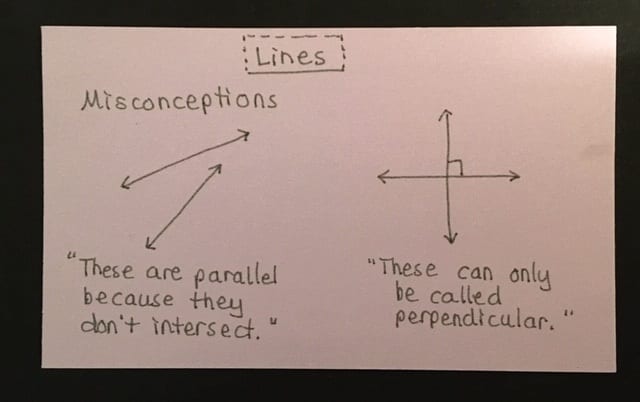
Lines: Parallel, Perpendicular, Intersecting
- Students get the terms parallel and perpendicular confused.
- Notice the word “parallel” has a set of parallel lines in the word (the two l’s).
- Students may see two lines and assume they are parallel just because they are not intersecting.
- Remind them that parallel lines are those who are the same distance apart.
- Show that 2 non-intersecting, non-parallel lines would intersect if you extended their lines.
- Students think lines must be intersecting OR perpendicular.
- Show them that all perpendicular lines are also intersecting lines, but not all intersecting lines are perpendicular.
- Perpendicular lines are a special type of intersecting line (with 90° angles).
Some good hands-on activities:
- Locate angles and lines of all types in the classroom.
- Bring in pictures and/or photographs of different lines and angles for collages or posters. Architectural features would be an excellent source.
- Create them with toothpicks, chenille stems, craft sticks, paper strips with brads, etc. BUT, help students see that acute and obtuse angles can be turned different directions and come in different sizes (acute angles range from 1° to 89° and obtuse range from 91° to 179°).
- Using an analog clock, name times in which the hour and minute hands form acute angles, right angles, obtuse angles, and straight angles. Here are some examples:
- Acute angles: 1:00, 2:00, 6:20
- Obtuse angles: 4:00, 8:00, 1:30
- Right angles: 3:00, 9:00, 12:15 (approximately)
- Straight angles: 6:00, 12:30 (approximately — or 12:32 exactly due to hour hand placement)
- Use a map of the United States to classify states according to the type of angles in their borders.
- Which states have right angles?
- Which states have acute angles?
- Which states have obtuse angles?
- Do any states have all 3 types?
- Using the capital letters of the printed standard alphabet, classify them by the types of lines and angles. Provide individual copies of the printed alphabet to each student (or pair of students). Click here for a FREE recording sheet: Classify Letters of the Alphabet CE:
- Here is a FREE measuring angles partner game called “Tangling with Angles .” A student draws an angle. Partner names the type of angle and estimates the measurement. Points are earned based on the difference between the estimate and the actual measurement. The partner with the least number of points is the winner.
- This is a good set of posters by Kathleen and Mande Lines and Angles Posters $2.25 @ TPT
Share some of your favorite lines and angles teaching points or activities!!