Printing at home for less

by C. Elkins, OK Math and Reading Lady

I am unable to add a new blog post today, so I am slipping in a previous post that might be helpful and save you $$ on printing!

Do you want to make task cards and cool colorful activities for your students, but can’t afford the cost of the color ink to print these things? I feel I just have to pass this tip along to you because it has been a real money saver for me.

When I bought an HP home printer, I enrolled in their HP Instant Ink plan hoping it would save me money on ink costs. With an HP Instant Ink plan, I can choose a 50 page a month plan ($2.99), a 100 page a month plan ($4.99), or a 300 page a month plan ($9.99). The best thing is that I can print color or black, whatever I choose, and HP monitors my usage (via wireless) so I can check at any time. There’s no extra cost for printing in color!! When the system sees I’m getting low on ink, they mail new cartridges to me in plenty of time so I never run out. And they provide an envelope to return the used cartridges. Any unused pages are rolled over to the next month. If I go over the allotted pages, I am billed $1 per each set of 20-25 pages.

I can cancel or change plans any time I want to. For example, during the school year I use the 300 page plan each month, but during the summer months, I use the 50 or 100 page plan. In essence you are paying for the number of pages you print, and not the ink cartridges.

Because I think it’s such a great plan, I want to pass along the information. If you are interested, click on the link below. If you enroll (check to make sure your printer is eligible) using my link below please, you will get 1 month free (and so will I).

USE GOOGLE CHROME or FIREFOX for this link ——————— NOT INTERNET EXPLORER

Click this link for more info. If you sign up, we will each get 1 free month: try.hpinstantink.com/gLHdm  

I am not getting paid to make this statement (other than bill credit if you enroll)– just trying to help us all out with teaching expenses any way I can!

Be sure to check out my new links to my free downloads (in the black bar on the home page).

Cindy Elkins – OK Math and Reading Lady

Reading Routines Part 5: Phonics

by C. Elkins, OK Math and Reading Lady

Research supports the fact that explicit systematic phonics instruction is highly beneficial to students. In other words, phonics instruction should make up part of the daily reading routine . . . especially in primary classrooms. Here is Reading Rockets take on the Alphabetic Principle: “Alphabetic principle is the idea that letters and letter patterns represent the sounds of spoken language. It differs from oral language and phonemic awareness because it is introducing students to letters and incorporating what they have already learned (sounds). It is showing them that the sounds they have learned have letters and can all be put together.” Here’s some more info from RRockets on this subject: Alphabetic Principle

Phonics instruction starts with matching letters with sounds as well as naming the letter. Here is a summary I wrote regarding some  fantastic research on alphabet learning (to change from the former letter-of-the-week method): Alphabet Letter / Sounds Research

  • Some of the most significant parts of the research for me was the realization that saying the letter name results in a variety of added vowel sounds such as short e sounds /em/ = m; /ef/ = f; or sometimes a long a /kay/ = k; /jay/ = j; or sometimes long e /dee/ = d; /tee/ = t; or something all together different such as /aich/ = h; /double u/ = w.
  • Sometimes the letter name is close to the sound assigned to it, and sometimes it’s not.
  • The research provides some evidence that letter of the day instruction with 5 to 6 cycles of instruction was very beneficial. Each cycle had a different focus such as letters common in the students’ names, most frequently used letters, by the ways letters are formed, etc.

In my last post on phonemic awareness (see Reading Routines Part 4), I shared the progession from sound boxes to letter boxes and included a couple of good videos. These are very helpful with cvc words and other one syllable words. The goal in all of this is to move from letter-by-letter sounding out to continuous blending and chunking.

So what do explicit phonics instructional programs look like? Although not set in stone, there is usually a progression of skills that look similar to this:

  • Letter and sound matching
  • CVC with short vowel practice
  • CVCe with long vowel practice
  • Beginning consonant blends
  • Beginning consonant digraphs
  • Vowel pairs
  • R controlled vowels
  • Vowel diphthongs
  • Multi-syllablic words

Starting in 2nd grade, the emphasis is more on the vowel patterns (such as different ways to spell the long a sound) as well as consonant combinations, both beginning and ending (such as ck, ng, str). Grades 3 and above focus on these as well, but improve and apply to multi-syllablic words. Most textbooks have a daily phonics lessons to help you keep your instructional explicit and systematic.

These are at the core of all phonics instructional programs:

  • Connecting phonics instruction to weekly spelling patterns and learning centers helps students practice a specific set of words and apply the skill to other similar words.
  • Moving away from sounding out words letter-by-letter to try continuous blending and chunking (by looking for common parts or patterns)
  • Using knowledge of one syllable words to apply to multi-syllablic words
  • Relating known words to new words (often called an Analogy Strategy). Here is an example I used with a 5th grader recently who was trying to read the word “wren” in a portion of text. Obviously this bird species is not well known, and the context didn’t help her with the pronunciation.  I just simply wrote the word “write” on my little white board because I was positive she knew it – and she recognized it immediately. Then I said, “Use what you know about this word (write) to help with the word in your text.” She was able to make the analogy quickly! I didn’t have to go into a phonics lesson on how to pronounce words with wr, etc.

Your phonics instruction is strengthened via fix-it strategies which are embedded in your day-to-day teaching situations (guided reading, etc.). Here is a link to my fix-it-strategies post: Decoding fix-it-strategies Continue reading

Reading Routines Part 4: Phonemic Awareness

by C. Elkins, OK Math and Reading Lady

This is Part 4 of a series about daily reading routines I recommend. Previously we have looked at read alouds, independent reading, and phonological awareness. Today’s focus is Phonemic Awareness. Some videos and freebies via TPT are linked below.

See link #3 below for FREE task cards from TPT

Phonemic Awareness is under the umbrella of phonological awareness. This encompasses pre-reading skills associated with the sounds of language. Phonemic awareness is the part dealing with individual phonemes and how they can be identified, segmented, blended, and manipulated to create recognizable units or words . . . . the auditory portion. Students need a firm foundation with this aspect before they can adequately apply it to phonics and reading (which is where the visual aspects of the letters that make these sounds appears). So here are some basics about phonemic awareness:

  • Phonemes are the basic sound units. In the English language there are 44 of them (the consonants, the vowels, digraphs, etc.). Here is a good, short list from Orchestrating Success in Reading by Dawn Reithaug (2002).: 44 Phonemes However, if you want to go more in depth, then this link should satisfy your curiosity (or make you want to quit teaching spelling) from The Reading Well44 Phonemes in Detail
  • Onsets/rimes:  The onset is the part of the word before the vowel. The rime is the part of the word including and after the vowel. Examples: In the word shop, /sh/ is the onset and /op/ is the rime. In the word bed, /b/ is the onset and /ed/ is the rime.
  • Identifying: When presented with a word orally, can a student identify the beginning sound or ending sound? Example: What is the beginning sound in the word moon? /m/.  What is the last sound in the word jump? /p/. The brackets are used to represent the sound – the child is not asked to name the letter.
  • Segmenting: When presented with these words, can a student take the parts or individual sounds apart orally (segment)? Examples: bed = /b/ + /ed/ or /b/ + /e/ + /d/.  Students would NOT be asked at this point to identify the letters that make those sounds, just the sounds.
  • Blending: When presented with these sounds, can a student put them together orally (blend) to form a word?  Examples:  /k/ + /at/ = cat; or /sh/ + /o/ + /p/ = shop
  • Manipulating:  This involves adding, deleting, or substituting sounds. Example:  What is /ap/ with /m/ added to the beginning? (map). What is /land/ without the /l/ sound? (and).  Change the /b/ in bed to /r/. . . (red).

Daily teaching routine for Phonemic Awareness:

  1. If using a reading series, check to see if there is a daily practice with words (like the examples above). Just a few minutes with the whole class is a good introduction and chance for you to observe / listen to who is or is not grasping these tasks.
  2. Use simple pictures (such as fox): Ask students to do some of the following when you feel they are ready:
    • Name the picture and tell the onset and rime. /f/ + /ox/
    • Orally say all of the separate sounds /f/ + /o/ + /ks/.  Use the length of your arm for these cvc words: tap shoulder and say /f/; tap inside elbow and say /o/; tap the wrist and say /ks/.  Then run your hand along the whole arm to blend them back together.
    • Use an Elkonin sound box to show the distinct sounds. For fox, use a 3-part box. Push a chip into each box as each sound is being made (no letters yet, just chips, beans, cubes, pennies, etc.). Then blend all the sounds together. (I like to put an arrow at the bottom of the boxes and run my finger along it to remind students with a visual that the last step is to blend the sounds together.)
    • Change the /f/ to /b/. What word does that sound like? /b/ + /o/ + /ks/ = /box/
    • Change the /ks/ to /g/. What word does that sound like? /f/ + /o/ + /g/ = /fog/
    • Change the /o/ to /i/. What word does that sound like? /f/ + /i/ + /ks/ = /fix/
    • If you remove the /f/ sound, what is left? /oks/ or /ox/
    • Be sure to use short and long vowel words, digraphs, etc. because it’s all about hearing the separate parts – not about matching up the letters that make those sounds.
  3. Follow up these same routines during guided reading and work station time. Here are 2 links from TPT (FREE) with some great sound box practice opportunities:

Here is a great short video I recommend regarding the Elkonin sound boxes: Sound boxes

When you are ready to progress from sound boxes to letter boxes, these two videos should be very helpful.

These routines will be very important once you feel they are ready to associate the letter(s) that make these sounds (via phonics, spelling, and writing). A phonics routine will be the next topic. So stay tuned!

Reading Routines Part 3: Phonological Awareness

by C. Elkins, OK Math and Reading Lady

Daily explicit routines regarding phonological awareness and phonics are important, especially for KG-2nd grade levels (and beyond for those who are in need of extra intervention). Whether you are utilizing the textbook’s recommended lesson plan or seeking out on your own, I’d like to advocate for a daily routine to teach and/or practice these skills. In this post, I will focus mostly on teaching early phonological awareness routines and how they are connected to later reading, spelling, and writing success.

Phonological Awareness encompasses pre-reading skills associated with the sounds of language. If you have assessed this at the PreK-2nd grade levels, you know part of the assessment involves identifying spoken words, rhymes, syllables, onsets/rimes, and identifying, segmenting, blending, and substituting phonemes. Phonemic awareness is under the umbrella of phonological awareness with more of a focus on the latter part (onsets/rimes, and identifying, segmenting, blending, and manipulating phonemes). All of this, regardless, is based on SOUNDS only. This awareness is AUDITORY and not print related.

My opinion regarding this daily routine, is for a whole class explicit 10-15 minute lesson. During the whole class daily routine, keep mental tabs or quick notes on who has difficulty so you can follow up during small group and learning station opportunities throughout the week. Try video taping your routine for those “extra eyes.” See a link to some FREE research-based activities at the end of this post.

Spoken Words: 

I have observed frequently that young students do not always know the difference between letters, words, and sentences. I usually discover this via writing lessons. Wonder why students don’t space between words? Or spread letters within a word far apart? I think it may go back to a misunderstanding about this very basic phonological awareness concept.

The assessment for this involves the teacher stating a sentence and the child pushes chips or pennies to indicate how many words were heard. Usually this isn’t too difficult until the teacher utters a 2-syllable word. Does the child understand this to be one or two words?

Believe it or not, this is a huge key concept later when the child is reading text. You may discover errors with 1-to-1 correspondence. When reading this sentence: “The apple is good.” does the child keep their finger on apple until the word is finished, or do they move their finger for each syllable? And then, as mentioned previously, it also becomes a hindrance when writing.

As you can see then, concept of spoken word is closely tied to the understanding of syllables. The number of syllables per word is determined by the number of vowel sounds heard. Friend = 1 syllable. Funny = 2 syllables. There are several ways to count them:

  • Clap or snap each syllable
  • Count with fingers
  • Feel the jaw move

Why is knowledge about hearing syllables important to later reading skills?

  • Breaking apart words by syllables is an important reading strategy. Can the child visually see the syllable and then pronounce each part as if it was a little word (example: yes-ter-day).
  • Breaking apart words by syllables is an important spelling and writing strategy.  Hearing the sounds of the word is just as important as the visual aspects of the word. Trying to spell the word important? Can I hear the parts /im/ + /por/ + /tant/? If I can hear them, I can come closer to spelling them.

Daily teaching routine for Spoken Word and Syllables:

  1. Present a sentence orally. Step 1:  Students repeat the sentence. Step 2: Have them do one of the following to indicate # of spoken words:  clap, stomp, use magnetic chips on a the board, unifix cubes, count with fingers, or select a # of students to match the # of words and they each stand to say one of the words in the sentence – they become the sentence.
  2. State a word and have students clap, snap, or count # of syllables.
  3. Hand out picture cards and have students group together by # of syllables.

Rhyme: Continue reading

Reading Routines Part 2: Independent Reading Time

by C. Elkins, OK Math and Reading Lady

This is part 2 of a series about reading routines I believe are important. The focus in this post will be on establishing a daily independent reading time. This independent reading time (or partner reading) will help extend some of the benefits of your read aloud routine.

According to Houghton Mifflin, “Research into effective literacy instruction has often noted that the best teachers of reading have an extensive collection of books in their classrooms (Allington & Gabriel, 2012; Morrow & Gambrell, 1998; Reutzel & Fawson, 2022). In large-scale national studies, researchers found that students in more effective teachers’ classrooms spent a larger percentage of reading instructional time actually reading; additionally, exemplary teachers were more likely to differentiate instruction using their book collections, so that all readers had books they could read accurately and fluently, with understanding and motivation (Allington & Gabriel, 2012).” This comes from an excellent, easy read from Houghton Mifflin Harcout: The Value of Independent Reading: Analysis of Research

What are the benefits? The child . . .

  • Gets a choice in what he/she reads.
  • Is able to practice concepts of print.
  • Is exposed to a wide range of books. This exposure is important in motivating children to read. I’m a strong believer that a child who doesn’t read just hasn’t found the right book / type of book yet.
  • Has the chance to make connections (with characters, places, situations).
  • Can explore all types of genres to include fairy tales, poetry, fantasy, and non-fiction.
  • Becomes more fluent when rereading a favorite book.
  • Increases vocabulary and comprehension.
  • Is able to apply knowledge about sight words and reading / decoding strategies at their own pace.
  • Becomes more confident, experienced, and committed.
  • Builds background knowledge.

Other ways to extend the benefits of independent reading time:

  • Check out the Daily 5 routines to get started. Here’s a summary:
    • Independent reading requires stamina. Start out with a brief time and observe when students start to get restless (5 minutes??) Then gradually add time, always taking cues from the students about how long is too long? Of course the optimum time is based more on age / grade level. But I would recommend you aim toward a goal of 15-20 minutes per day (more for older students).
    • What does independent reading look like? Which books can they choose? How to get them out and put them away. Where can I sit? What if I didn’t finish my book and want to keep it a little longer? If I don’t know the words yet, can I just look at the pictures?
    • How to choose a “just right book.”  Independent reading is most beneficial when a child chooses a book they can read, but we have to be careful not to make it too regimented and requiring only certain levels. A “just right” or “good fit” book is not too hard, not too easy, is on a topic you enjoy, and you can read most of the words.
    • Check out the Daily 5 / Daily Cafe links at the bottom of this blog.

      Anonymous source from Microsoft Clip Art

  • Periodically allow students to share something about a book they like (a book talk) to perhaps interest others. This could be while students are in a circle, or just a couple of students each day.
  • How about partner reading? This might be helpful with reluctant or new students to show them the procedures. Or a once-a-week treat.
  • For intermediate students (grades 3-5), be sure they have extra time to peruse / try out a book. The cover can entice them, but once they start reading, they need permission to trade for another if it doesn’t grab them. Also consider book clubs. This is when 2-3 students read the same book and have the opportunity to engage in discussion about their book.
  • Allow a classroom book to go home via a check out bag.
  • Make up special take home bags for special occasions (birthday, holiday, etc.).  I had two rotating bags that were sent home. My classroom name was “The Magical Mice.” One bag was painted with cute mice. Several books with a mouse theme (fiction and non-fiction) were included. A book log was included which included mouse poems and notebook paper for the child and/or parents to write a note. I even had a recipe to make mouse-shaped cookies in the bag. The student of the week got to take it home and keep it for the week. The other bag was for birthdays and included similar items with a birthday themed stories.

Thank you, Mrs. Seely!!

How to organize your classroom library to help your routine go smoothly:

  • Sort books into categories and label (using small easy-to-carry tubs). Find child-accessible shelves to keep them within reach. For PreK, KG, and 1st grade, consider labels with pictures also. Here’s a link to TPT for free and $ book labels: TPT Classroom Library Book Category Labels
  • If students’ desks are grouped together, rotate some tubs daily so students don’t have to leave their seats to get books. We all know this can get out of hand if students are constantly getting up.
  • Daily 5 suggests that each child have their own book collection box using a cardboard magazine holder (or you can cut an empty cereal box and cover with contact paper). Their box contains their school library book, leveled books, guided reading book, and free choice books they are reading. This might also be a great place to keep their writing journal (another reading routine I will blog about soon).
  • If not using the individual boxes (above), think about what you want to happen when independent reading time is over and a child wants the chance to finish their book. I had a small tub for each group. The student would put their personalized, laminated bookmark in the book to claim it for the next independent reading time. This valued their right to finish a book they had become engrossed in without someone else “stealing” it.

What are you as the teacher doing during this independent reading time?

  • You can enjoy your own book to model independent time.
  • This might be a good time to listen to individual children read to you (not a whole book, but just a few pages). It will build the teacher / child relationship and allow you to monitor and assist them with strategies.
  • Less desirable, but often necessary —  time for some independent assessments (for new students, at the end of the quarter, etc.

Some recommended links to launch your independent reading time:

Have a great week! Tell us about your independent reading routine!


Reading Routines Part 1: Read Aloud

by C. Elkins, OK Math and Reading Lady

Read aloud time is an important daily routine (for PreK – 5th).  It’s not just for primary students. According to an article in Reading Rockets (https://www.readingrockets.org/article/reading-aloud-build-comprehension), Reading aloud is the foundation for literacy development. It is the single most important activity for reading success (Bredekamp, Copple, & Neuman, 2000). It provides children with a demonstration of phrased, fluent reading (Fountas & Pinnell, 1996). It reveals the rewards of reading, and develops the listener’s interest in books and desire to be a reader (Mooney, 1990).

What are the benefits?

  • Teacher models good reading (not an internet book)
  • Reading is for enjoyment – so this is a story outside of the assigned reading curriculum for the week
  • There are great books available to spark the imagination and provide motivation to read
  • Students get practice making mental pictures (when listening to a chapter book)
  • Enhances listening comprehension
  • Vocabulary can be introduced in an informal way
  • Students learn about the author’s voice and point of view
  • Books can be compared (author, characters, genre)
  • Characters can be explored deeply if reading a series by the same author
  • Great comprehension skills to reflect on informally:  predict, cause-effect, sequence, compare-contrast, inference, theme
  • A calm atmosphere
  • Students feel more free to discuss aspects of the read-aloud (because there aren’t worksheets or tests involved)
  • Able to listen to books above independent reading level
  • Builds connections and classroom community (Example:  “This is a book about . . . .  What experience have you had with this?”)
  • Got a problem to solve (Friendship, etc.)? You can probably find a book about that topic
  • Younger students learn valuable concepts of print by participating in the shared reading of a big book

I know this precious read aloud time is often omitted due to tight schedules. If so, please examine your schedule to see if you can shave a little time in other places to include this important routine. Here’s a great article about ways to fit read-aloud time into your busy schedule: https://www.scholastic.com/teachers/blog-posts/juan-gonzales/17-18/3-ideas-on-how-to-create-more-read-aloud-time-the-classroom/

At the beginning of the year when you are establishing procedures, be sure to make an anchor chart for read aloud expectations.  Refer to the Daily 5 for great ideas. Things to consider:

  • Will children be on the floor or at their desks?
  • Will you allow doodling while you read? (There are differing opinions on this.)
  • How will you handle blurting (or not blurting) and discussion time?
  • Videotape yourself to analyze your reading — Do you enjoy listening to yourself?  If your voice sounds varied and interesting, your students most likely will be actively listening (rather than disrupting or falling asleep).
  • Choose books which encourage mental visualization. Check with your librarian if you need some advice.
  • With chapter books, choose those with interesting characters and riveting chapter endings (makes studens eager to listen the next day).

Final research note: The U.S. Department of Education Commission on Reading took into account over 10,000 studies and found that the most important activity for building the skills and background for eventual success in reading is reading aloud to children (see Anderson, Hiebert, Scott, & Wilkinson, 1985). Children who are read to are usually the very best readers in the classroom, and they acquire large vocabularies, write well, and do better in other subject areas, as well.

What are your favorite read-alouds? Please share! (indicate grade level range too)

Some of mine for 2nd-4th graders:  A Toad for Tuesday (by Russel Erickson), the Flat Stanley books, Snot Stew (by Bill Wallace)

Beginning of School Tips

by C. Elkins, OK Math and Reading Lady

I’m going to repost a few of my favorite beginning of the year articles along with some math and parent involvement tips (since last week focused more on literacy tips). I know this is coming to you on a Tuesday again this time (which is different than the normal Sunday release), due to some out of state travels (to see our grandson). I’ll get back on track here very soon.

  1. Here is a link to a post I made previously regarding a great back-to-school math/ literature activity:  Name Graphs with “Chrysanthemum” by Kevin Henkes

  2. Looking for some good stories to read to encourage classroom community (Grades K-5)? Try this post: Back to school stories and activities

I am in the middle of a great book study:  Accessible Mathematics: 10 Instructional Shifts That Raise Student Achievement by Steven Leinwand (Heinemann Publishers).  Click HERE  to get more details about the book. I’ll give you a rundown of what I’ve loved from this book so far:

  • The quality of instruction has more impact on student achievement than the curriculum or resources we use. This means the instruction is “enhancing, empowering, energizing, and engaging.”
  • “We can demonstrate, tell, and let our students practice, or we can engage and focus on understanding and application.”
  • Where do you fit? Where would you like to be? Which model provides students with the opportunity for productive struggle?
    • The more traditional:  Teacher instructs, teacher solves example problem with class, students practice on their own while teacher assists those who need help.  Or . . .
    • The focus on understanding: Teacher poses a problem (though-provoking). Students struggle. Students present ideas to class. Class discusses various solutions. Teacher summarizes class conclusions. Students practice similar problems.
  • Teacher questions like “Why?” and “How do you know?” invite students to explain their thinking and show different ways to solve a problem.
  • Daily cumulative review is important.  (I will touch more on this in later posts on ways you can incorporate this into your daily math routine where it is interesting, informative, and engaging. In the meantime, check out the categories section of my blog “Number Talks and Math Meetings“).

Miscellaneous parent involvement tips:

One of my goals the year I worked on National Board Certification was to improve parent involvement. In the last post I mentioned keeping a log of parent contacts and writing a weekly or monthly class newsletter or blog. Here are two other things I initiated that proved very successful, so I thought I’d share them with you.

  1. Invite parents to write to you about their child.  At the beginning of the year, I asked parents to write a note telling me about their child. I invited them to tell me the special things they wanted me as the teacher to know – to include their successes and proud moments. Perhaps even share the goals they have for their child, information about siblings, their feelings about homework, etc. This information was helpful to me to get to know the child better. Parents really appreciated the chance to tell about their child, and it set the stage for open communications with the parents. I hope you will try it.
  2. With the students’ help, we put together a memory book of the year’s events at school. I took lots of pictures (even of routine things like eating lunch, lining up, library time, where we put our coats, etc.). Every couple of months I printed the pictures and students chose 1 or 2 to write about. After editing the writing, the pictures and written captions were put together in a memory book (big scrapbook). We added borders, stickers, and other scrapbooking type visuals. We tried to finish the main parts of it by February so it was ready to share with the parents. It was available for viewing at conference times, and students could check it out to take home for parents to see.  It was especially valuable to those parents who were not able to visit school.  I put a few comment pages in the back for parents to leave notes. You wouldn’t believe how many had a much better understanding of the complex day-to-day school events and appreciated the chance to see what really goes on at school all day. After 2-3 years of making a book version,  I changed it to a digital format (power point) instead of a book version (because parents wanted copies). With a digital version, you have the capability of importing graphics, etc. to make it “fancy.” I still have my books and will always cherish them.

Enjoy!! Coming soon — I’ll share more from the book “Accessible Mathematics” as well as some cool things I’ve learned from a Building Math Minds summit I attended.

Be sure invite some of your new teachers to join this blog.


Welcome Back!

by C. Elkins, OK Math and Reading Lady

Welcome Back! Here are a few links to some of my previous posts regarding literacy and math you might be interested in to help you start your journey this year.  And in case you didn’t see it, I have an easy link to most of my own free resources. Click here to get it now, but it is also available in the black bar above. Have a great start to your year and Enjoy!!!  Please invite some of your new teachers to check out my blog!

  1. Getting to know you literature connection and math activity
  2. Building a classroom community (includes link to great team building practices)
  3. Writing part 1
  4. Guided Reading Part 1: Getting Started
  5. Guided Reading Part 2: Routines and Procedures
  6. Meaningful Student Engagement: Whole Class Reading
  7. Daily Math Meeting Part 1: Building Number Sense
  8. Daily Math Meeting Part 2: Subitizing
  9. Addition and Subtraction Part 1: Numerical Fluency
  10. Addition and Subtraction Part 3: Facts Strategies
  11. Multiplication Strategies Part 1
  12. Fractions Part 1: The basics

Some other tips to get prepared for your literacy lessons:

  • Organize your classroom books. Small tubs that can be brought to desk pods is helpful. Labels such as these help get the books returned to the right tub:  animals, friends, plants, weather, Clifford, by author, etc.  Think about a gradual release of your reading materials so students aren’t overwhelmed at the beginning of the year.  This way you can go over procedures for book selection, silent reading, how to treat books, etc. When I was in the classroom, I selected 5 tubs to put out onto desk pods each week (1 tub per pod). These were rotated daily.  The tubs were selected based on developmental level and theme. At the beginning of the year the tubs might be: friends, school, alphabet, problem solving, etc. Students could select from the tub at their pod during the day instead of everyone gathering at the bookshelf. Each student made a bookmark with their name on it (which I laminated).  They could put their book mark in it to signal to others in their group that they wanted to continue with that book later in the day. Each group had a “captain” for the week and they were in charge of making sure the books were in good order.
  • Plan for your word wall. I recommend building the word wall as the year goes along, with the children involved in placing words there (rather than coming in with a complete “busy” word wall).
  • Make a pledge to keep your guided reading table cleared and ready. Do you have these materials handy? Small whiteboards, markers, erasers, pencils, letter tiles or magnetic letters, sight word cards, pointers, small magnifying glasses, post-it notes, laminated graphic organizers, small teaching reference charts . . .
  • Literacy activities for students to do while you are assessing.  Get out those task cards for students to review skills from last year so you can do your required assessments. Try to include a running record if possible to help determine each child’s strategies. Procedures for the activities will be important to establish so that by your sixth week of school you will be ready to start guided reading.

General welcome back tips:

  1. Sharpened pencil(s): This is my most recommended tip. Give each student 1-2 already sharpened pencils to start their first day.  I learned this the hard way. First graders couldn’t sharpen their own pencils so I just about tore my arm/shoulder up sharpening pencils for them. Plus the electric one can’t take so many attempts. So it’s worth it!!
  2. Welcome bag: Check out this link for a cute poem and ideas for goody bags to welcome your students to your class: https://blog.reallygoodstuff.com/welcome-back-to-school-goodie-bags-by-hadar-maor/
  3. Think about how you are going to keep contact with parents.  I recommend some of the following:
    • Keep a separate log to keep track of phone, text, or email contacts (date, student name, parent name, reason, result)
    • Make it a goal to contact a specific number of parents each week with good news.
    • Try a weekly or monthly class newsletter. This is a great communication tool to let parents know what stds. you are working on, what they can do to help at home, activity ideas, sharing successes, advise them of things coming up, etc.
    • Start your own blog for your class. Then you can include the above newsletter type items, plus pictures, etc.
  4. Work to create a classroom community. I love the Responsive Classroom approach (Morning Meeting is one highly recommended routine). Everything you can do to build the sense of a classroom community will pay off in many ways!! Here is their website link to great articles and advice: https://www.responsiveclassroom.org/articles/

Multiplication Concepts Part 5: Multiple digit strategies

by C. Elkins, OK Math and Reading Lady

In this post, I will share some strategies for using concrete manipulatives and pictorial methods to solve multiple digit multiplication problems. By using these methods, students gain a better sense of place value as they work to decompose the problem into smaller units.  Decomposing also allows a student to better perform mental calculations. Some helpful manipulatives:  base ten materials (hundreds, tens, ones); place value disks; cups and pinto beans

What is the purpose of knowing multiple strategies? Some would argue that too many strategies are confusing for students. Some believe the only strategy needed is the standard algorithm. I believe teaching different strategies provides students with choices and improves analytical thinking. With only 1 strategy, if the “steps” are missed, the student has no other recourse. Student choice is a powerful motivator as well because they get a say-so in how they approach their own work.

I keep thinking about my past teaching when I only taught the standard algorithm (before I knew better). I recall saying: “Show all your work – because I said so.” This means I was not considering the students who were able to do some of the mental calculations in their head. I know I went through the steps in a robotic, don’t-question-me way:  “Multiply the ones, carry to the ten’s place, multiply again and add the digit you carried. When multiplying the 2nd digit, be sure to watch the placement in the second row and scoot it over to the left one place.” None of this conversation (if you could even call it that) mentioned the place value relationship, what the carried digit represented, or why the second row of the answer should be scooted over one place.

Here are some examples relating manipulative and pictorial methods with paper-pencil methods. I’ll use the problem 32 x 4. These methods help students use (30 + 2) x 4 to solve.

  1. Base ten: Show 3 tens rods and 2 ones four times.
  2. Place value disks: Show three 10’s disks and two 1’s disks four times.
  3. Cups and beans: Each cup contains 10 beans. Ones are shown by individual beans. Show 3 cups and 2 beans four times.
  4. Pictorial drawings and decomposing models:
  5. Partial products: This is a great way to help student realize that the 3 represents 30.
  6. Area (box) model: Another ways to visualize and utilize place value knowledge to solve.

When it is time to introduce the standard algorithm, you can relate it to the partial products or area model. I always recommend showing both side by side so students now understand what the carried digit represents, and why the second row is scooted over to the left, etc. Then try some problems like this for your daily mental math number talks (show problem horizontally). I practically guarantee that students who can visualize the manipulatives or the partial products method will get the answer more quickly than those who are performing the std. algorithm “in the air.”

I will take a break this summer and come back every now and then between now and August. Keep in touch! Enjoy your summer!!! Let me know if there are topics you’d like me to address on this blog.

Multiplication Concepts Part 4: Skip Counting

by C. Elkins, OK Math and Reading Lady

This is part 4 in a continuing series of posts about basic multiplication teaching concepts. Use them for beginning lessons or reteaching for struggling learners. Students could be struggling because they were not given enough exposure to concrete and pictorial models before going to the numbers only practices. The focus in this post will be skip counting to determine multiplication products. I will even focus on skip counting done in early grades (counting by 10’s, 5’s, and 2’s). Read on for 10 teaching strategies regarding skip counting.

I am going to give some of my opinions and misconceptions students have about skip counting.

  • Many students do not associate skip counting with multiplication, but just an exercise they started learning in KG and 1st (skip counting orally by 10’s, 5’s, and 2’s).  This is often because they started with numbers only and did not have the chance to see what this looks like using concrete objects or pictorial representations.
  • If you observe students skip counting, are they really just counting by 1’s over and over again? Or are they adding the number they are skip counting by repeatedly.  You know the scenario. You tell a student to skip count by 3’s and they know 3, 6, 9, but then hold up their 3 fingers and count 10, 11, 12, 13, 14, 15, 16, 17, 18, and so on.  Or are they truly counting like this: 3, 6, 9, 12, 15, 18, 21, 24, 27, 30?
  • The main issue I have with skip counting is that if a student makes an error regarding just one of the numbers in the sequence, then the rest of the sequence is incorrect. So this should not be their only strategy. Do you recall a previous story I mentioned about the 5th grader who tried to solve 12 x 3 by skip counting on a timed facts test? He was unsuccessful because he kept losing track and didn’t have another strategy to use.
  • Successful skip counting reinforces the concept that multiplication is repeated addition – do your students know this? I have witnessed many students who know the first 2-3 numbers in a skip counting sequence, but then don’t know how to get to the next numbers in the sequence.
  • Students don’t often relate the commutative property to skip counting. Let’s say the problem is 5 x 8. The student tries skip counting by 8’s (because this problem means 5 groups of 8) and may have difficulty.  Does the student try to skip count by 5’s eight times instead?

Ten teaching strategies for skip counting:

  1. For young students skip counting, use objects to show how to keep track:
    • Base 10 rods
    • Rekenrek (easily slide 5 or 10 beads at a time)
    • Hand prints (for counting 5’s or 10’s):  Which do you think would give students a better understanding: Holding up one hand at a time and counting by 5’s or lining up several children and having them hold up their hands as you continue counting? The second scenario enables students to see the total of fingers as opposed to just 5 at a time.
    • Use money: nickels and dimes
    • Associate counting by 2’s with concepts of even and odd
  2. Use manipulatives.  Do it often and with a variety of materials. The arrangements should emphasize the other strategies (equal groups, arrays, repeated addition).
  3. Draw and label pictures. The labels for this strategy would show the cumulative totals instead of just the number in each group.
  4. Arrange students in line or groups to practice skip counting. Example if practicing 4’s: Every 4th student turns sideways, every 4th student holds up their hands, every 4th student sits down. every 4th student holds a card with the number representing their value in the counting sequence, etc.
  5. Practice skip counting while bouncing or dribbling a ball. Great for PE class!
  6. Associate skip counting with sports:  2 and 3 pointers in basketball, 6 points for touchdowns in football, etc.
  7. Use a 0-100 chart to see patterns made when skip counting. I love the 0-100 pocket chart and translucent inserts that allow you to model this whole group. Individual 100 charts are readily available in which students can mark or color the spaces. Here are links to the chart and the translucent inserts: 1-100 pocket chart and Translucent pocket chart inserts


  8. Look for other patterns regarding skip counting. Refer to my previous post on this for more details: Skip counting patterns


  9. Relate skip counting to function charts and algebraic patterns using growing patterns.
  10. Practice skip counting using money: by 5’s, 10’s, 25’s, 50’s

What strategies do you like for multiplication? What misconceptions do you see with your students?

Next post will be part 5 of my multiplication posts – and the last one for this school year. I will focus on using these basic concepts with double-digit problems. Stay tuned!!


Multiplication Concepts Part 3: Equal Groups

by C. Elkins, OK Math and Reading Lady

Thanks for checking in on part 3 of my multiplication posts. Focus will be on the equal groups strategy — looking at how students can efficiently use this strategy to help learn basic multiplication facts. My angle will be at the conceptual level by using concrete and pictorial methods.

Basics:

  • Instead of in array or area format, equal groups are separate groups.
  • The “x” means “groups of.”  So 3 x 4 means “3 groups of 4.”

What things normally come in equal groups? Conduct a brainstorming session. I love the book “What Comes in 2’s, 3’s, and 4’s” as a springboard. After reading the book, let students brainstorm other things that come in equal groups. See the pictures below for some more ideas. After some internet research, I also made this attached list to use (in case you or your students draw a blank): click here: Equal groups pictures and list template

Use these lists to help students generate stories about equal groups. When students can create (and maybe illustrate) their own stories, they are much better at solving problems they must read on their own. This also helps students think carefully about what in the story constitutes a “group” and what the “groups of” represents:  

  1. There were 5 bowling balls on the rack. If you count all of the holes (3 per ball), how many holes are there all together? (5 x 3). The bowling balls are the groups. The holes are what is being counted in each group.
  2. How many numbers are shown on 3 clocks? (3 x 12). The clocks are the groups. The numbers are what is being counted in each group.
  3. I bought 8 pair of earrings. How many earrings are there? (8 x 2). The pairs are the groups.
  4. Seven ladybugs were crawling on the leaves. How many legs would there be? (7 x 6). The ladybugs are the groups. The legs are what is being counted in each group.

Ways to show equal groups with objects and drawings:

  • Hula hoops (great to use these in PE class to emphasize multiplication)
  • Embroidery hoops
  • Circles of yarn
  • Dishes:  cup, bowl, plate, tray
  • Baskets
  • Shelves

Objects to use to show equal groups:

  • people
  • cubes
  • tiles
  • mini erasers
  • teddy bear manipulatives
  • base ten materials
  • food: pinto beans, macaroni, cereal, candy
  • practically anything you have an abundance of!!

Teaching concepts regarding equal groups:

  • When students are placing objects or drawing inside, do they randomly place objects? Or do they organize them to enable ease in counting? Showing students how to organize the objects in each set contributes to their knowledge of equal groups — AND it’s a big help to you as the teacher as you check on students. If the dots are randomly placed, the teacher and student must count one at a time to check. If they are organized, teacher and student can tell at a glance if the amount in each group is correct. Notice the difference below: Which ones show a student’s understanding of 9? Which ones can a student or teacher check rapidly?

  • When counting the objects or drawings to determine the product of these equal groups, are students counting one at a time? Or are they counting in equal groups (such as by 2’s, 5’s, 3’s, etc.)? If we allow students to just count by ones, then they are not practicing multiplication, just counting!!

Activities to practice equal groups strategy:

  1. Circles and Stars:  Roll a dice once. This is the number of circles to draw. Roll a dice again. This is the number of stars to draw inside. If played with a partner, students can keep track of their totals to determine a winner. Dice can be varied depending on the facts that need to be practiced. A spinner can also be used. (See picture at beginning of this post.)
  2. Variation of above:  Use other materials (such as those listed above).
    • Dice roll #1 = # of cups. Dice roll #2 = number of cubes
    • Dice roll #1 = # of hoops. Dice roll #2 = # of pinto beans
    • Dice roll #1 = # of plates. Dice roll #2 = # of Cheerios
  3. Write and illustrate stories:  Provide a problem for students to illustrate (example:  6 x 3 or 3 x 6).  Then each student can decide how to form the story and illustrate. I always tell students to choose items they like to draw to make their story. Here are some examples.  See some examples from former students.
    • There were 6 monsters in the cave.  Each monster had 3 eyeballs. How many eyeballs all together?
    • Six princesses lived in the castle. They each had 3 ponies. How many ponies in all?
    • There are 3 plants in the garden. They each have 6 flowers. How many flowers are in my garden?
    • I made 3 pizzas. Each pizza had 6 slices. How many slices of pizza did I make?
  4. PE Class activities:  If your PE teacher likes to help you with your learning objectives, let them know you are working on equal groups strategies. While I’ve not done this personally, I think having relay races related to this would work perfectly. For example, the teacher presents a problem and each team must use hula hoops and objects to show the problem (and the answer).
  5. Try these story books about multiplication:
  6. Equal groups story problems to solve:  See my previous post related to this. You will find some story problem task cards and templates for solving multiplication and division problems using the equal groups strategy. Click HERE

Enjoy!!  


Multiplication Concepts Part 2: Arrays

by C. Elkins, OK Math and Reading Lady

Last week I posted my thoughts about multiplication strategies using the repeated addition strategy. This time I will focus on using arrays. Do you have some arrays in your classroom? Look for them with bookshelves, cubbies, windows, rows of desks, floor or ceiling tiles, bricks, pocket charts, etc. Students need to know arrays are everywhere! It is also very helpful for students to build arrays with objects as well as draw them. This assists students with moving from concrete to pictorial representations — then the abstract (numbers only) can be conceptualized and visualized more easily. Some good materials for arrays:

  • cubes
  • tiles
  • circular disks
  • flat stones
  • pinto beans (dry)
  • grid or graph paper
  • bingo stamper (to stamp arrays inside grids)
  • mini stickers
  • candy (Skittles, M&Ms, jellybeans)

Array Basics:

  1. Arrays form rectangular shapes.
  2. Arrays are arranged in horizontal rows and vertical columns.  This vocabulary is very important!
  3. The number of objects in each row (and column) in an array are equal.
  4. Arrays can be formed by objects, pictures, or numbers.
  5. Arrays can be described using numbers:  If there are 4 rows and 3 columns, it is a 4 by 3 array.
  6. The number of rows and number in each row are the factors. The product is the total.
  7. When an array is rotated, this shows the commutative property.

Ways to incorporate arrays into story problems:

  • Desks in a class (5 rows, 4 desks in each row)
  • Chairs in a classroom or auditorium (10 rows of chairs, 8 chairs in each row)
  • Plants in a garden (6 rows of corn, 8 corn plants in each row)
  • Boxes in a warehouse (7 stacks, 5 boxes in each stack)
  • Pancakes (3 stacks, 5 pancakes in each stack)
  • Cars in a parking lot (4 rows, 5 cars in each row)
  • Bottles of water in a crate (3 rows, 8 bottles in each row)
  • Donuts or cupcakes in a box (how many rows? how many in each row)

Activities to encourage concrete and pictorial construction of arrays:

  • Start off using manilla grid paper you probably have available with the construction paper supply at your school. This will help students keep their rows and columns even. Pose a problem and allow students to use manipulatives you have available to construct the array.  If you say, “Build an array for this multiplication problem: 3 x 5,” do they know the 3 refers to # of rows and the 5 refers to the number in each row?
  • Turn the paper after building the above array to see the commutative property. Now the picture shows 5 x 3 (5 rows with 3 in each row). The product is still 15.
  • Use the manilla grid paper along with bingo dobbers to create the array.  The grids can also be completed with mini stickers (I get them all the time in junk mail) or drawings.
  • When using pictures of arrays, direct your students to always label 2 sides of the array (the rows and columns). Try to label different sides of the array so it’s not always presented in the same format.
  • Find the product:  The whole point of using an array as a multiplication strategy is to visualize the rows and columns to help calculate the product. If students create rows and columns and then just count the objects one-by-one, then this does not accomplish the objective.  Show students how to skip count using the # of objects in the rows or columns. Believe me, students don’t always know to do this without a hint from the teacher.  Or better yet, before actually telling them to do this, ask students this question: “How did you get the total number of objects?” When you pose this question, you are honoring their strategy while secretly performing an informal assessment. Then when the student who skip counted to find the total shares their strategy, you give them the credit:  “That is an efficient and fast way to count the objects, thank you for sharing! I’d be interested to see if more of you would try that with the next problem.” Plus now students have 2 strategies.
  • Use the distributive property to find the product: Let’s suppose the array was 6 x 7.  Maybe your students are trying to count by 6’s or 7’s to be more efficient – but the problem is that counting by 6’s or 7’s is difficult for most students. Break up (decompose) the array into smaller sections in which the student can use their multiplication skills.  Decomposing into rows or columns of 2’s and 5’s would be a good place to start. This is the distributive property in action – and now the students have 3 strategies for using an array!! This is a great way to use known facts to help with those being learned.
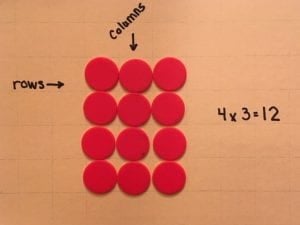
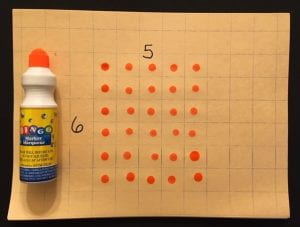
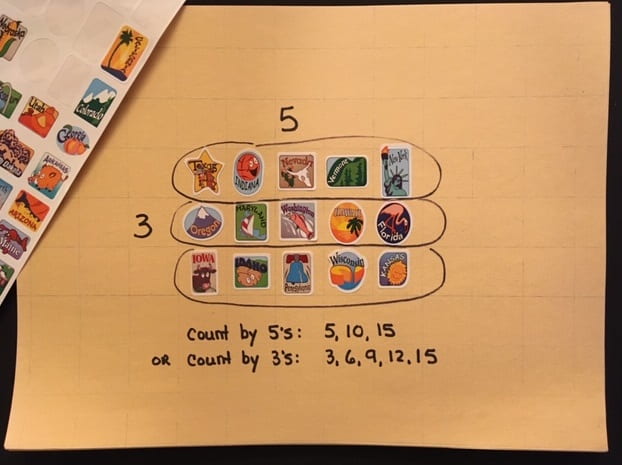
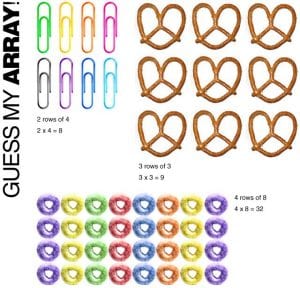
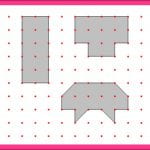
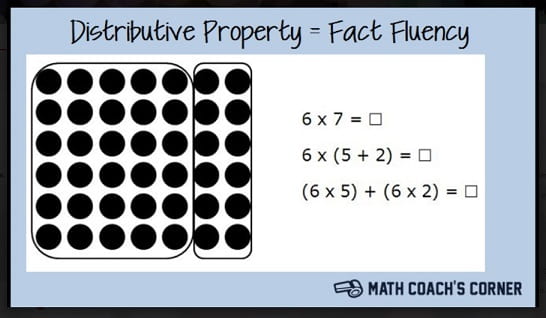
Here is a link to Math Coach’s Corner (image credited above) and a great array resource: Multiplication arrays activities from TPT $5.50.  Here is my FREE guided teaching activity to help students decompose an array into 2 smaller rectangles. Click HERE for the free blank template.
  • Use the online geoboard I described a few posts back to create arrays using geobands. Click here for the link: Online geoboard  Click here for the previous post: Geometry websites (blog post)
  • Try these freebies:  Free array activities from k-5mathteachingresources.com. Here’s a sample.


  • Play this game I call “Block-It.” This is a competitive partner game in which students must create arrays on grid paper. Click here for a FREE copy of the directions: Block-It Game Directions
  • Relate use of arrays when learning strategies for division and area.

In a future post I will show some ways to use manipulatives and pictures arrays for double digit multiplication problems. Stay tuned!!

Multiplication Concepts Part 1: Repeated Addition

by C. Elkins, OK Math and Reading Lady

The next few posts (until I take a break over the summer) will focus on the basic multiplication concepts one at a time. This will allow the opportunity to dig deeper into the concepts we want students to understand. This one will focus on the concept that multiplication is repeated addition. These posts will be helpful to teachers introducing multiplication to students in 2nd and 3rd grade as well as those in 4th, 5th, 6th and beyond who have missed some of these basic concepts. Future posts will focus on the area (array), set (equal groups), counting, and decomposing models as well as the associative and distributive properties.

Do your students know what the “times” sign means? They may hear it frequently, but not realize what it means. I like to interpret it as “groups of.”  So a problem like 3 x 4 can be said as “3 groups of 4.”

To show repeated addition, that same problem would be 4 + 4 + 4 = 12.

Repeated addition can be shown with numbers, and also with arrays and equal groups. These pictorial models are great for developing multiplication concepts (and will be topics of future posts). However, when students are presented with these models they often count the individual pieces one at a time rather than adding the same amount repeatedly. Observe your students to see how they are counting.

Do your students apply the commutative property of multiplication? This means if the problem is 3 x 4, it can also be solved by thinking of 4 x 3 (which is 4 groups of 3 OR  3 + 3 + 3 + 3). I want students to know even though the answers are the same, the way the factors are grouped is different. When used in a story, 3 x 4 is a different scenario than 4 x 3.

Do your students practice repeated addition, by combining 2 or more numbers? See the following for an illustration of 15 x 6:

Do your students apply the concept of repeated addition to multiple digit multiplication problems as well? I have witnessed students numerous times who only try a problem one way and struggle. For example, on a timed test I witnessed a 5th grader attempt the problem 12 x 3. I observed him counting by 3’s.  He was trying to keep track of this by skip counting by 3’s twelve times. I could tell he had to start over frequently, thus spending a lot of time on this one problem. It became obvious he had no other strategy to try. He finally left it blank and went on. Just think if he had thought of 12 + 12 + 12. This should have been relatively easy for a 5th grader.  He also could have decomposed it to this: (3 x 2) + (3 x 10).

Do your students always go to the standard algorithm when they could perhaps mentally solve the problem by repeated addition? If the problem was 50 x 3, are they thinking 50 + 50 + 50? Or are they using paper-pencil and following the steps?

What about a problem such as 45 x 4?  Using repeated addition, is your student thinking of 40 + 40 + 40 + 40 combined with 5 + 5 + 5 + 5? This is then solved as 160 + 20 = 180.

Students who are able to use repeated addition skillfully are showing a healthy understanding of place value and multiplication. This strategy also enhances mental math capabilities. Conducting daily number talks are highly advised as a way to discuss multiple ways to solve a given problem such as those mentioned above. Check out “Number Talks” in my category list for more information on this. Also check out some recommended videos about conducting number talks (above black bar “Instructional Resources”).

Geometry Websites

by C. Elkins, OK Math and Reading Lady

There are several great math websites which might help you and your students with geometry and measurement standards such as area, perimeter, volume, surface area, angles, etc.  The ones I am recommending are interactive and often customizable.  Check them out!! (Each title can be clicked to take you directly to the linked website.)

  1. Geoboard by The Math Learning Center:  I love the concept of geoboards to help children create polygons and measure area and perimeter.  However, most teachers have ditched their physical geoboards. They are often in boxes relegated to the basement storage areas.  I get it, though.  They take up a lot of shelf space in the class, there aren’t enough rubber bands to go around (aka geobands), the kids misuse them or break them, they don’t stretch far enough, the pegs get broken, etc.

I think you will LOVE this app. 
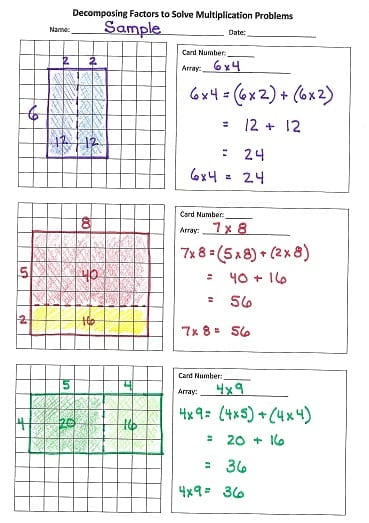
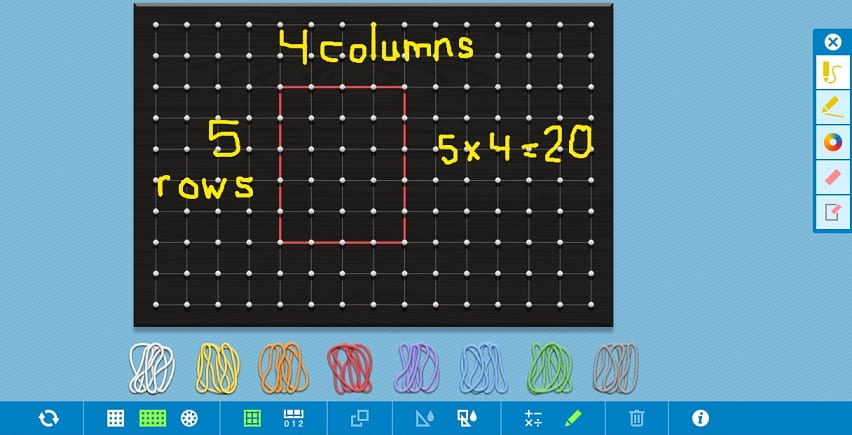
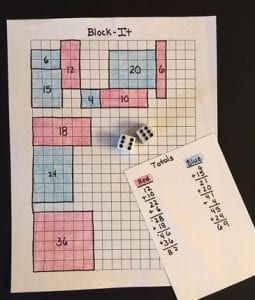
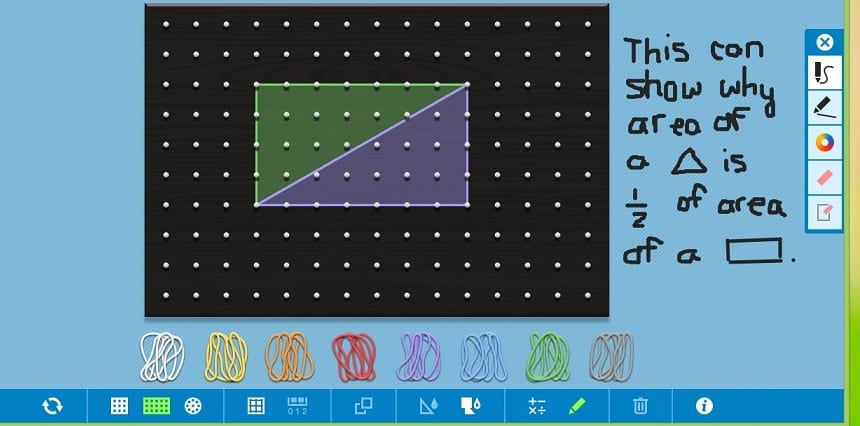
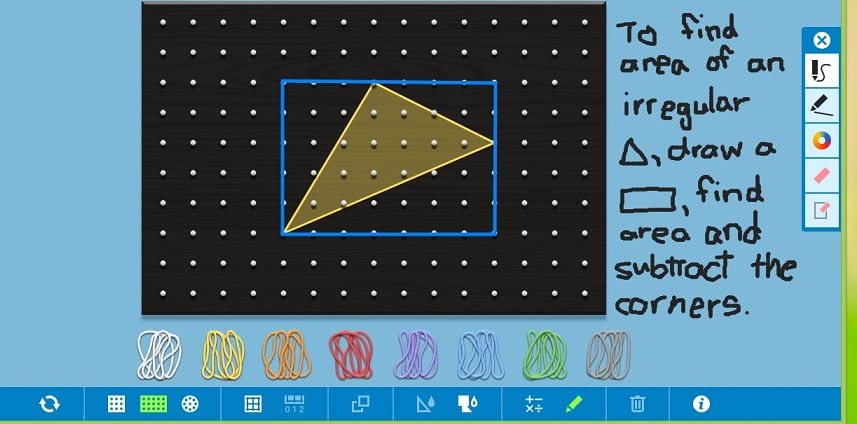
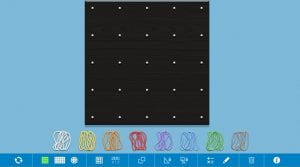
Check out the little “i” on how to get the most use out of it, but it has 2 variations for the board size and you can show it with/without gridlines or numbers. There are different colored bands which you drag to the board and stretch to whichever pegs you need. You can shade in areas, copy, and rotate (which is helpful to see if 2 similar shapes are equivalent). There is also a drawing palette in case you want to freehand something or draw lines (and with different colors as well).

What are the possibilities with this?

  • Use with primary students to create squares, rectangles, and other polygons. The teacher can elicit different responses with directions such as:  Make a square. Make a different size square. Make a trapezoid. Are any of our trapezoids the same?
  • Creations can sometimes be recorded on dot paper – although I would reserve this for less-complicated shapes.
  • Count the pegs around the shape to determine perimeter. The teacher might ask students to create a rectangle with a perimeter of 10 (or 12, or another amount). How many different ways are there? Be cautious with diagonal connections because they are not equivalent to vertical or horizontal connections. Think of how you can get students to discover this without just telling them.
  • Show the gridlines to help students determine area.  Initially,  students may just count the squares inside the shape. Guide students to more efficient ways to figure this (multiplying, decomposing into smaller sections, etc.).
  • This app is also great for creating irregular shapes in which students may decompose into smaller rectangles or triangles. Then check them with the standard formulas.

2. “Cubes” at NCTM’s site (Illuminations):  This one is perfect for volume and surface area.

  • Volume:  You can use the gear symbol to select the size (l, w, and h) of the rectangular prism, or use the default ones shown. Then there are 3 tools used to fill the rectangular prism:  individual cubes, rows of cubes, or layers of cubes. I prefer using the layer tool to support the formula for volume as:  area of the base x height.  The base is the bottom layer (which can be determined by looking at the length x the width). The height is the number of layers needed to fill the prism. Once you compute the volume, enter it and check to see if it is correct.
  • Surface Area of Rectangular Prism:  To calculate the surface area, you must find the the area of each face of the prism. Again, you can customize the size using the gear tool.  I prefer this as the shapes shown randomly often are too small to see. Yes, there is a formula for surface area — but conceptually we want students to note the surface area can be thought of in three parts. With a click on each face, this app opens (or closes) a rectangular prism into the 6-faced net making it easier to see the equal sized sections:
    • Area of the front and area of the back are the same
    • Area of the top and area of the bottom are the same
    • Area of each side is the same
    • Be sure to explore what happens when the prism is a cube.

3.Surface area with Desmos:  This link provides an interactive experience with surface area, using a net. This time, the three visible faces of the prism are color coded, which helps with identifying top / bottom; front / back; and side / side. The prisms on this site are also able to be changed so students can see how altering one dimension affects the surface area.

4. “Lines” on GeoGebra

5. “Angles” on GeoGebra

6. “Plane Figures” on GeoGebra

These three may be more relevant to middle school math standards.  Check them out!!  Also take a look at the “Resources” link (left side of web page).  There are plenty of other good links for arithmetic standards as well – too many to list here.  You may have to create a log-in, but it’s FREE!

Enjoy!  Do you have other websites to recommend? Let us know.

Graphic Organizers for Math

by C. Elkins, OK Math and Reading Lady

Here are some cool graphic organizers for your math files!  Make sets of them, laminate or put in plastic sleeves, and use them over and over again!  Graphic organizers help students stay organized and teach them how to complete problems neatly. They are also a great way for students to show different strategies for the same problem. While primary students may need an already-made graphic organizer, intermediate students should be taught how to duplicate them on their own to use whenever the need arises – so the simpler, the better! With repeated use, students are more likely to utilize them regularly in their daily work (and on their scratch paper with assessments).

This one has ten frames and part-part-whole models. In my opinion, these are essential when working with K-2 students because they help children with subitizing, number bonds, and addition / subtraction facts.  If you are using Saxon, you are missing these important strategies!!:

Here’s one to show fractions (area, set, length models)

Need a template for students to make arrays? This one is ready!  I love showing students how to break an array into smaller parts to see how multiplication (or division) facts can be decomposed.  Example:  Make a 6 x 7 array.  Section off a 6 x 5 part. Then you have a 6 x 2 part left over.  This proves:  6 x 7 = (6 x 5) + (6 x 2).  Or — 6 x 7 = 30 + 12 = 42

This graphic organizer shows 5 different multiplication strategies using 2 digit numbers, and a blank one for students to record their thinking. Very handy!!  One of my favorite strategies is partial products. I highly recommend this one before going to the std. algorithm because students decompose the problem by place value and must think about the whole number and not just the parts.

Do your students need something to help them see the different models for a decimal? Try out this graphic organizer. Students will utilize the pictorial forms as well as the abstract.

Do your students know that .7 (or 7/10) is the same as .70 (or 70/100)?  Using this dual set of tenths and hundredths grids will help them see why this is true!

Be sure to check out my FREE templates and organizers (see black bar above “links . . .”)  Please share your favorite graphic organizers for math!  Enjoy!!

Graphic Organizers for Literacy

by C. Elkins, OK Math and Reading Lady

I highly recommend the use of graphic organizers. The purpose is to help students organize information with regard to different text structures:  

  • Compare and contrast
  • Cause and effect
  • Details / Descriptive
  • Problem and solution
  • Sequence

Graphic organizers are also helpful with standards such as:

  • Main idea
  • Summarizing
  • Character analysis
  • Story elements

Graphic organizers help organize the student’s thinking, and assist with note-taking. The visual pictures created help the student “see” the text structure, recall details, state the main idea, and summarize the selection.

Here are links to some sites I think provide good quality graphic organizers which can be utilized with a variety of situations:

  1. This one is more primary oriented: https://www.eduplace.com/graphicorganizer/
  2. This one is oriented more for 3rd and above: http://www.educationoasis.com/printables/graphic-organizers/
  3. This one is a FREE resource at TPT (as pictured above) that supports each of the 5 text structures: https://www.teacherspayteachers.com/Product/Non-Fiction-Text-Structures-Flip-Flap-and-Graphic-Organizers-Freebie-1777102

I have also linked these in “Instructional Resources” and in the categories list on my blog.  Enjoy!!

Division Basics Part 3: Repeated Subtraction and # Line

by C. Elkins, OK Math and Reading Lady÷

In my opinion, the process of repeated subtraction is very important for students to practice. With repeated subtraction, we are actually asking this question:  “How many _____ in _______?”  If the problem was 20÷4, we can ask, “How many 4’s are in 20?”  The process is to keep subtracting 4 (using concrete, pictorial, and abstract methods) until zero is reached.  This would be done 5 times — thus, 20 ÷ 4 = 5.

Much like multiplication, there are different aspects of division children should become familiar with.

  • Arrays 
  • Equal Groups
  • Repeated Subtraction
  • Number lines
  • Skip counting

The focus today will be to help children understand how repeated subtraction can assist with the division process (using manipulatives, drawings, and paper-pencil methods). The template pictured here is FREE from: Multip. and Division templates FREE from Number Two Pencils @ TpT

The reason the repeated subtraction strategy is important is because this is what we are really asking students to do when they encounter long division or partial quotient problems. With the problem 100 ÷ 4, the question is, “How many 4’s are in 100?” If the repeated subtraction process is used, the answer is of course, 25.  But subtracting 4 twenty-five times is not very efficient.  So we want the student to get closer to 100 and subtract larger amounts than 4 at a time. The partial quotients method would allow the student to do this in chunks.  1 solution could be to subtract 40 (ten 4’s), subtract another 40 (ten more 4’s), subtract 20 (five 4’s).  See picture below: Continue reading

Division Basics Part 2: Equal Groups

by C. Elkins, OK Math and Reading Lady

Last post featured division using arrays and the area model.  
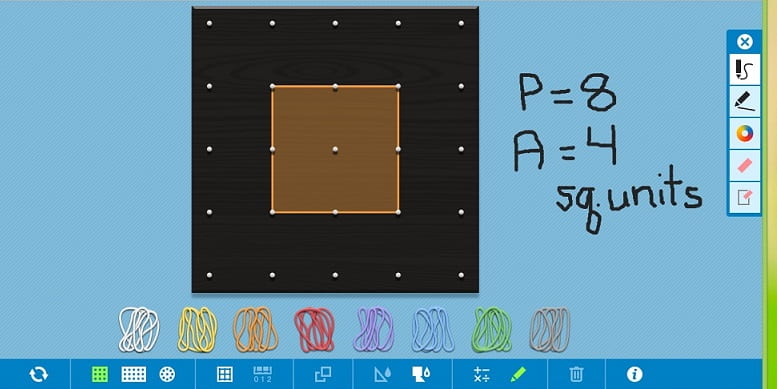
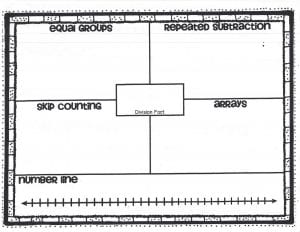
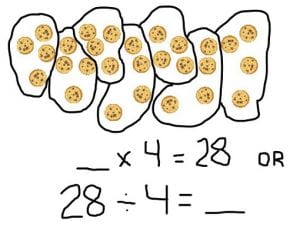
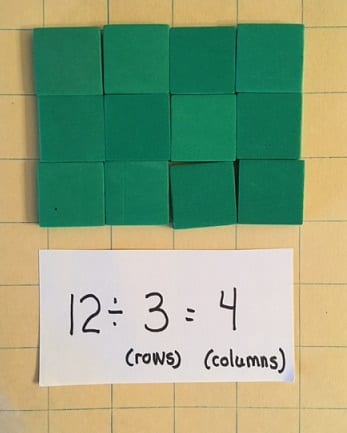
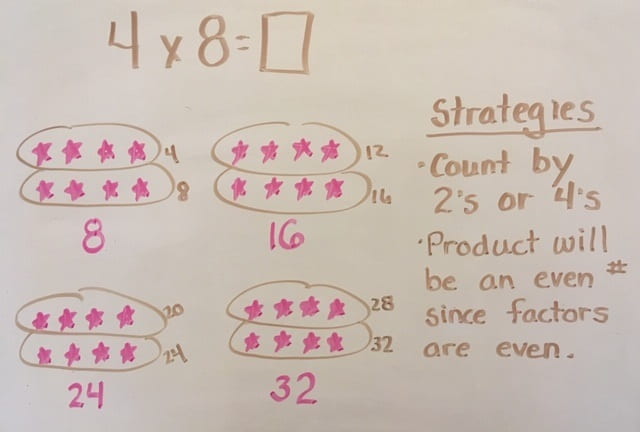
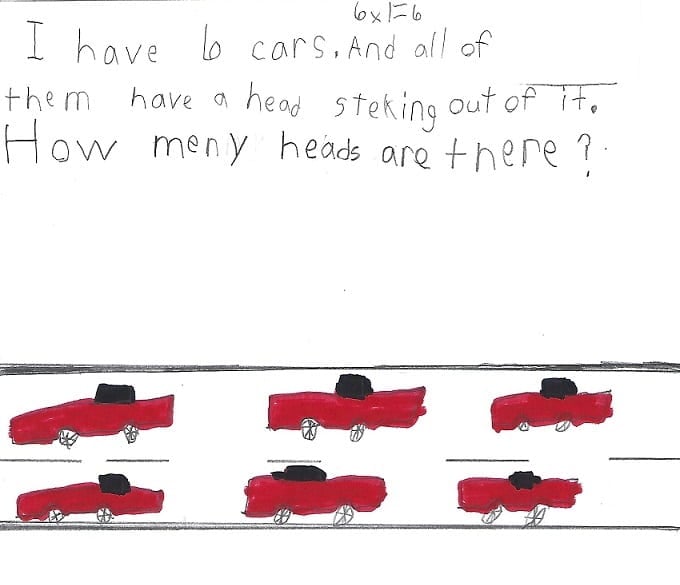
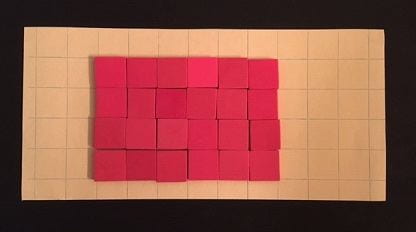
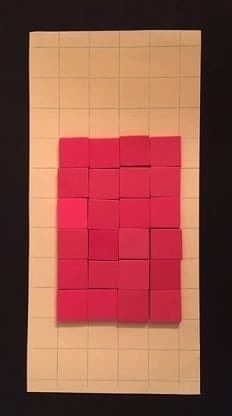
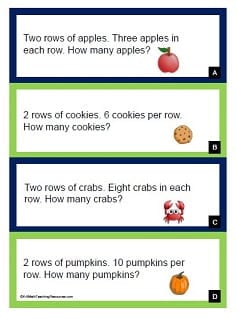
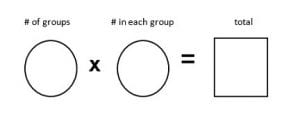
This post will focus on helping children see division as
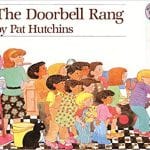
 equal groups. Most of us have used the “plates of cookies” analogy to help kids see how to represent equal groups in a drawing.  I will just take that a few more steps to increase efficiency.

Much like multiplication, there are different aspects of division children should get familiar with:

  • Arrays 
  • Equal Groups
  • Repeated Subtraction
  • Number lines
  • Skip counting

In this post, I will break down the benefits of equal groups models to help children understand division (and how it is related to multiplication). Check out the freebies within this post.

If you haven’t utilized this book with your students, please try to find a copy!  It’s called The Doorbell Rang by Pat Hutchins.  In this story, Ma makes some cookies to be split between the kids.  Then the doorbell rings and more kids come, so the problem has to be refigured. This scenario repeats. As a class, you can duplicate the story with a different # of cookies and children.

Another great story emphasizing equal groups (as well as arrays) is the story One Hundred Hungry Ants by Elinor Pinczes.  In this story, 100 ants are on their way to raid a picnic. They start off in one straight line (1 x 100), but then rearrange into different equal groups to shorten the line (2 lines of 50, 4 lines of 25, etc.). A nice project after reading this book is to see how many ways a different given # of ants (or other animals / objects) can be divided into equal groups / rows.


By clicking on the links for each book above, you will be taken to Amazon for more details.

As I mentioned earlier, many children’s view of equal groups regarding division is to use manipulatives and/or draw circles / plates to match the divisor and then divide up the “cookies” equally in these groups.  Let’s say you had this problem: “There are 12 cookies to be divided onto 3 plates equally.  How many cookies would go on each plate?” As you observe the students:

  • How are they dividing up the cookies? One at a time, two at a time, randomly, trial and error?
  • Are the “cookies” scattered randomly on the plate / circle?  Or, are they arranged in an easy-to-see pattern so they are easily counted (by the student and yourself as you walk around the room)?
  • Are the students able to verbally tell you how they divided them?
  • Are the students making the connection to multiplication by noting that 3 x 4 = 12?
  • Can they solve similar problems using language other than plates / cookies?
    • Try shelves / books; trays / brownies; buildings / windows; flowers / petals; students / rows of desks, stars / # of points; aquariums / fish; boxes / donuts; etc.

Use of manipulatives of various types (cubes, tiles, counters) is important for children to have their hands on the objects being divided. This is how they work out their thinking. Then work toward paper/pencil drawings before going to the abstract use of numbers only.  This doesn’t have to be done in separate lessons, however. There is great value for children to see how the concrete, pictorial, and abstract representations all work together.

Also, help children list synonyms for the dividing process:  distribute, share, split, separate, halve, quarter, partition

Here are a few strategies I believe help make the equal groups process more efficient: Continue reading

Division Basics Part 1: Arrays and Area Model

by OK Math and Reading Lady

Division seems to be the hot topic with classes I have been visiting lately, so I thought I’d focus on that for now. Let’s look at some of the basics.  Students as young as first grade actually start thinking about division when working on fraction standards such as:  Determine fair share — equal parts. Most students have had practical experience with dividing sets of objects in their real life to share with friends, classmates, or family (cookies, pizza, crayons, money, pieces of paper). So now our job as teachers is to relate this real-life experience with the division algorithm.

Much like multiplication, there are different aspects of division children should get familiar with:

  • Arrays 
  • Equal Groups
  • Repeated Subtraction
  • Number lines
  • Skip counting

In this post, I will break down the benefits and uses for arrays (and the related area model) to help children understand division (and how it is related to multiplication). There’s a fun FREE game (Block-It) at the end of the post.

What is an array?  An array is a rectangular model made up of rows and columns.  When an array is constructed, the factors are represented by the number of rows and columns.  So, do your students know the difference in a row and column?  (Rows go horizontally, while columns are vertical.)  These are important math terms students should be using.

  • Give students experience constructing arrays with manipulative objects (tiles, chips, cubes, etc.):
    • You can be specific, such as: “Build an array using a total of 12 tiles. Put them in 3 rows.  How many columns did you create?” In this scenario, there is only 1 way to show this array. Students would be modeling 12 ÷ 3 = 4. Twelve is the dividend (the total amount you started with). The # of rows is the divisor (how it was divided).  The quotient is the result (in this case the # of columns).
    • You can also be a little more open ended such as:  “Build an array using 12 tiles. Is there more than one way to do this?” If students are given the opportunity to explore, they hopefully find arrays such as 3 x 4; 4 x 3; 2 x 6; 6 x 2; 1 x 12; or 12 x 1. Students would be modeling 12 ÷ 4; 12 ÷ 2; 12 ÷1, etc.
  • Give students experience drawing arrays:
    • You can be specific or open-ended (as above).
    • Children can free-hand draw or use grid paper.  If using grid paper, then these can be cut out and displayed as “Different ways to divide 12.”
  • Give students experience using pre-drawn arrays:
    • Students should label the sides of the array with numbers.
    • Use the numbers shown to determine the fact family.  Example:  3 x 4 = 12; 4 x 3 = 12; 12 ÷ 3 = 4; and 12 ÷ 4 = 3
  • After the array is made, ask questions or explore more such as:
    • How many 3’s are in 12? (count the columns)
    • How many 4’s are in 12? (count the rows)
    • Circle the rows and / or columns to see the groups more easily.
    • Help children make up story problems to match the array:  “I have 12 desks that I need to arrange in 3 rows. How many desks will be in each row?” or “I need to put 12 books equally onto 3 shelves. How many books will go on each shelf?

Continue reading

Text Structures Part 4: Sentence Frame Posters

by C. Elkins, OK Math and Reading Lady

Today’s post is the result of a project I have been working on for awhile.  I created some posters you can use in your classroom which feature sentence frames connecting text structure to the skills of main idea and summarizing.

Here are samples of 2 of the Main Idea posters. Get the full set here FREE: Text Structure Main Idea Posters CE-2019  There are 10 posters (1 Main Idea and 1 Summarizing poster for each of the five text structures).  If you have suggestions for improvement, please let me know.  I want to make these usable for YOU!