Writing Part 1: How to get students to write

by C. Elkins, OK Math and Reading Lady

So many teachers have asked for assistance with writing – so here is Part 1. Stay tuned for more parts devoted to helping students become better writers.

Sometimes it’s hard to know where to start with writing. Do you have these thoughts?

  • What type of paper is best? Lined, unlined, wide rule, college rule, dotted lines?
  • How much should I help them with spelling? Does it need to be spelled correctly?
  • Should I use prompts or free choice journaling?
  • How do I get students to space correctly?
  • How do I get students to stay on a topic?
  • How do I get students to use the conventions we have worked on (capitalization, punctuation, etc.)
  • What do I do about handwriting issues?
  • How can I connect it with reading, math, or other subjects?

At the root of all of these issues above, I believe the following are musts for any grade level:

  1. Students must be exposed to quality literature which highlights a variety of writing styles. This is accomplished through the books you use in guided reading, whole group reading, and especially your daily read aloud time. Through this rich exposure to literature students become familiar with various authors and their styles of writing, as well as how authors use their “voice” to relay their message. Voice is the ability to project the way you talk into print. (More info in later posts about books that really show different types of “voice.”)
  2. Students can’t be expected to write if they don’t see the teacher model writing. Through modeling, teachers can use dozens of “think alouds” to share the decisions they are making. In this way, the strategies a writer (the teacher) uses are being exposed. Then the students are more likely to emulate these strategies.
  3. Writing needs to be scaffolded in the same way as other lessons: I do – we do – you do. Students observe and watch the teacher as he/she models various writing strategies. With shared writing, the teacher and students work together to “share the pen.” Then we gradually release students through guided writing sessions before expecting independent writing. This is a year-long process.
  4. Sometimes your writing strategy lessons might best be accomplished through your small group literacy time. Students are probably grouped based on their reading needs, so they likely have similar writing needs. From my experience, it’s a lot easier to monitor 4-6 students’ writing than a whole class. In this case a  goal could be to write once a week as part of your weekly routine. (Example: Monday and Tuesday are spent on the guided reading text for the week, Wednesday on word work, and Thursday for writing.)

Continue reading

Fractions Part 6: Adding and Subtracting Fractions

by C. Elkins, OK Math and Reading Lady

Starting in 3rd grade, students start building understanding about adding and subtracting fractions by composing and decomposing simple fractions using concrete and visual models. Composing: 1/4 and 3/4 combine to make 4/4 (whole). Decomposing: 8/8 is made up of 2/8 and 6/8. In fourth grade, students begin to add and subtract fractions with like denominators, but should still be utilizing models, drawings, and number lines to illustrate and simplify. In fifth grade, students are expected to add and subtract fractions of all types (proper, improper, with unlike denominators, etc.).

With a firm foundation of composing and decomposing, partitioning, comparing, naming equivalent fractions, and understanding the relationship between certain fractions (such as halves / fourths / eighths / sixteenths; and thirds / ninths / sixths / twelfths; or fifths / tenths), then students are more prepared to perform operations with fractions. Here’s a great resource by Donna Boucher at Math Coach’s Corner: Composing and Decomposing Fractions activity on TPT ($6)

Estimating: This is an important part of operations with fractions. Do you expect your answer to be less than 1/2, more than 1/2, more than 1? How do you know? If I was adding 8/9 + 11/12, my answer should be about _____? It should be slightly less than 2 because both of these fractions are almost 1.

If I am adding 4/6 and 6/8, my answer should be more than 1 because each of these fractions are greater than 1/2.

Different strategies: There are many “tricks” or shortcuts available to show students how to quickly add, subtract, or multiply fractions. I believe these shortcuts are only useful after a students has a strong understanding of why and how to find a common denominator and equivalent fraction. These shortcuts do not help build conceptual understanding of fractions.  I will focus on ways to understand the why using visual and pictorial models. Get your FREE copy of the following guides by clicking HERE. Continue reading

Fractions Part 5: Equivalent Fractions

by C. Elkins, OK Math and Reading Lady

This is part 5 of a series of fractions posts. Thanks for sticking around! Through explorations with fraction manipulatives, pictures, and drawings, we hope students begin to notice there may be different ways to express the same area using fractional terms. To cut a sandwich into halves and eat one of the halves is the same as cutting the same sandwich into fourths and eating two of the fourths. Read on for several freebies about equivalent fractions.

Students can gain experience finding equivalent fractions using models in several ways: Fraction strips, area models, set models, bar / length models, and number lines. Then with a strong understanding using concrete and pictorial models, the student is ready to apply paper-pencil methods to name equivalent fractions. But remember to use the same size whole: As in this picture using pattern blocks, 2/3 of a trapezoid is NOT the same as 2/3 of a hexagon.

Fraction Strips: If you don’t have sets of fraction strips, here is a free resource Fraction, decimal and percent strips charts via Kim Tran (TPT).  Commercially available strips are also nice. But, with some 1″ strips of construction paper, students can create their own and probably learn a lot about the relationship between halves, fourths, and eighths as well as thirds, sixths, and twelfths in the process of partitioning and cutting them.

TIP:  Make sure students know how to read a fraction strip chart. A couple of years ago I was working with a third grade class and assumed they could readily see that 5/10 was equivalent to 1/2. But after confusing looks, I realized that I needed to physically show them how to follow a line vertically down the chart to find other fractions that were in line (by placing a ruler or long pencil along the vertical line). Another example.  “To find another fraction equivalent to 1/3, find the line at the end of the 1/3 section and trace it vertically down the page to see if there are other fractions that stop along that same line. You should see in the sixth’s line that 2/6 lines up, and in the ninth’s line that 3/9 lines up and in the twelfths line that 4/12 lines up.”

After cutting and labeling strips, then explore equivalent fractions (those with the same size length). Students should be able to generalize that different fractions can used to represent the same area.

Area models:  By covering or partitioning shapes, students should notice that even though the same area is covered or shaded,  the number and size of the parts can change. Continue reading

Fractions Part 4: Compare Fractions

by C. Elkins, OK Math and Reading Lady

Starting in 3rd grade, students start using words and symbols to read and write fractions (Oklahoma Academic Standards OAS 3.N.3.1), construct fractions (3.N.3.2), compose and decompose them (3.N.3.3), and order and compare them using models and number lines (3.N.3.4).  Fourth and Fifth graders continue to refine these skills. In this post, I will address different ways to compare fractions (keeping in mind the concrete-pictorial-abstract progression) by comparing numerators, comparing denominators, comparing to half, and utilizing knowledge of unit fractions. Students should have extensive experience utilizing models such as fraction strips, fraction circles, pattern blocks, number lines, pictures, and drawings to help build the concepts of fractional parts before being asked to put a <, >, or = sign between two fractions. See the end for a FREE comparing fractions guide.

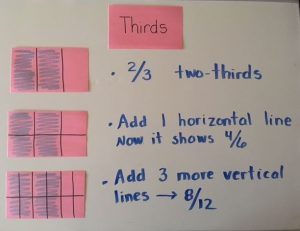
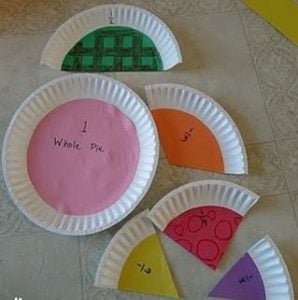
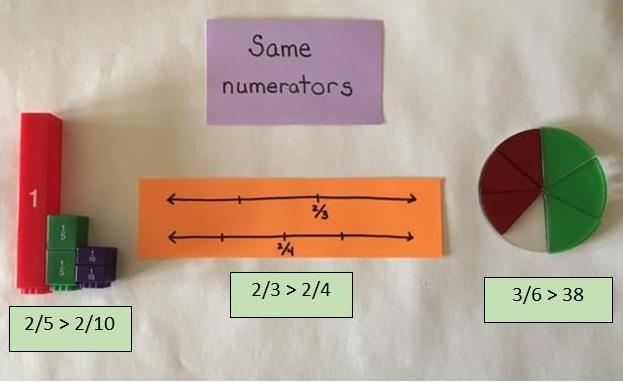
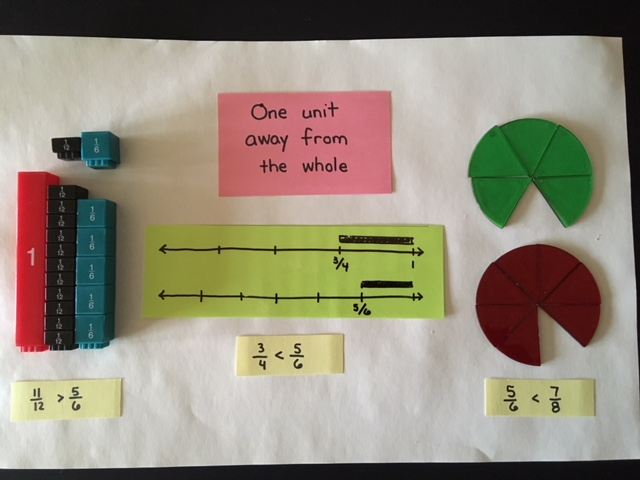
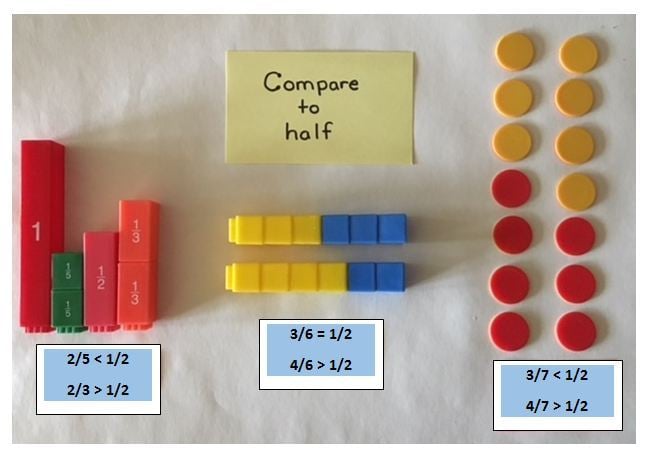
In my opinion, determining if (or how) two fractions are equivalent is also a very important step when comparing fractions. However, regarding the OAS, students are not asked to represent or rename equivalent fractions until 4th grade (4.N.2.1). I will address equivalent fractions in the next post – just know that sometimes this skill goes hand in hand with comparing fractions. AND keep in mind that most of the standards for fractions through 4th grade stipulate “using concrete and pictorial models, fraction strips, number lines.” Students in 4th grade should not be expected to do abstract paper-pencil steps to simplify or “reduce” fractions to simplest terms, nor cross multiply to compare, etc. They need hands-on experience to more fully understand the concepts about fractions that are so difficult to grasp abstractly. Then in 5th grade students should have enough visual pictures in their head to solve operational problems with fractions. OK, that’s my soapbox. Don’t make it harder than it should be.

Materials to use: pattern blocks, fraction strips, fraction circles, cubes, tiles, two-color counters, Cuisenaire rods, number lines, paper plates, graham crackers, candy (m and m’s, skittles, etc.)


Ways to Compare (when using same size wholes – you can’t compare 3/4 of a donut with 1/2 of a birthday cake):

  • Using unit fractions:  If the fraction is a unit fraction, it has a 1 as a numerator. This should form the first type of comparison:  1/2 > 1/3 and 1/5 < 1/4 and 1/6 > 1/10, etc. This type of comparison is critical to fractional understanding.
  • Same denominator: When the denominators are the same, then compare the numerators. 2/4 > 1/4.
  • Same numerator:  When the numerators are the same, compare the denominators. For example: When comparing 2/5 with 2/10, since fifths are larger parts than tenths, 2/5 will be larger than 2/10. This is hard for some students to think about, because the smaller the number designated for the denominator, the larger the part (when comparing the same size whole). 
  • Unit fractions one away from the whole:  These are fractions in which there is one unit to be added to make it a whole (1). The numerators of these fractions will be one less than the denominator.  11/12 is 1/12 away from the whole (1). 7/8 is 1/8 away from the whole (1). Example: To compare 3/4 with 5/6, use manipulatives or a number line to see that 3/4 is 1/4 away from 1, while 5/6 is 1/6 away from 1.  Since 1/4 is a bigger part than 1/6, then 3/4 < 5/6.
  • Less than half? More than half?  Learn all of the fractions that equal half. While this might sound simple, students often have misconceptions that 1/2 is the only way to describe half, or that a 5 must be in the fraction to be half (because 5 is the midpoint when used on a number line for rounding). I ask students to recall their addition facts dealing with doubles from 2nd grade. Since 2 + 2 = 4, two is half of 4, and 2/4 = 1/2. Repeat that with other forms of 1/2. Students should learn that finding half of an even-numbered denominator should be figured quickly (7/14, 9/18, 25/50, 50/100, etc.). Then use knowledge of half to determine if a fraction is less than half or more than half. Since 7/14 = 1/2, then I know that 6/14 < 1/2 and 9/14 > 1/2.

Continue reading

Fractions Part 3: Misconceptions

by C. Elkins, OK Math and Reading Lady

The fractions focus today will be on some basic concepts that students should understand before they work to compare them, determine equivalent fractions, simplify them, use mixed fractions, or add / subtract them.  I am including a FREE copy of my Fraction Basics reference guide (click here), along with a photo of an anchor chart I made for a fourth grade class.

I have been rereading a book I love about fractions called “Beyond Pizzas and Pies, 1st Edition.” 
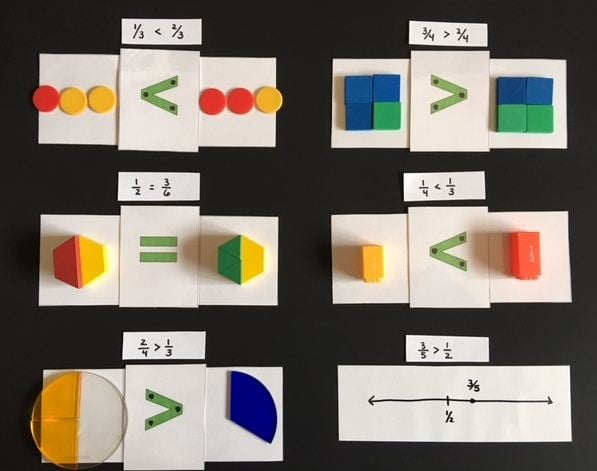
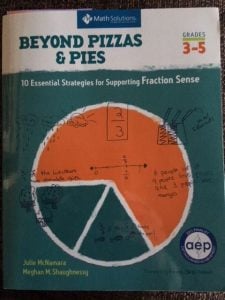
It has great examples of children’s misconceptions about fractions and lessons on how to try to remediate them. A recurring theme in the book is that while kids can learn “tricks” to help them solve fraction problems, they often do little to help students conceptualize what fractions are. Here’s a link to Math Solutions regarding this book: Beyond Pizzas and Pies (2nd Edition) Following are five  examples from the book that made an impact on me and my teaching (which I will go into more detail about on future posts). Continue reading

Fractions Part 2: Constructing and Drawing

by C. Elkins, OK Math and Reading Lady

The standards (CCSS or any state) use varied verbs to describe what students are to do regarding fractions: form, compose, construct, model, partition, draw, decompose, share, identify,  read, write, describe, order, and compare. Satisfying these standards can often be accomplished through use of concrete methods (manipulatives) and pictorial models (drawings). Remember the best understanding of concepts usually follows the concrete, pictorial, abstract progression (CPA). In other words, “Let’s make it, draw it, and then use numbers to represent it.”

Through constructing and drawing, students will  be prepared for further work with fractions, and they begin to conceptualize the relationship between the size of denominators, the numerators, and the whole. Click here for a FREE copy of the pictures you will see below (3 page pdf).

Form / Compose / Construct / Model:  Use smaller shapes to form or compose larger shapes (which is also a geometry std. in KG and 1st). Put together fraction pieces or puzzles to make the whole shape (circle, rectangle, hexagon, etc.). Use fraction pieces to demonstrate understanding by constructing models of area, set, and length.

These pictures show different ways students can use manipulatives to form, compose, construct, and model fractional parts (pattern blocks, fraction circles, tangrams, linking cubes, color tiles, fraction bars, Cuisenaire rods, two-color counters):

Partition / Draw / Decompose / Share: Split larger shapes into smaller fractional parts (halves, thirds, fourths, etc.). Divide (fair share) objects into equal groups. Use models to decompose a fraction in more than one way. Represent fractions on a number line.

I enjoy teaching children how to partition common shapes into fractional parts – because it involves drawing. Too often, if I just tell them to divide a rectangle or circle into fourths or sixths, I get something like this: Continue reading

Fractions Part I: Basics KG-2nd grade

by C. Elkins, OK Math and Reading Lady

This is the first post of several I will devote to fractions, starting with basic understanding in first grade and moving up toward operations with fractions in 5th and 6th grade. I would love to hear from you about your students successes and/or difficulties with fractions so I can be sure to address this topic to meet your needs. Free resources below.

What is a fraction?  A fraction represents a part of a whole. It consists of a numerator (which tells how many parts we are describing) and a denominator (how many parts the whole is divided into).

Some basics:

  • Fractional parts must be equal. This is a concept introduced in first grade. (See some lesson plan ideas below.)

    From Pinterest

  • The larger the denominator, the smaller the parts AND the smaller the denominator, the larger the parts — when comparing identical sized objects. You can’t compare 1/4 of a cookie with 1/4 of a cake. This is one of the hardest concepts to grasp – so lots of hands-on experience is needed.
  • Helpful manipulatives to use with fractions: pattern blocks, color tiles, Cuisenaire rods, fraction circles, fraction strips, fraction bars, graham crackers.
  • Be careful about always referring to fractions as “the shaded part.” While this might be true with pictures on worksheets, fractions can be described in these ways also: What fraction of the students are boys? What fraction of the pizza was eaten? What fraction of the candy bar is left? What fraction would belong here on the number line?
  • Lines do not necessarily define the fractional part. On the picture shown, the left shows 1/4 shaded. The right also shows 1/4 shaded, but students are likely to say 1/3. Why? Because they count the parts shown (3) and the shaded parts (1) and put that together as a fraction. A way to show this is still 1/4 is to show that the shaded part will fit into the whole shape 4 times.
  • A unit fraction: This is a fraction with 1 as the numerator (1/4, 1/8, etc.). It is one unit of the whole.
  • A fraction that is one unit away from a whole has a numerator one less than the denominator. Examples: 2/3, 3/4, 7/8, 11/12, etc. This is helpful to conceptualize when comparing fractions.
  • When reading a fraction number line, compare it to a bar model. Then it is easier to see it is the spaces are the focus, not the tick marks.

Continue reading

Making Sense of Division (3rd-5th)

by C. Elkins, OK Math and Reading Lady

Is division a dreaded topic on your list of objectives to teach? Like many math topics, students have a harder time understanding it most likely because it’s not something they use regularly in their lives. Students should understand why division is useful before they have to start solving division problems. In this post, I will focus on helping students see the relationship between subtraction, multiplication, and division both with concrete objects, pictures, and the partial quotients model. Freebies available below!!

Then let’s talk about what division really is — it is repeated subtraction; much the way multiplication is repeated addition. The issue is that repeated subtraction is not always very efficient. Here’s what I mean.

Let’s say I have the basic problem 25 ÷ 5.  I could start with 25 and then subtract 5, subtract another 5, another 5, another 5, and another 5 until I run out and reach zero.  I would have to do this 5 times. If I had 25 cookies that I wanted to share equally among 5 friends, I could do the “one for you, one for you, one for you, one for you, and one for you” process and still end up with 5 cookies for each. Or I could try “two for you, two for you,” etc. to make the action of passing out the cookies faster. When I get down to 5 cookies, I return to the “one for you . . .” to make it work.

With a larger problem such as 72 ÷ 6, I can again try subtracting 6 at a time until I reach zero. This would take 12 repetitions — not efficient, but still accurate. Could I subtract 12 at a time instead (2 groups of 6) to be more efficient? Or 18 at a time, or 24 at at time? This is the idea behind the partial quotients model I will refer to a little later. Continue reading

Building Reading Fluency

by C. Elkins, OK Math and Reading Lady

Now that everyone is back from your winter break, I am sending you a short article on ways to build reading fluency with your students as a way to say Happy New Year! Click here for a FREE copy of it:  Building Fluency Guide


Cindy Elkins, Educational Consultant, OK Math and Reading Lady

Volume: Concrete activities to increase understanding (Grades 3-6)

by C. Elkins, OK Math and Reading Lady

I have worked with several groups of 4th graders lately to build rectangular prisms as a way of learning more about volume. Typically students know the formula (length x width x height), but often lack the strategies or spatial ability to solve problems seen only in picture (2D form). Concrete (hands-on) experiences help cement knowledge when abstract formulas may pose difficulty. And . . . it’s always fun to “play” while doing math!!

Here are some observations regarding students’ difficulties:

  • Students often resort to counting the visible cubes, not realizing there are others on the back side – which can’t be seen on a 2D representation.
  • Students are unsure which dimensions are the length, width, and height.
  • Students lack multiplication skills.
  • Students don’t know the purpose of finding volume (other than counting the cubes).
  • Students are often confused when constructing prisms when one of the dimensions is 1. They weren’t sure this was even a possibility until they saw what it looked like (after building it!).

Some possible solutions:

Give students multiple opportunities to build 3D rectangular prisms:

  1. Length is the longest side on the base. Width is the shortest side on the base. The height is how tall it is.
  2. Use this variant of the L x W x H formula:  (Area of the base) x Height or (L x W) x H. With this mindset, the students need to find the length and width dimensions first. Finding the area of the base first helps them visualize the bottom layer. Then the height just means the number of total stacks or layers (with all of them matching the area of the base).
  3. Give students specific dimensions such as (5 x 3) x 2.
    • Using connecting cubes, build the base (bottom layer) first and determine the area (5 x 3 = 15).
    • Then build 1 more layer just like it so there is a total of 2 layers (the height).
    • Through this experience, students learn what a 5 by 3 base looks like . . . and that each layer of the height has the exact same area. It’s actually several layers stacked on top of each other.
    • To complete this prism, compute the area of the base (5 x 3) and then multiply it by the height (2). So (5 x 3) x 2 = 30 cubic units.
    • This experience shows why the measurement is stated as cubic units (because cubes were used).
    • Students may also see another way to solve the problem is to add the area of the base 2 times (15 + 15). Of course, multiplication is more efficient, but seeing the addition solution helps them realize each layer is the same.
    • Get this FREE Prism Building Activity and FREE Volume game for building rectangular prisms from me (click on links). For the game, you just need the recording sheet and 3 dice per pair of students.
    • Don’t have connecting cubes? Check with KG or 1st grade classes!

Continue reading

Six Small Group Literacy Center Organization Models

by C. Elkins, OK Math and Reading Lady

Teachers realize the great benefit of working with smaller intimate groups in reading. By doing this, the teacher is able to tailor reading instruction and text levels to the needs of the students. This is a valuable time for students as well as the teacher. However, organizing a schedule and the activities for students who are not meeting with the teacher is very difficult. Then, if there is a large class (which seems to be the norm now), how can 20 students realistically be properly engaged for 45 minutes while the teacher meets with 5 . . . and move from one station to the next orderly, clean up after themselves, and do this all rather quietly?

So I have developed 6 different options which will enable the teacher to conduct small group instruction, while the other students are occupied productively. Click here to get a full description of them all, with charts and illustrations to help visualize how they are organized.PDF Center Organization Ideas For more help, search for my previous posts on Guided Reading Literacy Stations. And if you have questions or suggestions, by all means — click the comment box!!

Option #1:  Traditional rotation method — students rotate every 15-20 minutes and visit each station every day (including the teacher table).

Option #2: This is a semi-flexible schedule. Students start off with a must-do desk assignment(s), followed by reading practice. Then they choose a work station. Each day is a different station. Continue reading

Meaningful Student Engagement – Whole Class Reading

by C. Elkins, OK Math and Reading Lady

Teachers often ask me for suggestions on ways to engage students more, especially during whole class reading lessons. Student engagement is vital, isn’t it? Robert Marzano is a well-known educator/speaker whose research shows that students in highly engaging classrooms outperform their peers by an average  of almost 30 percentile points.  Students today have a higher need for interaction or they check out. What does engagement look like? The student . . .

  • participates in discussion
  • stays on task
  • listens to others
  • shares ideas
  • is aware of what is going on / alert
  • follows directions
  • reflects on learning
  • helps others
  • does more work than the teacher
  • enjoys the process
  • committed
  • applies new strategies
  • and . . . learns!!

What does lack of engagement look like? The student . . .

  • looks bored, sleepy, uninterested
  • can’t keep up
  • talks to their neighbor
  • is apathetic
  • gets confused
  • lacks understanding
  • fiddles with items in their desk
  • has a wandering mind
  • misbehaves
  • has a tired, frustrated teacher (because he/she is doing most of the work)
  • misses important information
  • hears the teacher do all the talking
  • has to be reminded to pay attention / follow along

I read an interesting article titled The Eight C’s of Engagement: How Learning Styles and Instructional Design Increase Students’ Commitment to Learning by Harvey F. Silver & Matthew J. Perini (linked here:The Eight C’s of Engagement).  They are:  Competition, Challenge, Cooperation, Connections, Curiosity, Controversy, Choice and Creativity (pages 9-11).

Cindy’s Top 20 Reading Engagement Ideas / Activities: These are based on personal experience, observation, and research. Get your free pdf copy here: Student Engagement – Whole Class Reading

    1. All students respond:
      • Thumbs up / down
      • Yes / No cards
      • Stand up / Sit down
      • Individual white boards (having specific procedures ensures productive use)
      • Multiple choice hand signals positioned in front of the student’s chest (1, 2, 3 or 4 fingers or finger-spelling sign language for a, b, c, d)
    2. Partner share: This takes modeling, observation, and practice to make it productive so students know quickly who their sharing partner is, what voice level to use, how to listen, how to take turns, how to summarize or recall what your partner said, how to help properly, etc.
    3. Sorting activities: Prepare cards which can be grouped according to your specs such as…
      • Sort the verbs (or adjectives) according to the character who exhibits these actions (or qualities).
      • Sort words to emphasize story elements: the characters, the setting, problems, actions, etc.
      • Sort words into a Venn diagram template while reading a compare / contrast article.
    4. Complete a graphic organizer together as you read and discuss the story. Notice that different text structures require a different way to organize the information.
    5. Fold it note taking: Students fold a blank sheet of paper into 4-8 sections to take notes, show examples, or illustrate desired elements. Teacher directs note-taking by modeling or telling what to put in each section.
    6. Technology – video – interactive Smartboard activities or tools
    7. Post-it-notes:  Students use post-it-notes to mark critical parts in the story. Focus on one objective at a time. Even more powerful — connect to a skill you are working on.
      • when new characters are introduced
      • on a confusing part or a question
      • to mark an “A-ha!” moment
      • on the part that shows a problem in the story, plus write what it is
      • to mark changes in time, indicating a sequential structure
      • to recall who and what periodically throughout the selection
      • to write an important detail, especially with a descriptive structure
    8. Teach students to ask thoughtful questions about the text instead of always waiting for the teacher to ask. Asking a question is much like having a conversation with yourself. Students can write questions on post its, a book mark, an index card, or on a piece of butcher paper hung in the classroom (for multiple questions).
      • Is there a word you don’t understand?
      • Are you confused or curious about something?
      • Do you have a question about the author’s purpose?
      • What is something you wonder about?
      • Do you need more background information?
      • Can you turn a heading or subheading into a question?
    9. Instead of questioning students after reading, give then a purpose to read a paragraph, page, or set of pages before reading. (Example:  Read ahead to find out ______).
    10. STOP ROUND ROBIN READING! What can be done instead?
      • Partner read: Teach how to do this properly. For example if partner A doesn’t know a word, how can partner B help without always just telling them the word? How much does each partner read? How to ask each other questions, or summarize as they read? How to stay engaged with your partner? How to share a book if needed?
      • Project the story on the screen.
      • For a story heavy with conversation, read the characters speaking parts. (I love the books Freckle Juice and Snot Stew for this!)
      • Read short specific excerpts. Example:  “Find the part which tells how _____.”
      • For poetry, find poems that can be read in two voices. Partner 1 reads 1st line, couplet, or stanza, Partner 2 reads next set. This is also great fluency practice!
      • In small group, students read silently while teacher “taps in” to listen to one read at a time.
      • If there is patterned text (ex: Gingerbread Man), choral read those parts.
    11. Provide more than one option for the assignment – – students are likely to be more engaged if they have a choice.
    12. Make a “scoot” activity in which students move around the room to answer posted questions.
    13. Matching:  Students each have a card and must walk around the room to find their matching partner. Switch cards with someone else and repeat. Connect to the story you are reading.
      • word – definition
      • synonym – antonym
      • sentence – missing verb
      • fact – opinion
      • character – quote
      • affix – root word
    14. Become a vocabulary expert (get free pdf attachment click here):
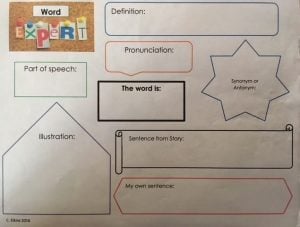
Each student thoroughly researches one word from the vocabulary list (definition, synonym, antonym, use in sentence, pronunciation, part of speech, and illustration). They become the expert about that word and teach it to others.
    15. Cooperative groups – each person should have a role:
      • Summarize a page, set of pages, or chapter.
      • Give an opinion.
      • Sequence main events.
      • Illustrate the story elements of a fictional selection.
      • Search for a specific number of interesting details (they get a choice in what details to include, plus they must debate or rate how interesting the detail is). Let class vote on which detail was the most interesting.
    16. Prepare work stations (learning centers) to review, expand concepts in a game or interactive format.
    17. Four corners:  Pose an open-ended question with 4 possible scenarios. Post each in a different corner. Students go to the corner that matches their opinion and discuss with others who think the same way they do. Then meet with group with opposing opinion for a friendly debate.
    18. Connect phonics, spelling, or word work lessons to the story by searching for one of these categories of words:
      • nouns
      • verbs (you can even specify past tense, present tense, past participles, action, etc.)
      • contractions / compound words
      • by number of syllables
      • vowel sounds
      • opinion words
      • sequence words
      • words with embedded little words (ex: yesterday)
    19. Make a poster of text features to go along with a story or article that didn’t have any.
    20. For stories with very few illustrations, describe a mental picture of what could be going on. Compare and contrast those mental pictures (by illustration if needed).

    Graphics provided via Microsoft Office clipart (creative commons)

    See www.teachertrap.com for this engagement poster:


Addition and Subtraction Part 5: Separate and Comparison Problem Solving Structures KG-4th

by C. Elkins, OK Math and Reading Lady

This week I will focus on subtraction problem structures. There are two types: separate and compare. I suggest teaching these models separately. Also, some part-part-whole problems can be solved using subtraction. I will refer to the same terms as in addition:  start, change, result.  You can also use the same materials  used with addition problems:  part-part-whole templates, bar models, ten frames, two-color counters, number lines, and connecting cubes.

The goal is for students to see that subtraction has different models (separate vs. comparison) and an inverse relationship with addition — we can compose as well as decompose those numbers. Knowledge of number bonds will support the addition / subtraction relationship. Here is the same freebie I offered last week you can download for your math files:  Addition and Subtraction Story Structure Information The six color anchor charts shown below are also attached here free for your use: Subtraction structure anchor charts

Separate:  Result Unknown

  • Example:  10 – 4 = ____; There were 10 cookies on the plate. Dad ate 4 of them. How many are left on the plate?
  • Explanation: The problem starts with 10. It changes when 4 of the cookies are eaten. The result in this problem is the  answer to the question (how many are left on the plate).
  • Teaching and practice suggestions:
    • Ask questions such as:  Do we know the start? (Yes, it is 10.) Do we know what changed? (Yes, 4 cookies were eaten so we take those away.) How many cookies are left on the plate now? (Result is 6.)
    • Reinforce the number bonds of 10:  What goes with 4 to make 10? (6)
    • Draw a picture to show the starting amount. Cross out the items to symbolize removal.
    • Show the problem in this order also:  ____ = 10 – 4. Remember the equal sign means the same as — what is on the left matches the amount on the right of the equal sign.

Continue reading

Addition and Subtraction Part 4: The Equal Sign and Join Problem Solving Structures KG-4th

by C. Elkins, OK Math and Reading Lady

Ask your students this question: “What does the equal sign mean?” I venture many or most of them will say, “It’s where the answer goes,” or something to that effect. You will see them apply this understanding with the type of problem  in which the answer blank comes after the equal sign such as in 5 + 6 = _____  or  14 – 9 = _____.  This is the most common type of problem structure called Result Unknown.  I was guilty of providing this type of equation structure a majority of the time because I didn’t know there actually were other structures, and I didn’t realize the importance of teaching students the other structures. So . . . here we go.  (Be sure to look for freebies ahead.)

Teach your students the equal sign means “the same as.”  Think of addition and subtraction problems as a balance scale: what’s on one side must be the same as the other side — to balance it evenly.

Let’s look at the equal sign’s role in solving the different addition / subtraction structures. I will be using the words start to represent how the problem starts, the word change to represent what happens to the starting amount (either added to or subtracted), and the result.  In this post I will be addressing the join / addition models of Result Unknown, Change Unknown, Start Unknown and Part-Part-Whole. I will highlight the subtraction models (Separate and Comparison) next time.  Knowing these types of structures strengthens the relationship between addition and subtraction.

Three of these addition models use the term join because that is the action taken. There are some, then some more are joined together in an additive model. One addition model, however, is the part-part-whole model. In this type there is no joining involved – only showing that part of our objects have this attribute and the other part have a different attribute (such as color, type, size, opposites).

Helpful materials to teach and practice these strategies are bar models, part whole templates, a balance scale, and ten frames using cubes and/or two color counters. Here are 2 free PDF attachments. First one: Addition and Subtraction Story Structure Information. Second one is a copy of each of the 4 anchor charts shown below:  Join and part-part-whole story structure anchor charts

Join: Result Unknown

  • Example: 5 + 4 = ____; A boy had 5 marbles and his friend gave him 4 more marbles. How many marbles does the boy have now?
  • Explanation:  The boy started with 5 marbles. There was a change in the story because he got 4 more.  The result in this problem is the action of adding the two together.
  • Teaching and practice suggestions:
    • Ask questions such as: Do we know the start? (Yes, it is 5.) Do we know what changed? (Yes, his friend gave him more, so we add 4.) What happens when we put these together?(Result is 9.)
    • Show the problem in this order also (with result blank first instead of last) :  ____ = 5 + 4
    • Common questions:  How many now? How many in all?  How many all together? What is the sum?

Join: Change Unknown

  • Example:  5 + ____ = 9; A boy had 5 marbles. His friend gave him some more. Now he has 9 marbles. How many marbles did his friend give him?  You could also call this a missing addend structure.
  • Explanation: This problem starts with 5.  There is a change of getting some more marbles, but we don’t know how many yet. The result after the change is (9).  It is very likely  students will solve like this:   5 + 14 = 9. Why? Because they see the equal sign and a plus sign and perform that operation with the 2 numbers showing. Their answer of 14 is put in the blank because of their misunderstanding of the meaning of the equal sign.
  • Teaching and practice suggestions: 
    • Ask questions such as: Do we know the start? (Yes, he started with 5 marbles.) Do we know what changed in the story? (Yes, his friend gave him some marbles, but we don’t know how many.) Do we know the result? (Yes, he ended up with 9 marbles.) So the mystery is “How many marbles did his friend give him?”
    • Count up from the start amount to the total amount. This will give you the change involved in the story.
    • Reinforce number bonds by asking, “What goes with 5 to make 9?” or “What is the difference between 5 and 9?”

Join:  Start Unknown

  • Example:  ____ + 4 = 9; A boy had some marbles. His friend gave him 4 more. Now he has 9. How many did he have to start with?
  • Explanation:  The boy had some marbles to start with, but the story does not tell us. Then there is a change in the story when his friend gives him some more (4). The result is that he has 9.
  • Teaching and practice suggestions:
    • Ask questions such as:  Do we know how many marbles the boy started with? (No, the story didn’t tell us.) Do we know what changed in the story? (Yes, his friend have him 4 marbles.) Do we know the result? (Yes, he had 9 marbles at the end.)
    • Count up from 4 to 9.
    • Reinforce knowledge of number bonds by asking, “What goes with 4 to make 9?”

Continue reading

Addition and Subtraction Part 3: Facts Strategies KG-3rd

by C. Elkins, OK Math and Reading Lady

This is part three in a series of strategies regarding addition and subtraction strategies.  This part will focus on a variety of strategies to help toward memorization of facts, meaning automatic computation. While children are learning their number bonds (building up to 5 in KG, to 10 in first grade, and to 20 in second grade), there are other facts which cross several number bonds that students can work towards. These strategies to build mental math automaticity are highlighted below. Get some freebies in the section on doubles / near doubles.

Identity (or Zero) Property:

  • The value of the number does not change when zero is added or subtracted.
  • 3 + 0 = 3
  • 9 – 0 = 9

Subtracting All:

  • The answer is always zero when you take away / subtract all.
  • 9 – 9 = 0
  • 50 – 50 = 0

Adding 1 or Subtracting 1:

  • Adding 1 results in the next number in the counting sequence.
  • Subtracting 1 means naming the number that comes right before it in the counting sequence.
  • With manipulatives, lay out an amount for student to count.  Slide one more and see if he/she can name the amount without recounting.
  • Do the same as above, but take one away from the group to see if he/she can name the amount without recounting.
  • Show this concept using a number line.
  • 6 + 1 = 7;    26 + 1 = 27
  • 7 – 1 = 6;     37 – 1 = 36
  • After +1 or -1 strategies are in place, then go for +2 or -2 for automatic processing.

Next-Door Neighbor Numbers:

  • If subtracting two sequential numbers (ie 7 subtract 6), the answer is always one because you are taking away almost all of the original amount.
  • Help students identify these types of problems:  8-7;   10-9;   98-97;  158-157
  • Guide students to writing these types of problems.
  • Relate these to subtracting 1 problems.  If 10-1 = 9;   then 10 – 9 = 1.
  • Show on a number line.

Doubles (with freebies): Continue reading

Addition and Subtraction Part 2: Part-Part-Whole Models KG-2nd

by OK Math and Reading Lady

In Part 1 I focused on a numerical fluency continuum, which defines the stages a child goes through to achieve number sense. After a child has a firm grasp of one-to-one correspondence, can count on, and understands concepts of more and less, he/she is ready to explore part-part-whole relationships which lead to the operations of addition and subtraction. That will be the focus of this post. Read on for free number bond activities and a free number bond assessment!

One way to explore part-part-whole relationships is through various number bonds experiences.  Number Bonds are pairs of numbers that combine to total the target or focus number. When students learn number bonds they are applying the commutative, identity, and zero properties. Do you notice from the chart below that there are 4 number bonds for the number 3; 5 number bonds for the number 4; 6 number bonds for the number 5, etc? And . . . half of the number bonds are actually just the commutative property in action, so there really aren’t as many combinations for each number to learn after all.

  • KG students should master number bonds to 5.
  • First graders should master number bonds to 10.
  • Second graders should master number bonds to 20.Teaching Methods for Number Bonds
  • Ideally, students should focus on the bonds for one number at a time, until mastery is achieved. In other words, if working on the number bond of 3, they would learn 0 and 3, 3 and 0, 1 and 2, 2 and 1 before trying to learn number bonds of 4. See the end of this post for assessment ideas.

  • Ten Frame cards: Use counters to show different ways to make the focus number. (See above example of 2 ways to show 6.) Shake and Spill games are also great for this:  Using 2-color counters, shake and spill the number of counters matching your focus number.  See how many spilled out red and how many spilled out yellow.  Record results on a blank ten-frame template. Repeat 10 times.
  • Number Bond Bracelets: Use beads and chenille stems to form bracelets for each number 2-10.  Slide beads apart to see different ways to make the focus number.
  • Reckenreck: Slide beads on the frame to show different combinations.
  • Part-Part-Whole Graphic Organizers:  Here are two templates I like. Start with objects matching the focus number in the “whole” section. Then move “part” of them to one section and the rest to the other section. Rearrange to find different bonds for the same focus number. Start students with manipulalatives before moving to numbers. Or use numbers as a way for students to record their findings.

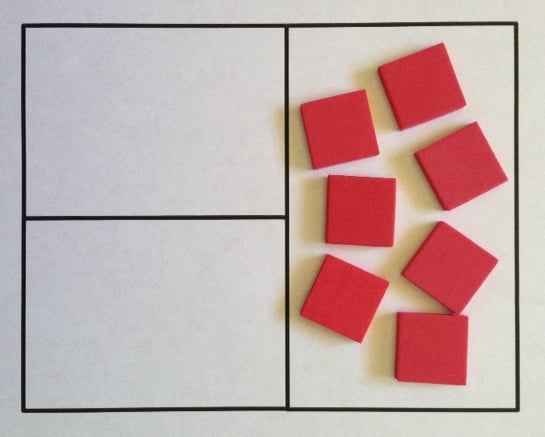
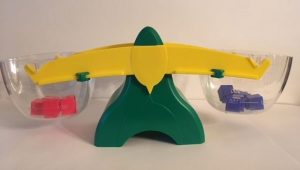
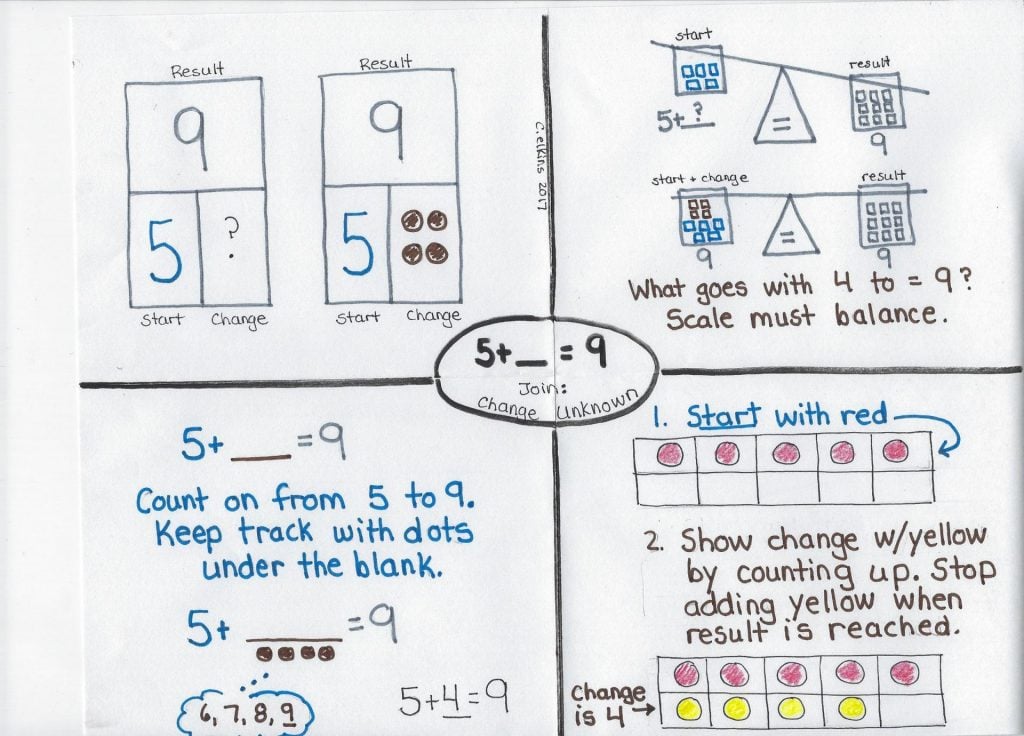
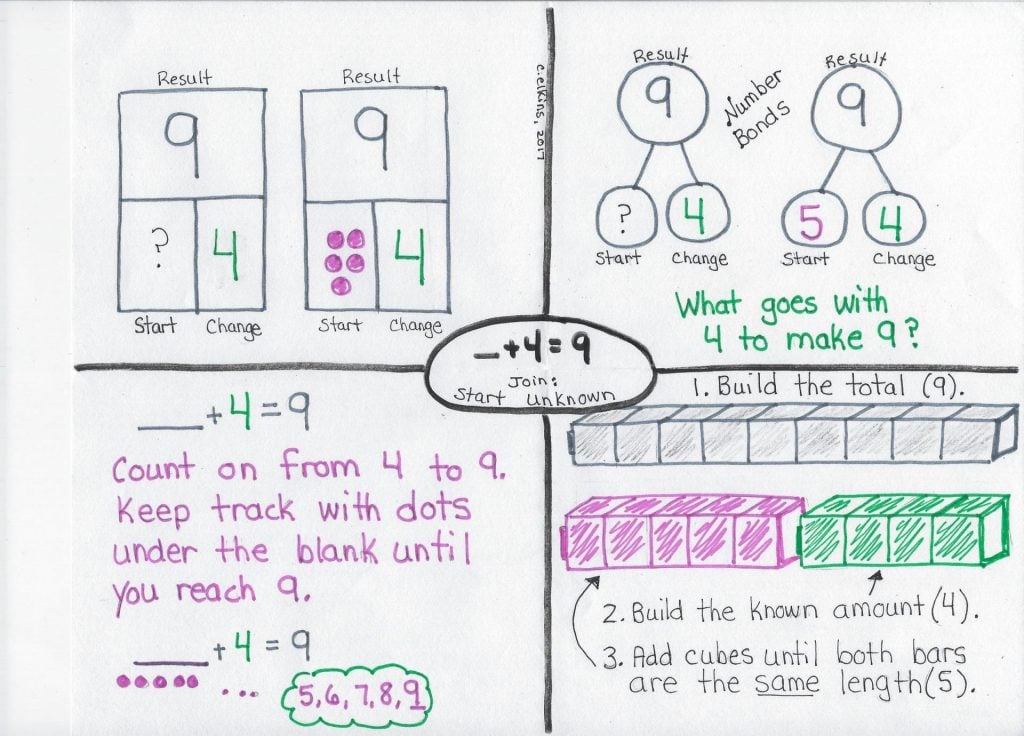
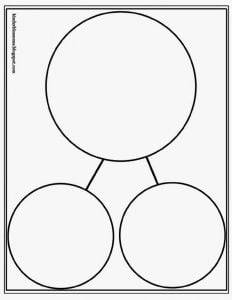
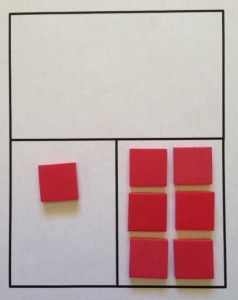
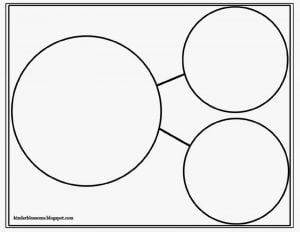
    Once students have a good concept of number bonds, these part-part-whole organizers are very helpful when doing addition and subtraction problems (including story problems) using these structures: Result Unknown, Change Unknown, and Start Unknown.  Children should use manipulatives at first to “figure out” the story.

  • Here is an example of a change unknown story:  “I have 5 pennies in one pocket and some more in my other pocket. I have 7 pennies all together. How many pennies in my other pocket?” To do this, put 5 counters in one “part” section. Count on from 5 to 7 by placing more counters in the second “part” section (2). Then move them all to the whole section to check that there are 7 all together.  Students are determining “What goes with 5 to make 7?” 5 + ___ = 7
  • Here is an example of a result unknown subtraction story:  “Mom put 7 cookies on a plate. I ate 2 of them. How many cookies are still on the plate?” To do this start with the whole amount (7) in the large section. Then move the 2 that were eaten to a “part” section. Count how many are remaining in the “whole section” to find out how many are still on the plate?  7 – 2 = ____.
  • How are number bonds related to fact families?  A fact family is one number bond shown with 2 addition and 2 subtraction statements.  Ex:  With number bonds 3 and 4 for the number 7, you can make 4 problems: 3 + 4 = 7;  4 + 3 = 7;  7-3 = 4;  and 7-4=3.

Continue reading

Addition and Subtraction Part 1: Numerical Fluency

by C. Elkins, OK Math and Reading Lady

To be able to add and subtract, students normally pass through several phases as they build readiness for these operations with numbers.  As teachers, we know oral counting does not necessarily indicate an understanding of numbers and sets, just like reciting the alphabet doesn’t necessarily mean a child can recognize letters and sounds. Read ahead for freebies in the Part-Part-Whole section.

Numerical Fluency Continuum:  There are 7 steps to numerical fluency. If a child gets stuck on any of these steps, it may very likely halt their progress. Hopefully children move through these by the end of 2nd grade, but many students beyond that level have a breakdown which is likely because they missed one of these stages. Can you determine which of these stages your students are in?

  1. One-to-one correspondence: The ability to count objects so each object counted is matched with one number word.
  2. Inclusion of set: Does a child realize that the last number counted names the number of objects in the set? A child counts 5 objects.  When you ask how many, can they state “5.” If you mix them up after they just counted them, do they realize there are still 5?
  3. Counting on: If a child counts 5 objects and the teacher then puts 2 more objects for the child to count, do they start all over or continue counting from 5?  5 . . . 6, 7.
  4. Subitizing:
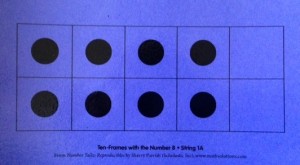
Recognize an amount without physically counting (ie on dice, dot cards, fingers).
  5. More Than / Less Than / Equal To:  Can a child look at two sets of objects and tell whether the second set is more, less, or equal to the first set. Can a child build a second set with one more, one less, or equal to the first set?
  6. Part / Part / Whole: Compose and decompose sets by looking at the whole and the parts that make up the whole.
  7. Unitizing: The child is able to move from counting by ones to count by sets / groups: fives, tens, etc.

Continue reading

Discovering Decimals Part 3: Multiplication and Division

by C. Elkins, OK Math and Reading Lady

This is the last part of number operations dealing with decimals: multiplication and division in a concrete and pictorial method. This is actually not part of the KG-5th grade OAS standards, but it is addressed in 6th grade and for those of you utilizing the CCSS, you will find multiplication and division with decimals starts in 5th grade.  Or you may have advanced students who are ready to explore this concept. There are a couple of freebies included in this post. Read on to find them!

Multiplying Decimals:

Typically we teach our students that when you multiply 2 numbers together, the product is larger than the 2 factors. And when we divide two numbers, the quotient is smaller than the dividend.

Be careful about stating this generalization: This remains true when multiplying whole numbers (or even a combination of whole and decimal such as 5.2 x 6.4 = 33.28 in which the product is larger than either factor), but NOT with decimals or fractions less than 1 (example: .7 x .2 = .14 in which .14 is less than either factor .7 or .2). With division of decimals less than 1, the answer is often a whole number larger than either the divisor or the dividend (such as 5 divided by 1/2 = 10). This is a difficult concept, but modeling and practicing with concrete and pictorial models helps to see the reasoning. So, be careful not to say, “When you multiply two numbers together you always get a bigger number.” because it’s not always true.

To further understand this principal, let’s look at the use of the times (x) sign with whole numbers. The problem 5 x 2 could be shown in an array as 5 rows with 2 in each row (phrased as 5 “rows of” 2).  It can be shown in a set model such as 5 groups and each group has 2 (phrased as 5 “groups of” 2) . It can also be shown in an area model (box) as a shape divided equally into 5 rows and 2 columns (phrased as 5 “by” 2). Continue reading

Discovering Decimals Part 2: Addition & Subtraction

by C. Elkins, OK Math and Reading Lady

Last week, we looked at some ways to gain number sense about decimals. This post will address using decimals in the operations of addition and subtraction . . . and how to model concretely and pictorially. You can also download the color grid pages along with a free decimal math game in this post. Part 3 (future post) will address multiplication and division of decimals.

If you missed last week’s post, please review it first before continuing with this one. Before performing various operations with decimals, students must have a basic understanding of how to represent them concretely, pictorially and numerically.  Example:  .8 = .80 can be proven with base ten blocks and with 100 grid drawings. This understanding should also be linked to fractions: 8/10 is equivalent to 80/100. Click here for pdf of Representing Decimals page.

Addition  

For concrete practice, use a 100 base ten block to represent the whole (ones), the tens rod to represent tenths, and unit blocks to represent hundredths. Construct each addend and then combine them. Ten tenths’ rods become one whole. Ten hundredths cubes become one tenth. Continue reading

Discovering Decimals Part 1: Basic Concepts

by C. Elkins, OK Math and Reading Lady

Number sense regarding decimals usually starts with fourth grade and continues with more complex operations involving decimals in fifth grade and beyond. It is this extension of the place value system and then relating them to fractions and percentages that often perplex our students (and the teachers, too)!  Read ahead to get your freebies (Decimal practice notes, anchor charts, and Discovering Decimals Number of the Day / Game activity).  I have revised this previous post and included some more freebies below.

Students must understand  this base-ten value system extends in both directions — between any two values the 10-to-1 ratio remains the same. When using place value blocks in primary grades, students recognize the 100 square as 100, the tens strip as 10, and the units cube as 1.  Then with decimals, we ask them to reverse their thinking as the 100 square represents 1 whole, the tens strip represents a tenth, and the unit cube represents a hundredth.  This may take repeated practice to make the shift in thinking — but don’t leave it out. Remember the progression from concrete (hands-on) to pictorial to abstract is heavily grounded in research. Students will likely gain better understanding of decimals by beginning with concrete and pictorial representations.

I am sharing my decimal practice notes, which highlight some of the basic concepts to consider when teaching. Pronouncing the names for the decimals is not in these notes, but be sure to emphasize correct pronunciation — .34 is not “point three four.” It is “thirty-four hundredths.” Use the word and for the decimal point when combining with a whole number.  Example: 25.34 is pronounced “Twenty-five and thirty-four hundredths.” I know as adults we often use the term “point,” but we need to model correct academic language when teaching. You can get also the pdf version of these notes by clicking here: Decimal practice teaching notes.

Anchor charts are excellent ways to highlight strategies in pictorial form. Here are some examples of anchor charts to help students relate decimals to fractions, location on a number line, word form, and equivalencies. Get the free pdf version here: Discovering decimals anchor charts. It includes a blank form to create your own.


In this model, I chose the 1000 cube to model 356 thousandths. It’s a little tricky – be sure to see that the 300 part is shaded all the way (front and top – picture 3 slices of 100), the 50 part is shaded (front and half the top – picture half of a 100 slice), and the 6 part is just shaded in the front (picture 6 individual parts). The entire cube would represent 1 whole.

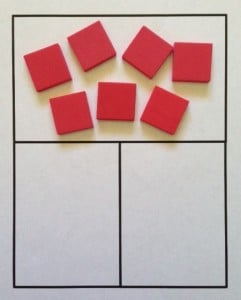
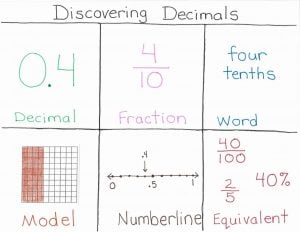
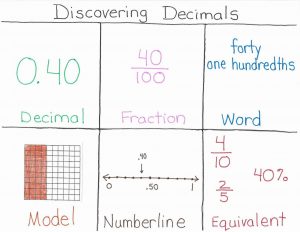
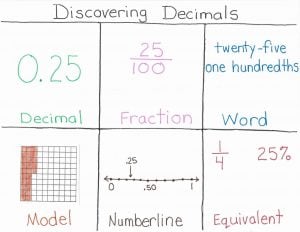
Here’s a matching activity / game in which students match decimal to fraction, word form, expanded form, money, and pictorial form. Included is a blank page so you can make your own or have students take notes. Click here for the FREE activity:  Decimal, Fraction, & Money Match

Another resource ($2.50 at TPT from Joanne Miller) to help students relate the decimal to the pictorial form:Decimal 100 grid Scoot

Finally, below is an activity to practice or reinforce decimal concepts. The page showing can be used as a “Number of the Day” practice. I also created a game using this model, and the whole packet is included in this free pdf. Click here: Discovering Decimals number of the day and game

For more teaching help (videos and interactive models) for decimals, check out the following 3 free resources. These are also listed in my resources section of the blog (top black bar):

  1. www.learnzillion.com
  2. www.teachingchannel.org
  3. http://illuminations.nctm.org

As always, you are welcome to share your decimal discovery ideas. Just click the comment box speech bubble at the top of the article or the comment box at the end of the article.